![](https://nagi.blog/wp-content/uploads/2022/03/49ef664720433fb37002b605195c5e9b-150x150.png)
きめた!WordPressテーマはSWELLにしようかと思う
![](https://nagi.blog/wp-content/uploads/2022/03/e83fa52eac00d47020c79e84425066c0-150x150.jpg)
なるほど、じゃ今日は、WordPressテーマのSWELLの購入方法と、SWELLをWordPressにインストールするまでの手順を解説するね
![](https://nagi.blog/wp-content/uploads/2022/03/975429aa9a80f4f9bc5ca68a5e46d0cf-150x150.png)
この動画を見れば、SWELLの購入とWordPressに、SWELLをインストールできるようになります。
SWELLの購入方法/ダウンロード/WordPressへのインストール解説
![](https://nagi.blog/wp-content/uploads/2022/03/e83fa52eac00d47020c79e84425066c0-150x150.jpg)
では、まずはSWELL公式ページに行ってみたいと思います。
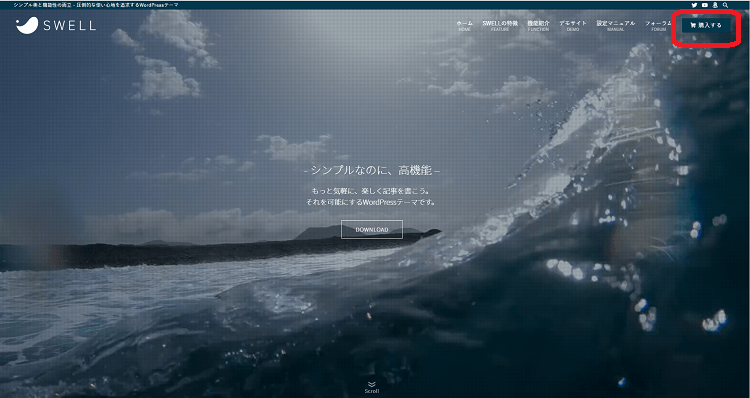
![](http://image.moshimo.com/af-img/3130/000000053838.jpg)
![](https://nagi.blog/wp-content/uploads/2022/03/e83fa52eac00d47020c79e84425066c0-150x150.jpg)
SWELLの公式ページに来ました。
右上に購入するというボタンがありますので、コチラをクリックですね
![](https://nagi.blog/wp-content/uploads/2022/04/7c57751ba2e160d189aa84068ca029f0.png)
![](https://nagi.blog/wp-content/uploads/2022/03/e83fa52eac00d47020c79e84425066c0-150x150.jpg)
そうしますと、こちらのページが開きます
![](https://nagi.blog/wp-content/uploads/2022/04/7d7e710f7622461c6251377713123f47.png)
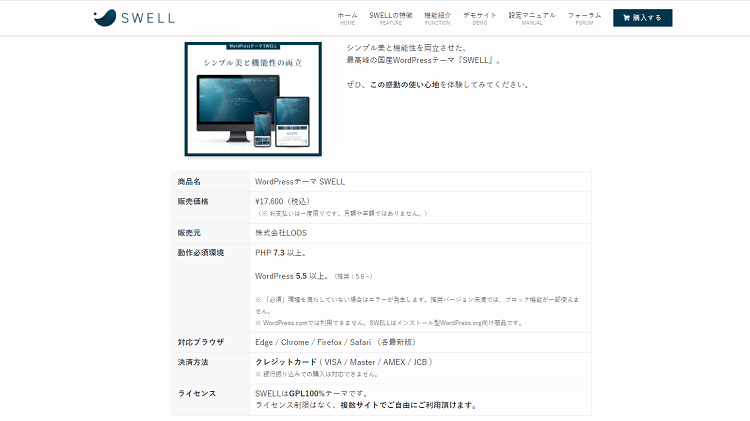
お値段 動作環境 対応ブラウザ などが表記しています
気になるお値段は、17600円の税込みになり、決済はクレジットカードのみになりますね。
![](https://nagi.blog/wp-content/uploads/2022/03/49ef664720433fb37002b605195c5e9b-150x150.png)
クレジットカードが必要になるんだね
![](https://nagi.blog/wp-content/uploads/2022/03/e83fa52eac00d47020c79e84425066c0-150x150.jpg)
そうだね、銀行振り込みや、コンビニ払いなどには対応していないので、クレジットカードが必要になります
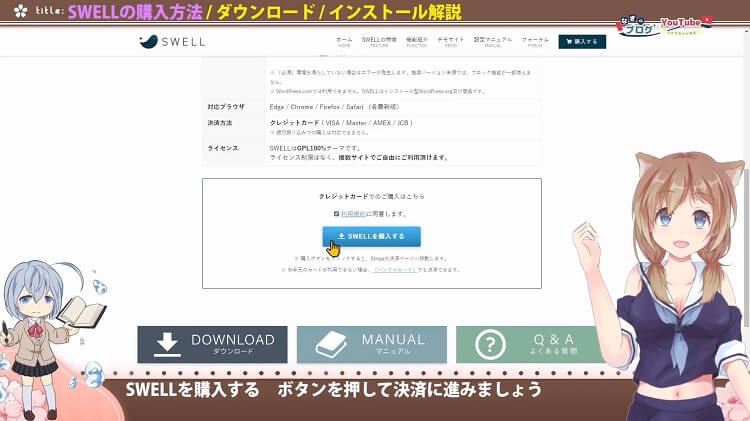
では、購入の方に行きますが、その前に利用規約と書いてあるところがリンクになっていまして、リンク先で利用規約が読めますのでひととおり目を通してください
確認が出来ましたら、同意のチェックボックスにチェックをいれて、SWELLを購入する ボタンを押して決済に進みましょう
![](https://nagi.blog/wp-content/uploads/2022/04/3bba1614d4bb8d391d77d2b0b9b4b478.jpg)
![](https://nagi.blog/wp-content/uploads/2022/03/e83fa52eac00d47020c79e84425066c0-150x150.jpg)
はい、決済の画面が開いたと思います。
まずは、WordPressテーマSWELLを購入するのに必要になるためメールアドレスを記入します
![](https://nagi.blog/wp-content/uploads/2022/04/c5929d8eec62fad05e3941c87f21753a.png)
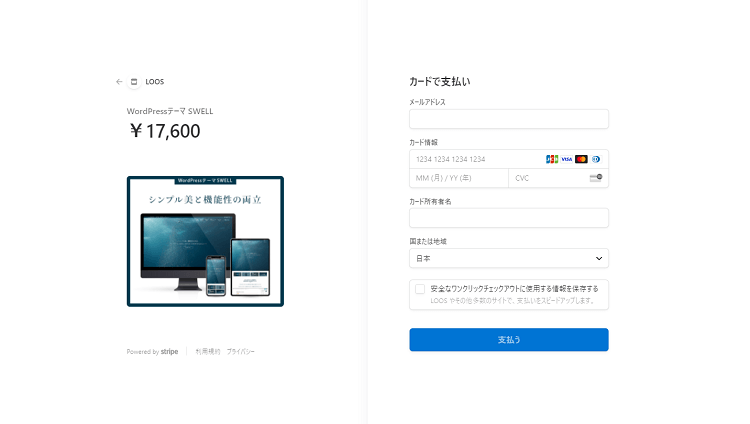
このメールアドレスは、決済するとこのメールアドレスにメールが送られてくると思います
このメールアドレスは、スウェルの購入者専用ページのスェラーズに会員登録する時や、ログインする時や、パスワードを設定するのに必要なメールアドレスになります。
SWELLのデータファイルや、プラグインはSWELLの購入者専用ページのSWELLERS’のなかからダウンロードするので、きちんと覚えておいてくださいね
![](https://nagi.blog/wp-content/uploads/2022/03/e83fa52eac00d47020c79e84425066c0-150x150.jpg)
次は決済するクレジットカードの情報を入力していきます
その後、国または地域を、お住まいの地域に選択してください
私の動画をみている皆さんは日本かなぁーと思いますので、日本を選んでください
記入が全部終わりましたら、支払うボタン を押して進んでみてください
![](https://nagi.blog/wp-content/uploads/2022/03/e83fa52eac00d47020c79e84425066c0-150x150.jpg)
お支払いが済むと 購入完了ページの方に進むと思います
![](https://nagi.blog/wp-content/uploads/2022/04/c9b4ff3b767125e8b24f03ee9471dbd0.jpg)
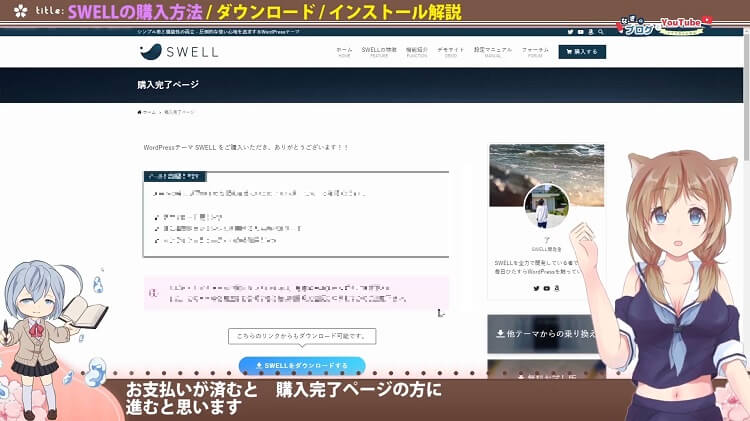
同時に、先ほど登録したメールアドレスにメールが来ると思います
迷惑メールフォルダの方に入ってしまう可能性もあるので、届いてなさそうでしたら迷惑メールフォルダ のほうもご確認ください。
このメールアドレスで、購入者限定の会員サイトにはいれるようになりまして、SWELLの本体のファイル以外にもSWELL購入者のかたが、ダウンロードできるファイルのあるページにも行けるようになります
![](https://nagi.blog/wp-content/uploads/2022/03/e83fa52eac00d47020c79e84425066c0-150x150.jpg)
では、SWELLのユーザー限定の新しい会員サイト SWELLERS’の会員登録と、ログインをしていきましょう
SWELLERS’の会員登録
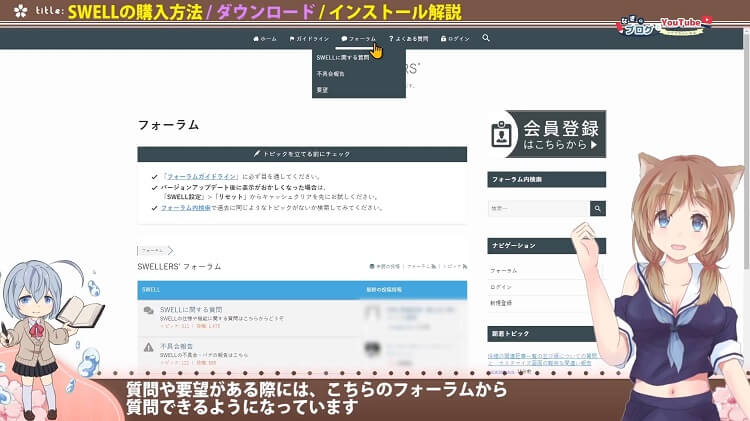
まずは、画面上のやや右側に フォーラムという場所があると思いますので クリックしてください
![](https://nagi.blog/wp-content/uploads/2022/04/635d1bd0b9290b5761186442f60cea45.jpg)
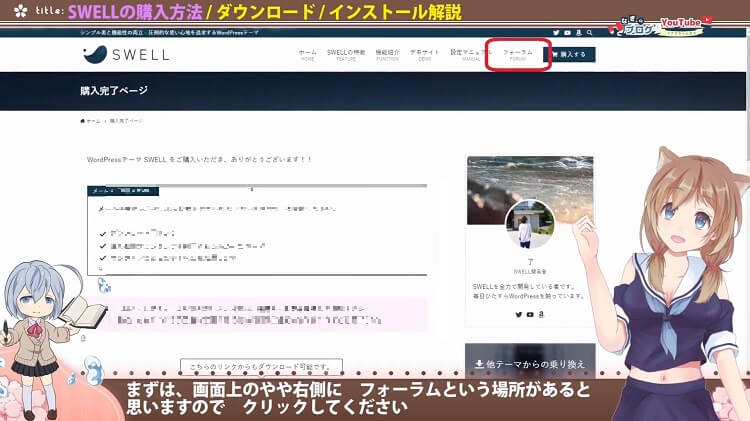
そうしますと、SWELLERS’というページに来ますので、サイドバーの一番上にある会員登録はこちらをクリックしてください
![](https://nagi.blog/wp-content/uploads/2022/04/ec53379876e923b03d8a13a2c122abc8.jpg)
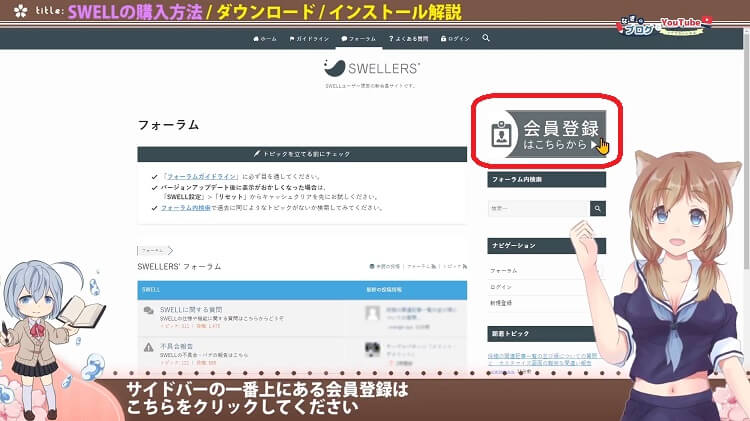
コチラのページが開きますので、会員登録をしてください
![](https://nagi.blog/wp-content/uploads/2022/04/b287ef4d4df4e36921f18f8c87c9f7c8.jpg)
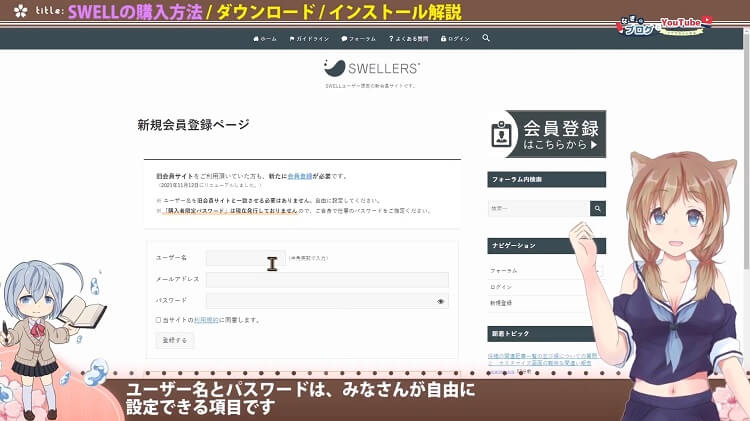
ユーザー名とパスワードは、みなさんが自由に設定できる項目です
メールアドレスは、決済した時に使ったメールアドレスを入力しましょう
入力しましたら、コチラのサイトの方でも、先ほどの利用規約とは別の利用規約の方がリンク先で見れますので、一通り確認しておいてくださいね
戻りましたら、チェックボックスの方にチェックを入れてください
![](https://nagi.blog/wp-content/uploads/2022/03/e83fa52eac00d47020c79e84425066c0-150x150.jpg)
入力情報を確認しましたら登録ボタンを押してください
「入力されたメールアドレスではSWELLLの購入履歴が見つかりませんでした。」と表示される時は…
購入時に登録したメールアドレスか確認してください。
購入履歴が確認できる、メールアドレスでのみユーザー登録が可能になっています。
購入したのにメールアドレスが認証されない場合は、下のリンクのお問い合わせページからご連絡してみてください
![](https://nagi.blog/wp-content/uploads/2022/03/e83fa52eac00d47020c79e84425066c0-150x150.jpg)
ログインするページは開きましたでしょうか?
開いていない場合には、画面うえにある項目のログインをクリックして、ログインページを表示させてくださいね
![](https://nagi.blog/wp-content/uploads/2022/04/4e93e5f3d9ce1ca6f3277003243dd305.jpg)
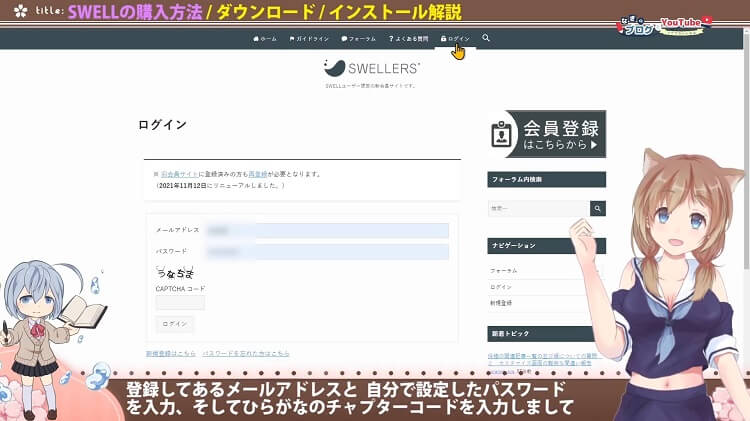
登録してあるメールアドレス と自分で設定したパスワードを入力、そしてひらがなのチャプターコードを入力しましてログインのボタンをクリックしてログインしてください
![](https://nagi.blog/wp-content/uploads/2022/03/e83fa52eac00d47020c79e84425066c0-150x150.jpg)
マイページの方にログインできたと思います
このマイページでは、ユーザーのデータや、SWELL本体のファイルや 子テーマ プラグインなどがダウンロードできるようになっています
![](https://nagi.blog/wp-content/uploads/2022/04/246c2581eb7790fb2eb588b59aaecf67.jpg)
![](https://nagi.blog/wp-content/uploads/2022/03/e83fa52eac00d47020c79e84425066c0-150x150.jpg)
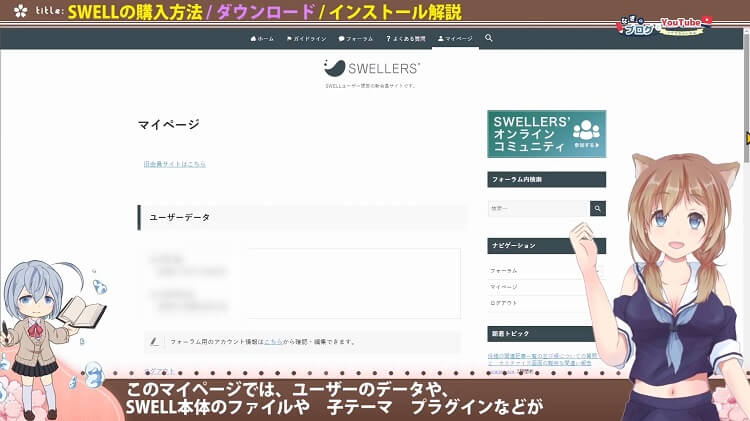
下の方にスクロールしますと、各種データがダウンロードできるところがありますね
そのまえに、コチラの方で、SWELL購入者限定のSWELLERS’オンラインコミュニティがありまして、スラックを使い、会員様同士や、SWELLのバージョンアップ情報や、現在起こっている不具合情報などが見れるようになっていますので、興味ある方は登録しておくといいですね
![](https://nagi.blog/wp-content/uploads/2022/04/01fc334c7cb19bc64310c9c4d53b84b3.jpg)
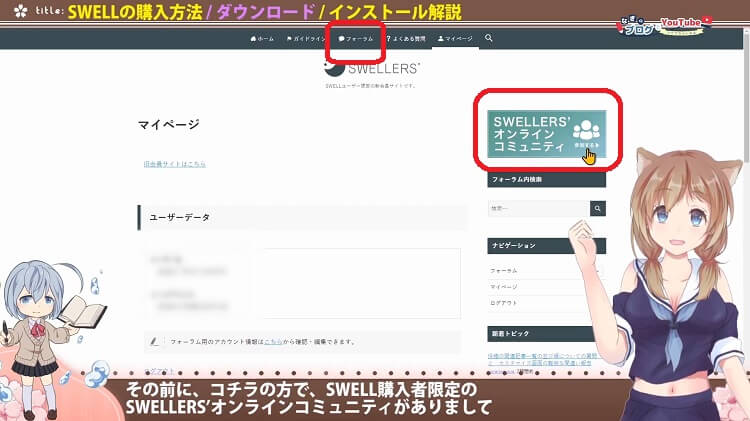
質問や要望がある際には、こちらのフォーラムから質問できるようになっています
![](https://nagi.blog/wp-content/uploads/2022/04/e20c628b7045ddcef469e2b73a062c98.jpg)
ダウンロード
では、SWELLの親テーマと子テーマの方のダウンロードと、WordPressへのインストールの方を解説していきます
![](https://nagi.blog/wp-content/uploads/2022/03/e83fa52eac00d47020c79e84425066c0-150x150.jpg)
さきほどのマイページの、SWELLのデータをダウンロードできる場所に戻りますね
最低限必要になるのは、SWELLの親テーマと子テーマになりますので、コチラの2つをダウンロードしてください。
![](https://nagi.blog/wp-content/uploads/2022/04/f3fea8d7e39cbf8d461b07ce8bc5f83c.jpg)
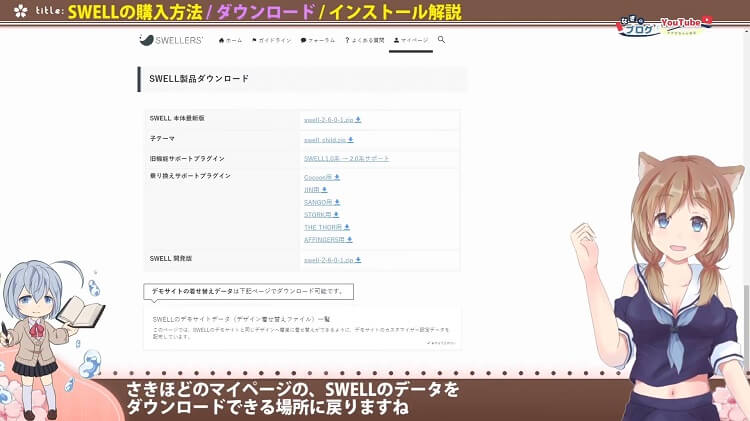
他のテーマから移行されてくる方は、元のテーマに応じた移行プラグインをダウンロードしてください
他のテーマから移行されてくるかたは、SWELLを入れる前に、SWELLと相性の悪いプラグインがありますので、削除しておくことをおススメします
SWELLで推奨しているプラグインの解説や、わたしがおすすめする、SWELLと相性の良いプラグインなどを、解説している動画もありますので、良かったら見てくださいね
WordPressにインストール
では、ダウンロードが終わりましたら、今度はWordPressのほうにのWELLを導入していきますので、WordPressのほうを開いてください
WordPressのほうにきましたら、ダッシュボードに外観 という場所があるのでここにカーソルを当ててください
テーマ という項目がありますので、クリックしてください。
![](https://nagi.blog/wp-content/uploads/2022/04/57d53bc64e5d033aeb6f58c5ff6e90da.jpg)
既に導入されているテーマが一覧で出ると思います。
上の方に 新規追加 の項目があるので、コチラをクリックしてください。
![](https://nagi.blog/wp-content/uploads/2022/04/cc024d80fa23d80715d815bd5f3ae861.jpg)
![](https://nagi.blog/wp-content/uploads/2022/03/e83fa52eac00d47020c79e84425066c0-150x150.jpg)
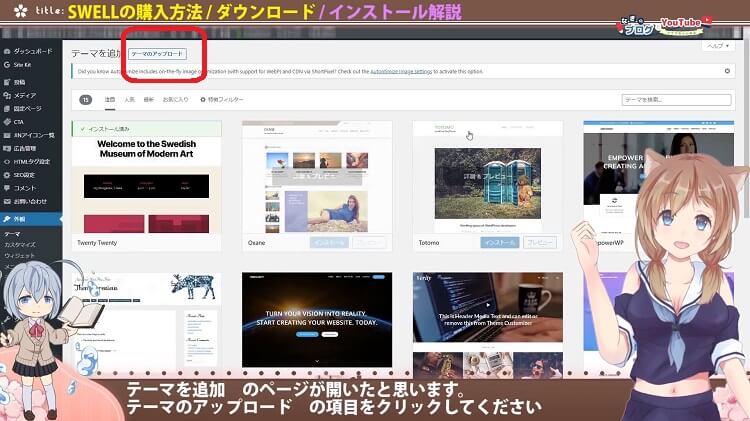
テーマを追加 のページが開いたと思います。
テーマのアップロード の項目をクリックしてください
![](https://nagi.blog/wp-content/uploads/2022/04/a56842ebef1793bde4d1d0826af1653f.jpg)
そうしますと、ジップ形式のテーマファイルをお持ちの場合、こちらからアップロードしてインストールまたは更新できます。と書いてある項目が出てきますので、ファイルの選択をクリックします。
![](https://nagi.blog/wp-content/uploads/2022/04/69f8e14d2cb4b59bcbc13562c33628c5.jpg)
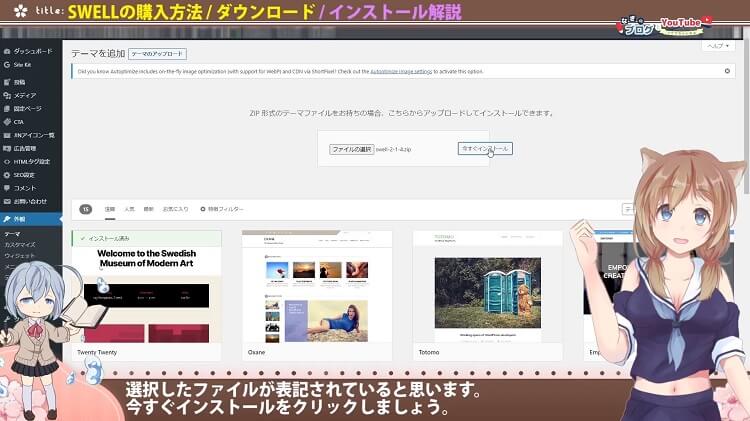
先ほどダウンロードしたSWELLの親テーマの方からインストールしていきます。SWELLの表記と番号が振ってあるファイルですね。
こちらを解凍しないままで、Zip形式の状態で選択します。
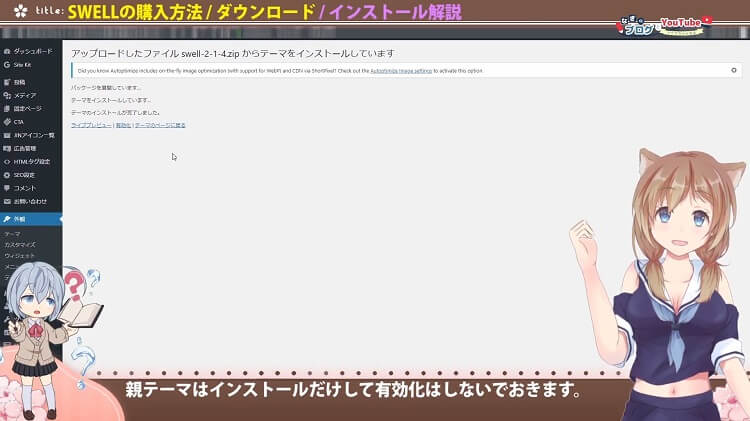
選択したファイルが表記されていると思います。今すぐインストールをクリックしましょう。
![](https://nagi.blog/wp-content/uploads/2022/03/e83fa52eac00d47020c79e84425066c0-150x150.jpg)
親テーマはインストールだけして有効化はしないでおきます。
![](https://nagi.blog/wp-content/uploads/2022/04/d68ba9d54dff87ee561b4439832b9133.jpg)
![](https://nagi.blog/wp-content/uploads/2022/03/49ef664720433fb37002b605195c5e9b-150x150.png)
どうして親テーマは使わないの?
先に、手順を解説するので、手順を解説の後に「なぜほとんどの場合、親テーマを使わないのか?」を解説しますね
![](https://nagi.blog/wp-content/uploads/2022/03/49ef664720433fb37002b605195c5e9b-150x150.png)
ありがとう
今度は子テーマのほうをインストールしていきたいと思います。
![](https://nagi.blog/wp-content/uploads/2022/03/e83fa52eac00d47020c79e84425066c0-150x150.jpg)
同様の手順で子テーマをインストールしてください
ダッシュボードの中から 外観 テーマ にきまして 新規追加 テーマのアップロード ファイルの選択 今度はSWELL_childの形式のファイルを選択 今すぐインストールをクリック 今度は有効化していきましょう
![](https://nagi.blog/wp-content/uploads/2022/03/e83fa52eac00d47020c79e84425066c0-150x150.jpg)
子テーマのほうのSWELL_childを有効化です。
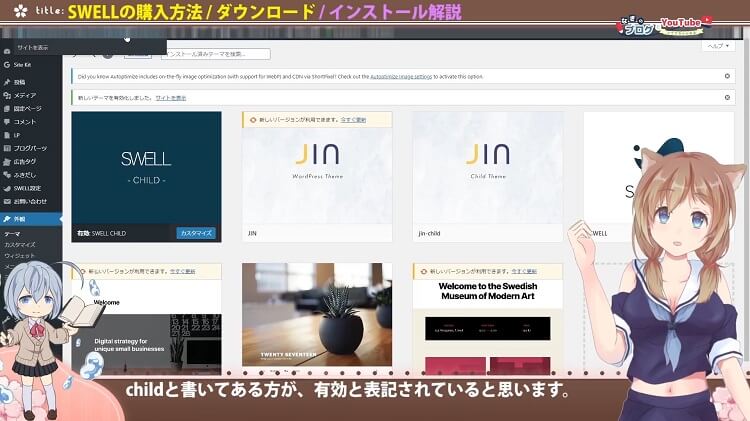
テーマの画面にもどりました。
SWELLの親テーマ SWELLの子テーマがインストールされていて、childと書いてあるほうが有効と表記されていると思います。
![](https://nagi.blog/wp-content/uploads/2022/04/9093c7025184bf15f8f41591582821a9.jpg)
![](https://nagi.blog/wp-content/uploads/2022/03/e83fa52eac00d47020c79e84425066c0-150x150.jpg)
以上でSWELLの購入 ダウンロード インストールまでの流れでした。
![](https://nagi.blog/wp-content/uploads/2022/03/975429aa9a80f4f9bc5ca68a5e46d0cf-150x150.png)
SWELLをインストールした状態を確認してみましょう
インストールしただけでも、オシャレな雰囲気を感じますね
メインビジュアル お知らせバー スライダー ページャーなど、既に整えられています。
![](https://nagi.blog/wp-content/uploads/2022/03/e83fa52eac00d47020c79e84425066c0-150x150.jpg)
SWELLの機能を全て使いためには、SWELL公式サイトに、自分のサイトを認証する必要があります
![](https://nagi.blog/wp-content/uploads/2022/03/e83fa52eac00d47020c79e84425066c0-150x150.jpg)
認証手続きが分からない場合は、ユーザー認証にを行う手順を参考に認証してくださいね
さらにデモデザインも用意されているので、着せ替えするだけで、細かい設定もすることなくお好きなデザインや機能を導入することが出来ます
WordPressの操作が苦手なかたにはありがたいですよね。
![](https://nagi.blog/wp-content/uploads/2022/03/e83fa52eac00d47020c79e84425066c0-150x150.jpg)
デモデザインをご利用したい方は,
手順の方を解説させて頂きましたので、参考にしてもらえると嬉しいです
![](https://nagi.blog/wp-content/uploads/2022/04/4100da67e98a76fd7c97b23eb3358567-300x168.jpg)
![](https://nagi.blog/wp-content/uploads/2022/03/e83fa52eac00d47020c79e84425066c0-150x150.jpg)
自分で設定していきたい方は、SWELLのカスタマイズで設定していけます。設定方法はSWELLカスタマイズのカテゴリーにまとめました
![](https://nagi.blog/wp-content/uploads/2022/03/e83fa52eac00d47020c79e84425066c0-150x150.jpg)
また、ブログをするうえで超基礎となる最も大切なSEO対策5選も解説してます
![](https://nagi.blog/wp-content/uploads/2022/06/a331b4e2af31014a18e22d9a2c05df43-300x168.jpg)
WordPressテーマはなぜ親テーマを使わずに子テーマを使うのか?
では最後に、WordPressテーマはなぜ親テーマを使わずに、子テーマを使うのか?ですが
ほとんどのかたは、ふだんは親テーマと子テーマをインストールし、子テーマのほうを有効化して使っていると思います。
と、いうのも親テーマをそのまま使ってしまうと、バージョンアップの際に自分がカスタムしたデータが上書きされてしまいます。
初期状態のようになってしまう、様な感じですね。
なので、自分が設定などをした子テーマと、新たなデータが更新されてベースになる親テーマを使い分けている感じになりますね
プログラムが詳しくゴリゴリ自分でプログラムを入れていく方は親テーマの方を使う場合もあるみたいですが、そうでない限りは親テーマを入れて、子テーマを入れて、子テーマの方で作業していきます。
バージョンアップで書き換えられるのは親テーマだけなので、子テーマの方はバージョンアップの影響は反映されますが、自分で設定したことなどは上書きされないようになります。
最後まで見て頂きまして、ありがとうございました
ありがとうございました