![](https://nagi.blog/wp-content/uploads/2022/03/49ef664720433fb37002b605195c5e9b-150x150.png)
このSWELLのデモサイト素敵だな
![](https://nagi.blog/wp-content/uploads/2022/03/49ef664720433fb37002b605195c5e9b-150x150.png)
私もこのデモサイトみたいにしてみたいけど、難しそうだな
![](https://nagi.blog/wp-content/uploads/2022/03/e83fa52eac00d47020c79e84425066c0-150x150.jpg)
そんなことないよ~、
デモサイトの様にするのはダウンロードして、インストールしちゃえば、簡単に着せ替えができるよ
![](https://nagi.blog/wp-content/uploads/2022/03/49ef664720433fb37002b605195c5e9b-150x150.png)
そうなの?
![](https://nagi.blog/wp-content/uploads/2022/03/e83fa52eac00d47020c79e84425066c0-150x150.jpg)
じゃ今日は、WordPressテーマ、スウェルのデザインを、サクッと整えられてしまう、デモサイトを利用した着せ替えの機能をご紹介と、手順を解説していきますね
![](https://nagi.blog/wp-content/uploads/2022/03/975429aa9a80f4f9bc5ca68a5e46d0cf-150x150.png)
この記事を見れば、誰でも簡単に、スウェルのデモサイトと同じようなデザインに、みなさんのサイトを変えることが出来ます
SWELLデモサイトと同じデザインに着せ替え手順
![](https://nagi.blog/wp-content/uploads/2022/03/e83fa52eac00d47020c79e84425066c0-150x150.jpg)
動画の最後に、デモサイトに関する、期待のおまけ情報もありますので、是非最後まで見てくださいね
SWELLと、SWELLのデモサイトの着替えについて予備知識
![](https://nagi.blog/wp-content/uploads/2022/03/e83fa52eac00d47020c79e84425066c0-150x150.jpg)
私も初めて、WordPressに触れた時には、HTMLやCSSをゴリゴリいじって行かないと、ブログも書けないし、デザインも整えられないのかと思っていました。
たしかにそのような面はあるのですが、テーマを入れることである程度、設定をいじるだけで整えて行けるようになります。
![](https://nagi.blog/wp-content/uploads/2022/03/49ef664720433fb37002b605195c5e9b-150x150.png)
特にSWELLでは、デザインを整えられる幅も 設定もすごく分かりやすくなっているんだよね
そうだね、本当に自分好みにデザインを整えるのも、基本はカスタマイズから設定をすればだいたいのデザインは整えられますし、追加でHTMLやCSSを入れたりして機能やデザインを変更する事も可能です
![](https://nagi.blog/wp-content/uploads/2022/03/49ef664720433fb37002b605195c5e9b-150x150.png)
それでも、WordPressを始めたばかりの方は、この設定いじるのもけっこう大変ですよねぇ
デザインを整えたいかたは、楽しくできると思うのですが、はやく記事を書きたい人にとっては結構大変なさぎょうになります
なので、SWELLはあらかじめ 特に細かい設定もしなくて済むように、デザインを整えてくれたサイトが用意されていまして、そのデザインをそのまま自分のブログに着せ替えさせてしまうことが可能なんです。
![](https://nagi.blog/wp-content/uploads/2022/03/49ef664720433fb37002b605195c5e9b-150x150.png)
それは嬉しい機能だね
デザインも現在6種類用意されていまして、そのまま着せ替えて使うことも可能ですし、着せ替えてからデザインをカスタマイズしていくことも可能です
正直、私くらいのSWELLユーザーがデザインを整えていくよりも、デモサイトそのまま使う方がオシャレなくらい、オシャレで簡単にデザインをサクッと変えられちゃいますね
![](https://nagi.blog/wp-content/uploads/2022/03/e83fa52eac00d47020c79e84425066c0-150x150.jpg)
前置きのお話にお付き合いいただきまして、ありがとうございます
前回の記事で、WordPressにSWELLをインストールした直後の状態となっているかと思います
![](https://nagi.blog/wp-content/uploads/2022/04/8033ee2257f117260d6cc87b763c91b3.jpg)
![](https://nagi.blog/wp-content/uploads/2022/03/49ef664720433fb37002b605195c5e9b-150x150.png)
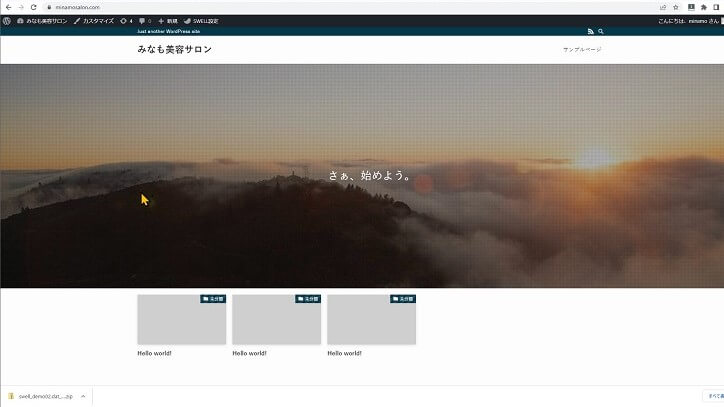
もう割とデフォルトの状態でもこのまま使えるくらいスタイリッシュですよね
![](https://nagi.blog/wp-content/uploads/2022/03/e83fa52eac00d47020c79e84425066c0-150x150.jpg)
SWELLをインストールしただけの状態の所に、SWELLの6種類のデモサイトのデザインを選んで着せ替えしていきたいと思います。
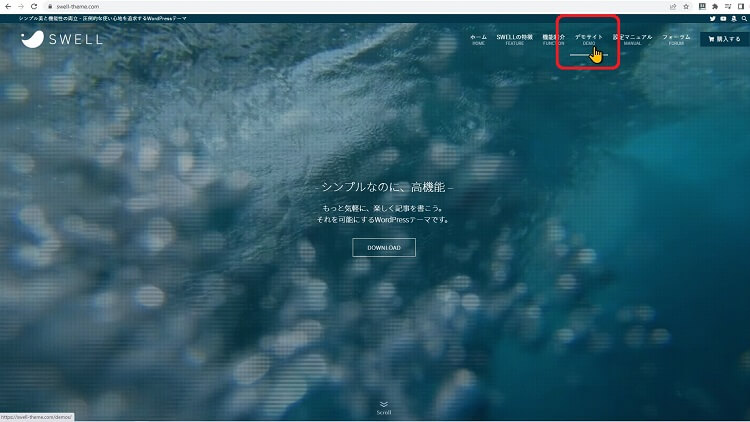
まずは、SWELLの公式ページに行ってみたいと思います。
![](http://image.moshimo.com/af-img/3130/000000053839.png)
SWELLデモデータのダウンロード方法
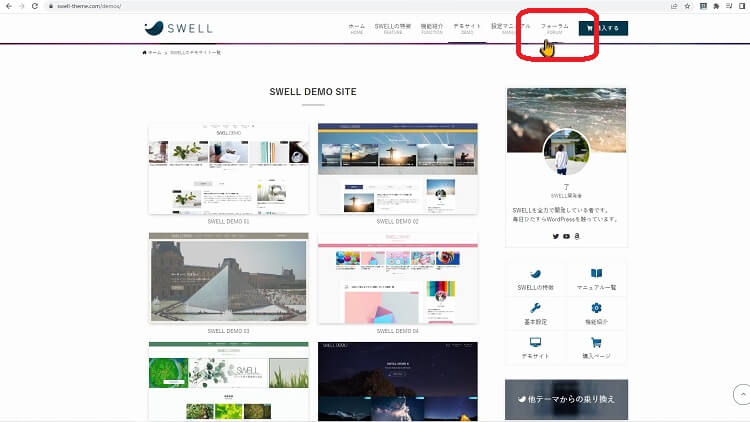
SWELLの公式ページのほうに来ましたら、上の方にデモサイトとあるので、クリックしてください
![](https://nagi.blog/wp-content/uploads/2022/04/53d5cede908620773d6143d099594683.jpg)
デモサイトの方に来ましたら、6つのデモサイトのデザインが見えると思います。
この画像の上でクリックするとさらに詳細に確認することが出来ます
![](https://nagi.blog/wp-content/uploads/2022/04/733531590f6ea942dc26aa89af4f8a77.jpg)
![](https://nagi.blog/wp-content/uploads/2022/03/e83fa52eac00d47020c79e84425066c0-150x150.jpg)
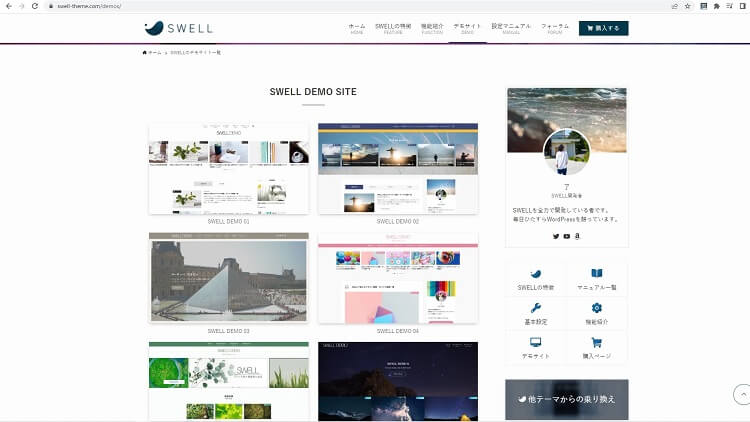
それぞれに特徴あるデザインですが、もうこのまま使いたいっていう人にはデモ1かデモ2 あたりがおすすめですね
![](https://nagi.blog/wp-content/uploads/2022/03/e83fa52eac00d47020c79e84425066c0-150x150.jpg)
シンプルでスタイリッシュで、わたしのSWELLのおすすめの機能である記事一覧の上のタブ機能も備わっています
![](https://nagi.blog/wp-content/uploads/2022/03/49ef664720433fb37002b605195c5e9b-150x150.png)
デモ3はSWELLらしいデザインだね。
表示展開しているメインビジュアルに、お好きな画像を数枚入れることも出来ます。
その際は、自分で画像を設定が必要になります
![](https://nagi.blog/wp-content/uploads/2022/03/e83fa52eac00d47020c79e84425066c0-150x150.jpg)
デモサイトにて、ご自分のお好みのデザインを試してよく見てみてください。
どれを選んだとしても、カスタマイズ機能などで、お好みにデザインや機能を追加でもたらすことは可能です
![](https://nagi.blog/wp-content/uploads/2022/03/e83fa52eac00d47020c79e84425066c0-150x150.jpg)
今回の私の解説では、デモ2のほうを使って解説していきたいと思います。
みなさまも、着せ替えしたいデザインが決まりましたら、先ほどの デモサイト一覧のページにもどりまして
うえの所にフォーラムというところがあるのでクリックしてみてください。
![](https://nagi.blog/wp-content/uploads/2022/04/19218fd5e3b8b2494d670654af874118.jpg)
コチラの画面が開きましたら、ログインしまして、マイページをクリックですね
![](https://nagi.blog/wp-content/uploads/2022/04/8431b1ee178ee57d440210076b75c285.jpg)
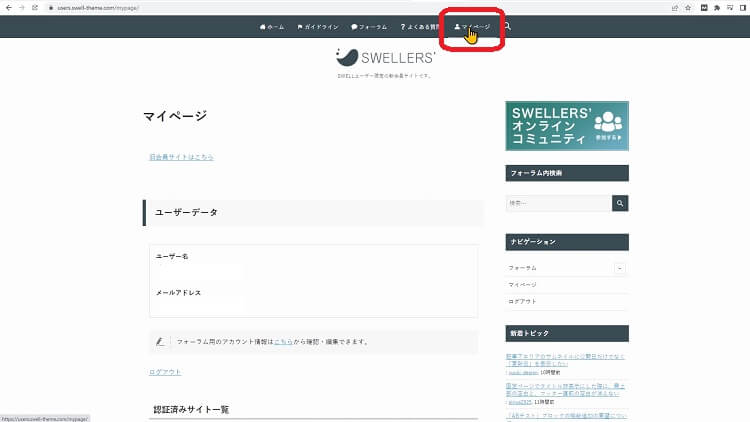
マイページが開きましたら、一番下までスクロールしてみてください
![](https://nagi.blog/wp-content/uploads/2022/04/5bd730c0f34a5075f752be5cd648a956.jpg)
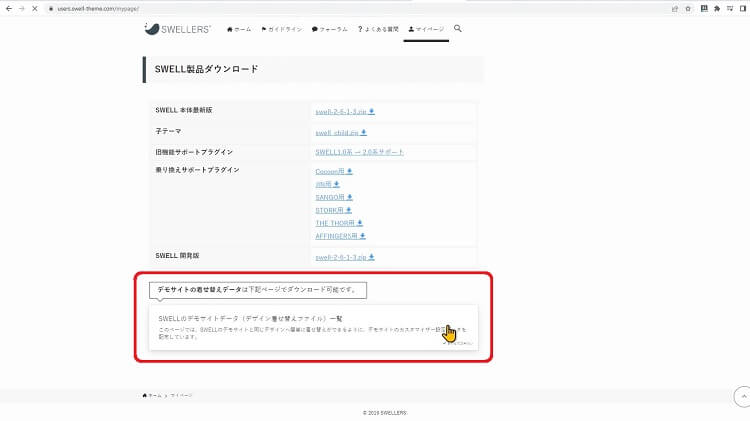
デモサイトの着せ替えデータは下記ページでダウンロード可能です。
SWELLのデモサイトデータ(デザイン着せ替えファイル)一覧
という所があるのでクリックしてください
![](https://nagi.blog/wp-content/uploads/2022/03/e83fa52eac00d47020c79e84425066c0-150x150.jpg)
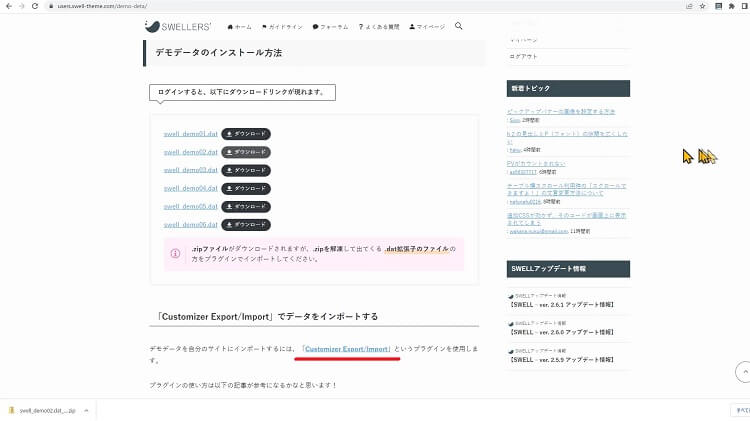
SWELLのデモサイトデータ一覧のページが開きます
そうしますと、SWELLのデモサイトのデータをダウンロードできるところがありまして、デモサイトのファイルが6種類並んでいます。
着せ替えたいデザインのデータのところをクリックしてください、
ダウンロードすることが出来ます
![](https://nagi.blog/wp-content/uploads/2022/04/6a23628f79e07c7a5057782f5d31de4d.jpg)
![](https://nagi.blog/wp-content/uploads/2022/03/e83fa52eac00d47020c79e84425066c0-150x150.jpg)
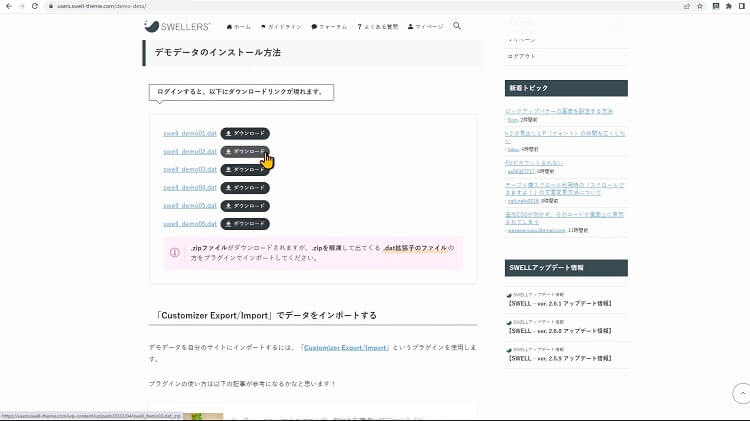
今回は わたしは2番のサイトを選んでみたので、2番のファイルをの所の ダウンロードのボタンをクリックします
みなさんは、みなさんの選んだ番号のダウンロードボタンをクリックしてみてくださいね
![](https://nagi.blog/wp-content/uploads/2022/03/975429aa9a80f4f9bc5ca68a5e46d0cf-150x150.png)
では、WordPressにこのデモデータをインストールしていきましょう
プラグイン Customizer Export/Importを入れよう
![](https://nagi.blog/wp-content/uploads/2022/03/e83fa52eac00d47020c79e84425066c0-150x150.jpg)
まずデモサイトのデザインをインストールするためには、1つプラグインが必要となります。
このページに記載している Customizer Export/Importいうプラグインをいれていきます
なので、まずはこの Customizer Export/Import と書いてある場所をコピーしてください。
![](https://nagi.blog/wp-content/uploads/2022/04/292eafd2ee0ba2363a2803e15e636679.jpg)
![](https://nagi.blog/wp-content/uploads/2022/03/e83fa52eac00d47020c79e84425066c0-150x150.jpg)
プラグインのインストールは簡単ですのでやっていきましょう
WordPress側の設定
WordPressのダッシュボードを開いて 左の欄にプラグインの項目があると思うので、コチラをクリックですね
![](https://nagi.blog/wp-content/uploads/2022/04/ef314e8177086f5d6c111aea02e46cf3.jpg)
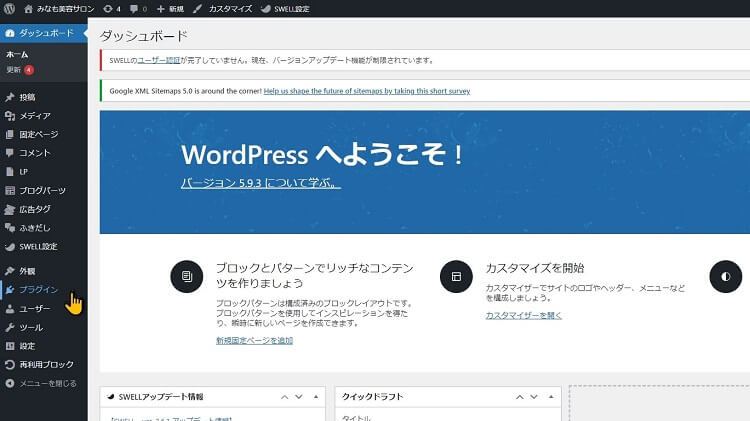
プラグインのページが開いたと思いますので、上の方に新規追加という場所があるので、こちらをクリック
![](https://nagi.blog/wp-content/uploads/2022/04/16628e32f55ce3167fc36a1cc9f5c7f3.jpg)
新規追加の画面が開きましたら、右の方にプラグインの検索となっている窓があるので、コチラに先ほどコピーした Customizer Export/Import を貼り付けてください
![](https://nagi.blog/wp-content/uploads/2022/04/5a52e17ae61804f3f883272dc4c19891.jpg)
![](https://nagi.blog/wp-content/uploads/2022/03/975429aa9a80f4f9bc5ca68a5e46d0cf-150x150.png)
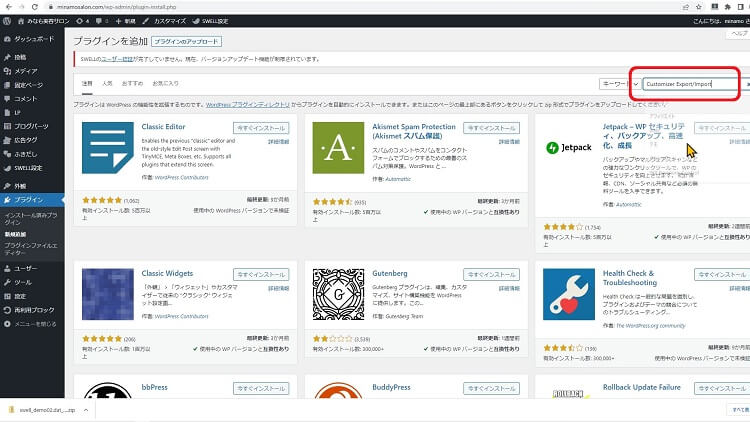
この検索窓なんですが、少しスペルを間違えるだけでも、検索結果に出てこないので、コピー&ペーストしてしまった方がらくですね。
そうしますと、コチラのプラグインが検索結果に表示されますので こちらの 今すぐインストールをクリックしてください
![](https://nagi.blog/wp-content/uploads/2022/04/e46a3934910a72a4f15cd5495d414b4b.jpg)
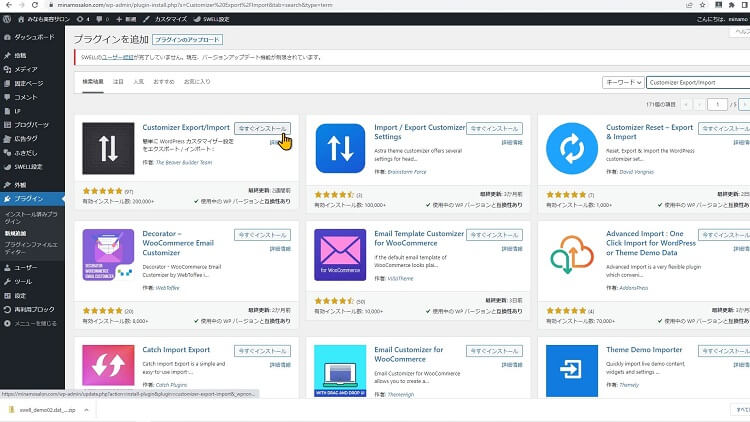
インストールが終わりますと、有効化というボタンに代わりますので有効化していきましょう。クリックしてみてください。
![](https://nagi.blog/wp-content/uploads/2022/04/844bb6d7fe461924bac7bc7ff43f7395.jpg)
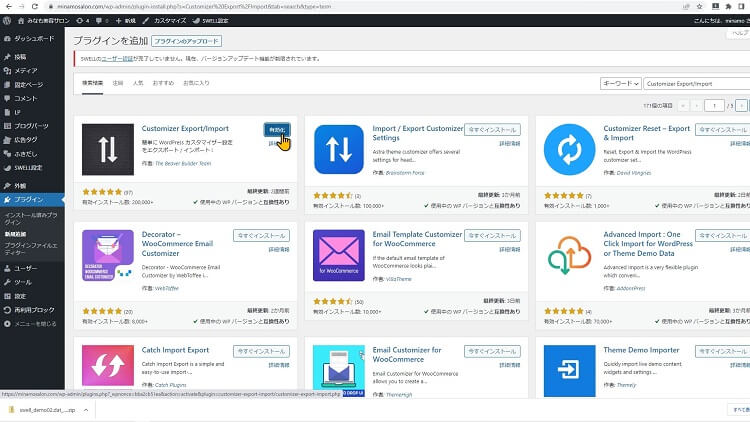
これで、 Customizer Export/Import のプラグインをインストールできました
ファイルの展開
今度は、パソコンのファイルを開いてください
![](https://nagi.blog/wp-content/uploads/2022/03/e83fa52eac00d47020c79e84425066c0-150x150.jpg)
先ほどダウンロードしたデモデータがダウンロードされていると思います。
コチラのファイルは、ZIPファイルという圧縮されているファイルなので、このままでは使うことが出来ません。
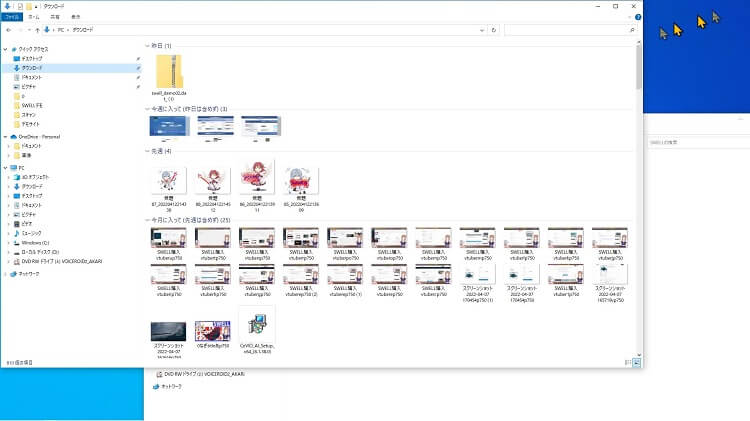
![](https://nagi.blog/wp-content/uploads/2022/04/c36801ae73a03c6cc5f062b6eeba8cca.jpg)
まずは、このファイルを開いていきます
こちらのファイルをどこか分かりやすいところに移動しておきましょう
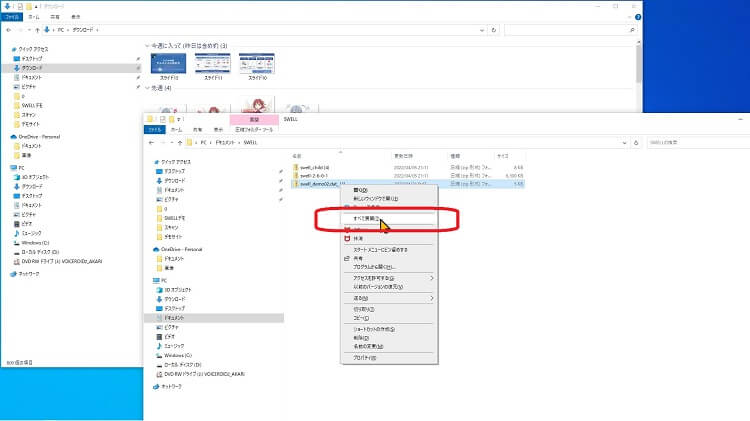
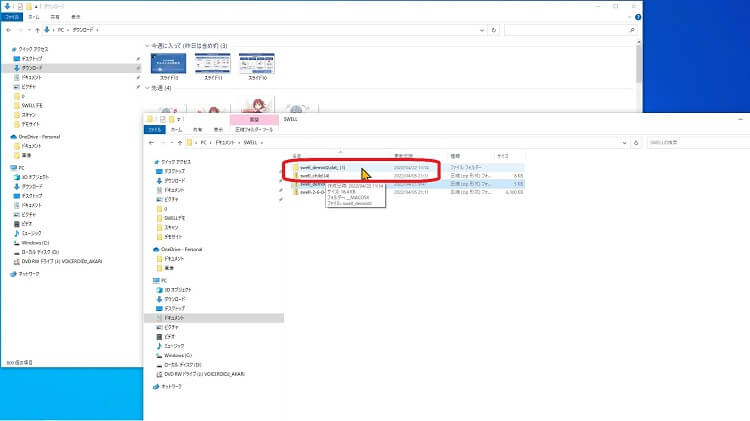
こちらのZIPファイルにカーソルを合わせて、右クリックをすると小さな選択画面が開きますので、この中にある 展開をするをクリックすれば 展開されたファイルが出来ると思います。
![](https://nagi.blog/wp-content/uploads/2022/04/6d250efd3fa99267be5498013af9c968.jpg)
![](https://nagi.blog/wp-content/uploads/2022/04/c021d730cb98af0668907d79d801e02c.jpg)
WordPressの方の画面にいきます
SWELLデモデータのインストール方法
ダッシュボードの左の欄にある 外観 にマウスポインタを当てると カスタマイズが出ると思うので、こちらをクリックしてみてください
![](https://nagi.blog/wp-content/uploads/2022/04/bb795702ae7964a064fd735a96869b04.jpg)
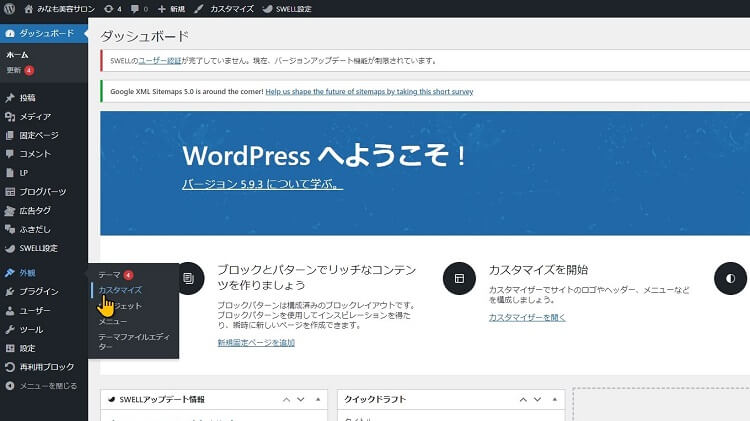
左に出てくるメニューの 一番下を見ると エクスポート インポートという欄がありますでしょうか?
![](https://nagi.blog/wp-content/uploads/2022/04/cd8f32c713b25d3b5d12f08034e7eda2.jpg)
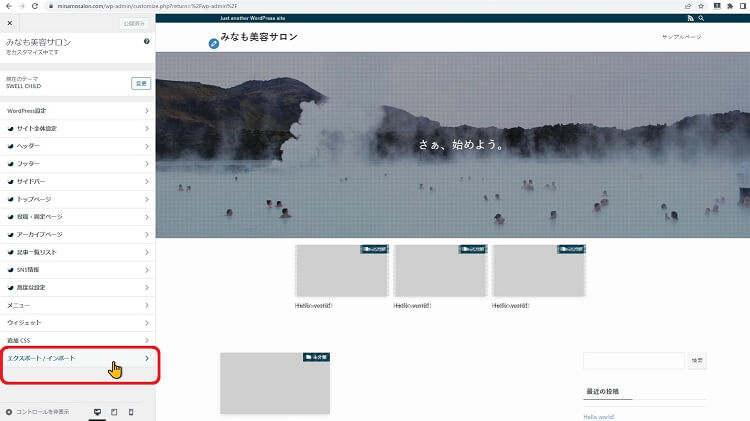
こちらは、先ほど入れた カスタマイザー エクス ポート イン ポートのプラグインの機能です。
![](https://nagi.blog/wp-content/uploads/2022/03/49ef664720433fb37002b605195c5e9b-150x150.png)
あれ?表示されてない…
![](https://nagi.blog/wp-content/uploads/2022/03/e83fa52eac00d47020c79e84425066c0-150x150.jpg)
入れてなかったり、有効化していないとコチラは表記がないと思います
表示されてない方は、Customizer Export/Importのプラグインの方を確認してみてください
![](https://nagi.blog/wp-content/uploads/2022/03/49ef664720433fb37002b605195c5e9b-150x150.png)
インストールして、有効化します
表示されている方は、Customizer Export/Importをクリックして進んでください。
そうしますとファイルを選択というところがありますでしょうか
![](https://nagi.blog/wp-content/uploads/2022/04/836a8905911ea92e3bef8097cab65d35.jpg)
こちらをクリックして、先ほど展開したほうのデモサイトのデータを選択しましょう
![](https://nagi.blog/wp-content/uploads/2022/04/2c683de32b73550dd1ff9730e73585c4.jpg)
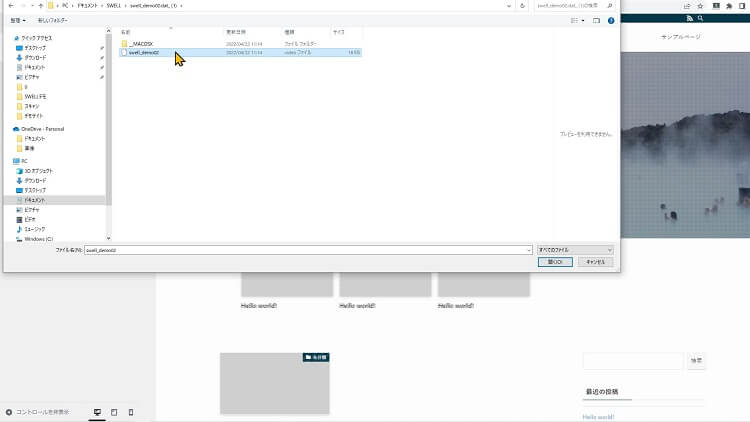
こちらに選択したデータ表記が出ると思いますので確認しましょう
画像ファイルをダウンロードしてインポートしますか?の所にチェックを入れてください
![](https://nagi.blog/wp-content/uploads/2022/04/904bb1810d4aaf3502d2ab5f5d278cb2.jpg)
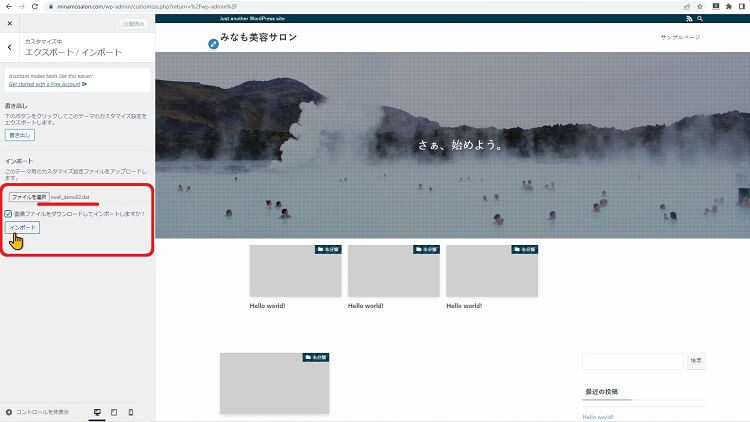
そうしましたら、インポートをクリックですね
![](https://nagi.blog/wp-content/uploads/2022/03/e83fa52eac00d47020c79e84425066c0-150x150.jpg)
はい、右側にプレビューされると思うのですが、デモサイトと同じようなデザインが表示されましたでしょうか?
![](https://nagi.blog/wp-content/uploads/2022/04/4783c241d2ab6eb6f30d418c4c006f9f.jpg)
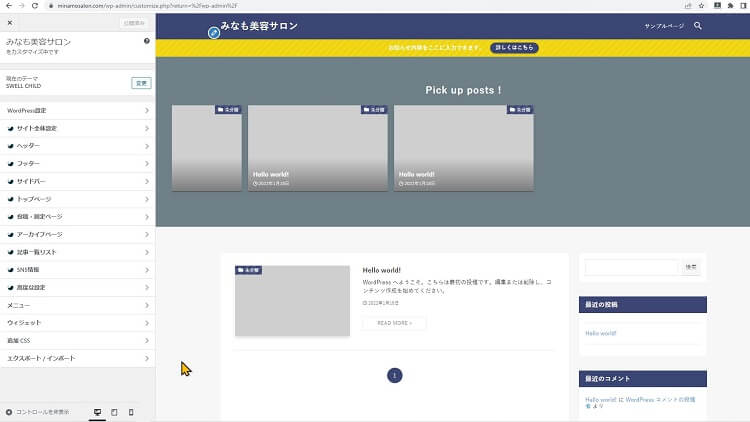
デモサイトと同じ様に変わっているか見てみましょう
![](https://nagi.blog/wp-content/uploads/2022/03/e83fa52eac00d47020c79e84425066c0-150x150.jpg)
では実際に、変わっているか見てみましょう
サイトのトップページに行ってみたいと思います
この様な感じにデフォルトのデザインから、先ほど選んだデモサイトと同じようなデザインに変わったと思います
![](https://nagi.blog/wp-content/uploads/2022/04/f643090a9f8a99c06c5f15141b035f36.png)
![](https://nagi.blog/wp-content/uploads/2022/03/975429aa9a80f4f9bc5ca68a5e46d0cf-150x150.png)
今回はデモサイトの2番のデザインを実演しながら解説してみましたが、他の物を選んでも同じ手順ですのでやってみてください。
![](https://nagi.blog/wp-content/uploads/2022/03/e83fa52eac00d47020c79e84425066c0-150x150.jpg)
デザインが決まったら次はプラグインを入れてみよう
設定をリセットする方法
設定してみたけど、気に入らなかった場合や、他のデザインにしたい場合は、設定をリセットする方法があります
![](https://nagi.blog/wp-content/uploads/2022/06/004038d6890f73a6ecea7fe6d926f74c-300x168.jpg)
デモデータに関するおまけ情報
![](https://nagi.blog/wp-content/uploads/2022/03/e83fa52eac00d47020c79e84425066c0-150x150.jpg)
最後に、おまけ情報ですが、先日SWELL開発者の了さんがこの様なツイートをしてました
![](https://nagi.blog/wp-content/uploads/2022/03/49ef664720433fb37002b605195c5e9b-150x150.png)
これは、もしかすると公式のデモサイトが増えるかもしれない…ということだよね
![](https://nagi.blog/wp-content/uploads/2022/03/e83fa52eac00d47020c79e84425066c0-150x150.jpg)
そうだね、デモサイトは6種類ありますが、2年以上6つのままなので、オシャレなデモサイトが加わると嬉しいよね
次回以降の記事では、SWELLのカスタマイズ機能を使って手動でいろいろ設定していきたいと思います
なぎのブログとYoutubeのチャンネルではあまりSWELLの解説の動画は少ないのですが、よかったらSWELLに関する過去動画もありますので見て頂けたら嬉しいです
今後も、SWELLのカスタマイズする動画も出していきますので、チャンネル登録 高評価していただけるとうれしいです。
![](https://nagi.blog/wp-content/uploads/2022/03/49ef664720433fb37002b605195c5e9b-150x150.png)
みなさんの応援が、なぎちゃんの動画制作のモチベーションになります
最後まで、見てくれて、ありがとうございました
![](https://nagi.blog/wp-content/uploads/2022/03/49ef664720433fb37002b605195c5e9b-150x150.png)
ありがとうございました