![](https://nagi.blog/wp-content/uploads/2022/03/49ef664720433fb37002b605195c5e9b-150x150.png)
所有している独自ドメインを、ConohaWINGのサーバーで使いたいんだけど…どうすればいいんだろ
![](https://nagi.blog/wp-content/uploads/2022/03/e83fa52eac00d47020c79e84425066c0-150x150.jpg)
独自ドメインの設定や、サーバーの設定って慣れてないと難しいですよね…
ConohaWING以外のドメインサービスで所有している独自ドメインを、ConoHaWINGで使う方法・いわゆるネームサーバーの設定についてについて説明していきますね
![](https://nagi.blog/wp-content/uploads/2022/03/975429aa9a80f4f9bc5ca68a5e46d0cf-150x150.png)
この記事を見ると、レンタルサーバーと独自ドメインを紐づける方法(ネームサーバー設定)が分かります
ネームサーバー設定DNS設定【ConoHaWING×ムームードメイン】紐づけ
![](https://nagi.blog/wp-content/uploads/2022/03/e83fa52eac00d47020c79e84425066c0-150x150.jpg)
まずは、 ConoHaWINGのサイトに行きまして、ログインしてくださいね
![](http://image.moshimo.com/af-img/1762/000000030609.gif)
![](https://nagi.blog/wp-content/uploads/2022/03/0030de9297fbca91ae7ffe3eb9e7b828.jpg)
まだ、ConoHaWINGと契約してない方は、借りる方法をコチラの私の動画や、ブログがありますので、見て頂けたら嬉しいです
![](https://nagi.blog/wp-content/uploads/2022/03/84bed319d7edf409610110adc1062d8f-300x168.jpg)
ネームサーバー設定(DNS設定)とは?
![](https://nagi.blog/wp-content/uploads/2022/03/e83fa52eac00d47020c79e84425066c0-150x150.jpg)
簡単に独自ドメインと サーバーを例えますと 独自ドメインが住所で サーバーが家のような感じです。
![](https://nagi.blog/wp-content/uploads/2022/03/49ef664720433fb37002b605195c5e9b-150x150.png)
独自ドメインが住所で サーバーが家 ?
住所だけでは、データを保管する事は出来ませんし、家に文書や写真 動画をただ置いてあるだけだと誰にも見ることは出来ない状態です。
ですので、この住所と家を紐づけする事で、読者がみなもちゃんや、みなさんのサイトを閲覧できるようになる感じだね
![](https://nagi.blog/wp-content/uploads/2022/03/49ef664720433fb37002b605195c5e9b-150x150.png)
なるほど、そういう関係なのね
![](https://nagi.blog/wp-content/uploads/2022/03/975429aa9a80f4f9bc5ca68a5e46d0cf-150x150.png)
ちょっと専門的に言わせていただきますと…
このDNS設定をすることで、ドメインにアクセスした時に指定されたサーバーから情報が引き出されまして、サイトやブログ記事が表示される、ようになるという感じですね
みなさんは、この様な画面になっていますでしょうか? こちらはConoHaWINGのコントロールパネル ユーザー専用のページとなっております。
![](https://nagi.blog/wp-content/uploads/2022/03/315a642cf400bfbd5617a5591c4740cb.jpg)
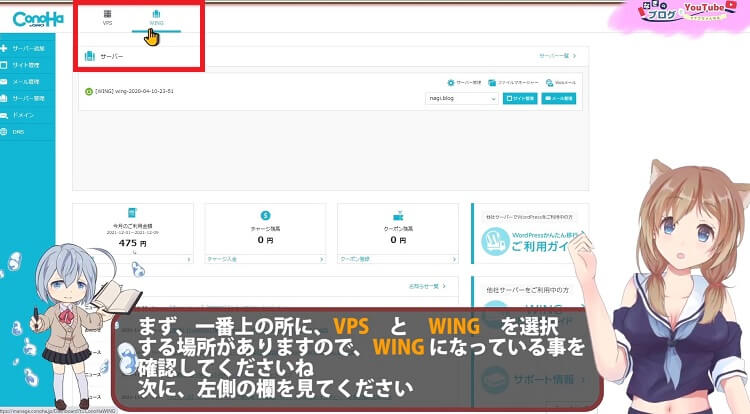
まず、一番上の所に、VPS と ウイング を選択する場所がありますので、WINGになっている事を確認してくださいね
ConoHaWINGに独自ドメインを登録
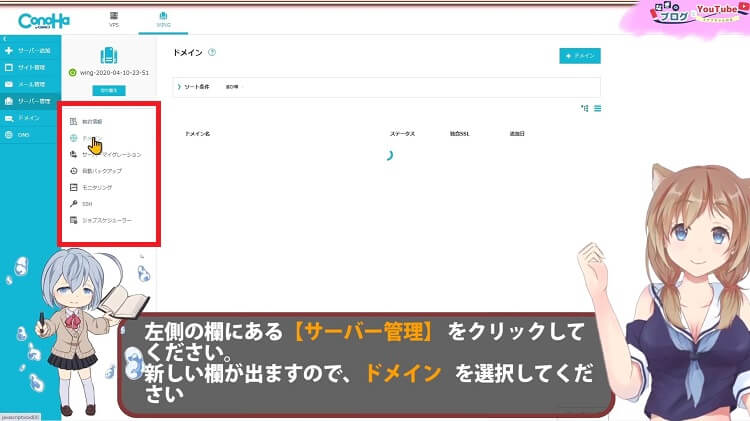
次に、左側の欄を見てください
左側の欄にある【サーバー管理】をクリックしてください。
![](https://nagi.blog/wp-content/uploads/2022/03/b9d59dd10009b12743352495c760cfad.jpg)
![](https://nagi.blog/wp-content/uploads/2022/03/e83fa52eac00d47020c79e84425066c0-150x150.jpg)
新しい欄が出ますので、ドメインを選択してください
![](https://nagi.blog/wp-content/uploads/2022/03/56e285c416803ea76cfcaff83076ff7f.jpg)
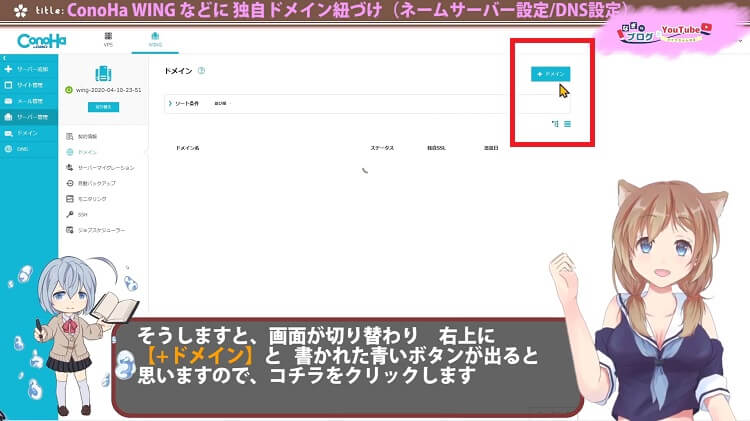
そうしますと、画面が切り替わり 右上に【+ドメイン】と書かれた青いボタンが出ると思いますので、コチラをクリックします
![](https://nagi.blog/wp-content/uploads/2022/03/eb5990e027b71105f8744346740e1252.jpg)
[ドメインを入力してください ]の部分に、取得したドメインを入力してください
![](https://nagi.blog/wp-content/uploads/2022/03/aa479f1af6d0e7ecc5a0390e9e9ee7ef.jpg)
![](https://nagi.blog/wp-content/uploads/2022/03/e83fa52eac00d47020c79e84425066c0-150x150.jpg)
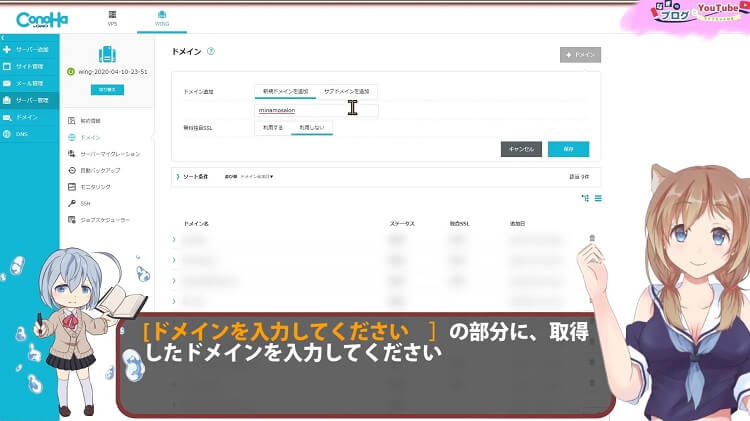
無料独自SSLは、ここでは[ 利用しない ]で大丈夫です。
SSL化については、重要なのですが、後ほど詳しく解説しますね
入力できましたら、保存をしてください
ドメインが問題なく追加されれば、画面左下に通知が表示されます。
ネームサーバーを確認します
サーバー管理の中にある 【契約情報】をクリックしてください
![](https://nagi.blog/wp-content/uploads/2022/03/7d59274841003d527559284659f9d4f9.jpg)
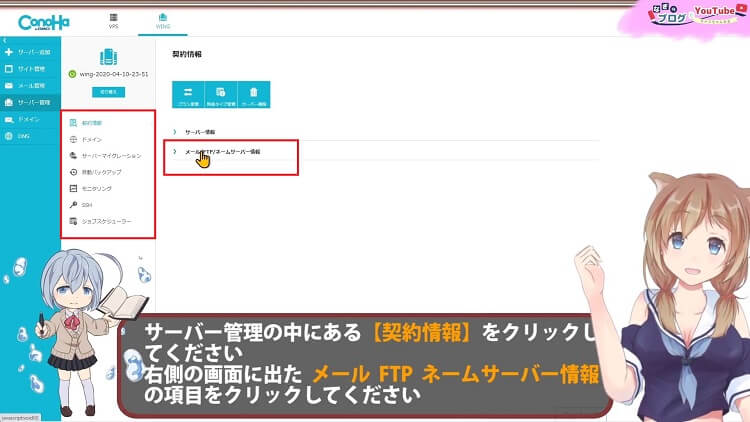
右側の画面に出た メール FTP ネームサーバー情報 の項目をクリックしてください
![](https://nagi.blog/wp-content/uploads/2022/03/e83fa52eac00d47020c79e84425066c0-150x150.jpg)
ずらっと、いろいろてたと思います
![](https://nagi.blog/wp-content/uploads/2022/03/7c1d51d4c57efb0af4101810ceb80823.jpg)
![](https://nagi.blog/wp-content/uploads/2022/03/49ef664720433fb37002b605195c5e9b-150x150.png)
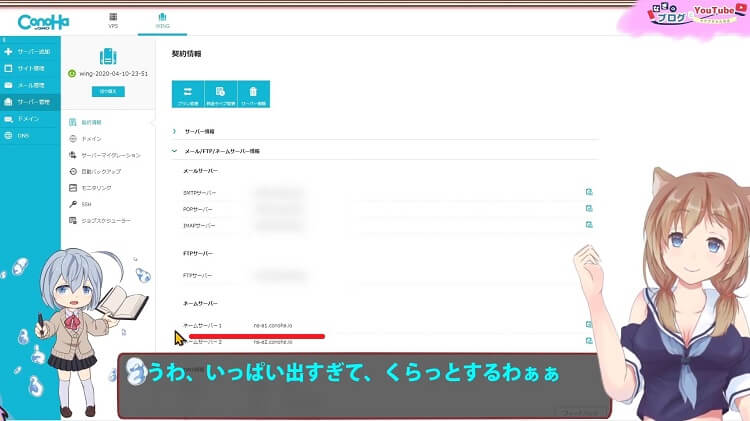
うわ、いっぱい出すぎて、くらっとするわぁぁ
![](https://nagi.blog/wp-content/uploads/2022/03/e83fa52eac00d47020c79e84425066c0-150x150.jpg)
大丈夫、そんなに難しくないから、怖がらないでね
ここにネームサーバーの項目があると思います
ネームサーバー1 というところに、英数字の文字列があるでしょ
コチラをですね、コピーしてください
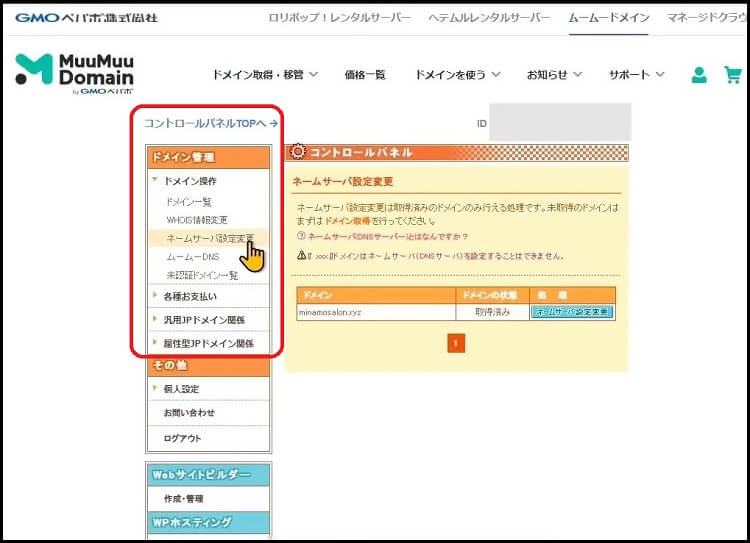
ドメイン事業者側(ムームードメイン)の設定
![](https://nagi.blog/wp-content/uploads/2022/03/e83fa52eac00d47020c79e84425066c0-150x150.jpg)
別ウインドウでムームードメインのサイトを開いてみましょう
(上記リンクで新しいウインドウで開けます)
ムームードメインに来ましたら、ログインしてくださいね
ムームードメインのコントロールパネルの方にきましたら、
左側の欄の ドメイン管理 から
ドメイン操作 の中にある ネームサーバー設定変更 をクリック
![](https://nagi.blog/wp-content/uploads/2022/03/59b5ccc1cb81722969712e22c49416f5.jpg)
![](https://nagi.blog/wp-content/uploads/2022/03/e83fa52eac00d47020c79e84425066c0-150x150.jpg)
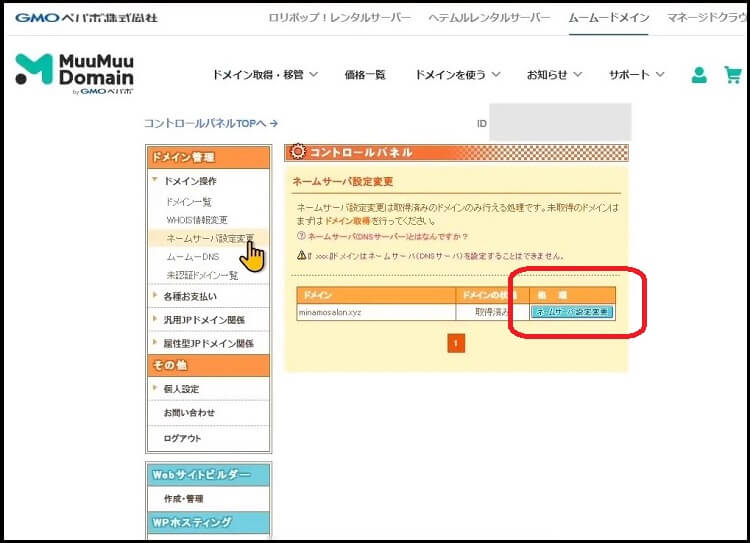
画面右側の場所に、ネームサーバー設定変更の画面が表示されまして 所持しているドメインが出たと思います。
設定したいドメインの右側にある 水色のボタンの ネームサーバー設定変更 をクリックしてね
![](https://nagi.blog/wp-content/uploads/2022/03/964f3d8b1fee7f9f89193fc4872b863a.jpg)
![](https://nagi.blog/wp-content/uploads/2022/03/e83fa52eac00d47020c79e84425066c0-150x150.jpg)
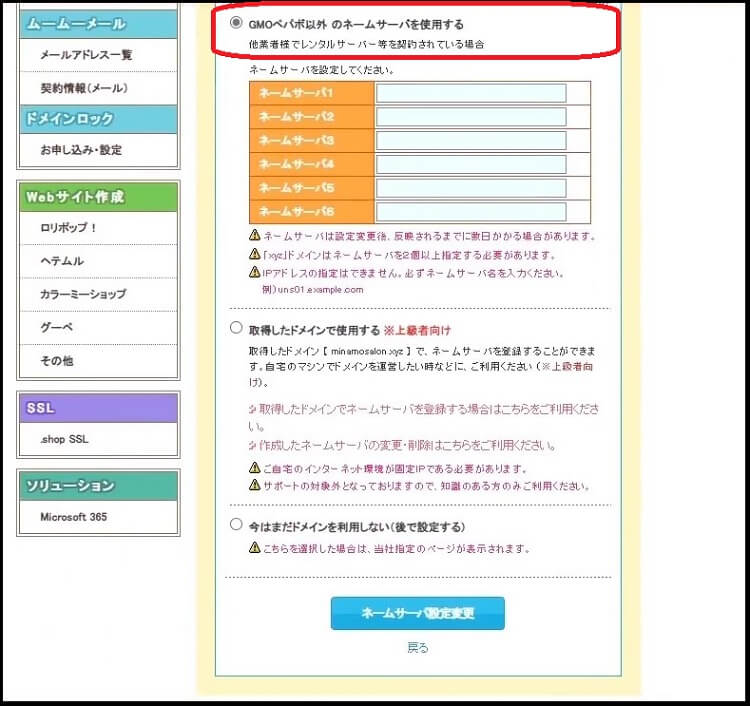
選択した独自ドメインのネームサーバーを変える事の出来る画面に来ました
そうしましたら、上から9つ目になると思いますが、GMOペパボ以外のネームサーバーを使用するの所をクリックしまして、ボタンを移してください
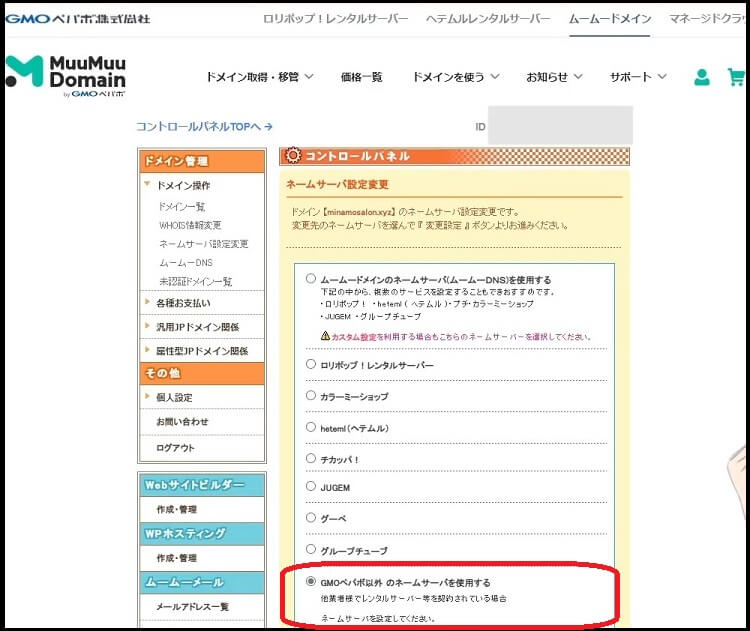
![](https://nagi.blog/wp-content/uploads/2022/03/70013acf31c4a757ec042a82149aca73.jpg)
![](https://nagi.blog/wp-content/uploads/2022/03/e83fa52eac00d47020c79e84425066c0-150x150.jpg)
入力できる欄が現れると思います。
![](https://nagi.blog/wp-content/uploads/2022/03/86978ccfedaba450d37618161adb749b.jpg)
こちらのネームサーバー1に 木の葉ウイングで先ほどコピーした、ネームサーバー1の英数字の文字列を貼り付けてください
同じように、 ConoHaWINGでネームサーバー2の英数字をコピーしまして、ムームードメインのネームサーバー2の欄へ貼り付けます
![](https://nagi.blog/wp-content/uploads/2022/03/eec7986007f5c4b90a57ac3617d7303e.jpg)
![](https://nagi.blog/wp-content/uploads/2022/03/e83fa52eac00d47020c79e84425066c0-150x150.jpg)
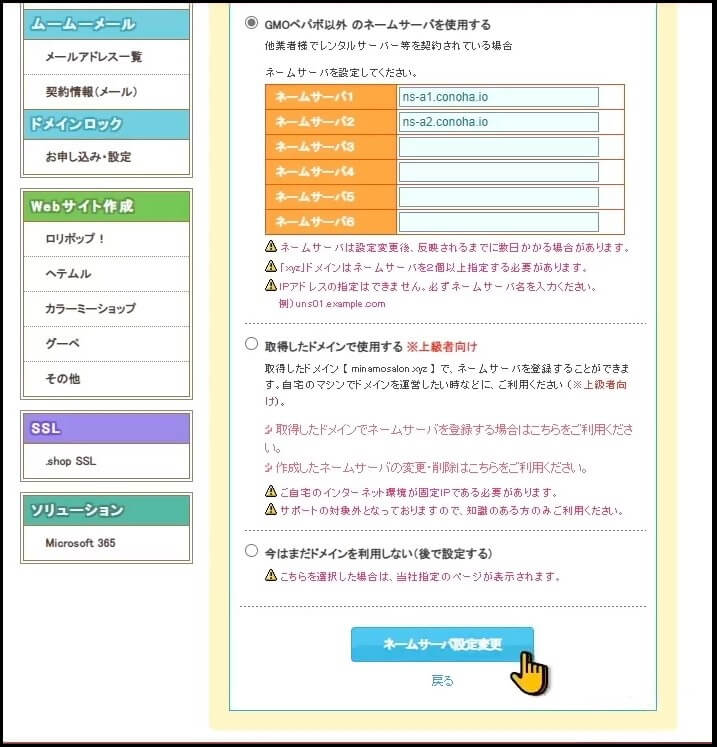
そうしましたら、下のネームサーバー設定変更をクリックしてください
サーバーの設定変更を行ってもよろしいですか?と確認がありますのでOKをクリックしてください
サーバーの設定を変更しました と表示されます。
これで設定的には終わりになりますが、表示されている様に反映には2から3日かかる場合もあります。
ですが、ほとんどの場合は数分から、数時間の内にはだいたい反映されているようですね
![](https://nagi.blog/wp-content/uploads/2022/03/975429aa9a80f4f9bc5ca68a5e46d0cf-150x150.png)
これで、ドメインとサーバーがむすびついたので、レンタルサーバーの方にデータを上げて行けば、独自ドメインのURLで閲覧することが出来ます
![](https://nagi.blog/wp-content/uploads/2022/03/e83fa52eac00d47020c79e84425066c0-150x150.jpg)
次の記事では、WordPressを導入を解説するから、いよいよみなもちゃんのサイトが出来上がるよ
![](https://nagi.blog/wp-content/uploads/2022/03/975429aa9a80f4f9bc5ca68a5e46d0cf-150x150.png)
ConoHaWING で他に困ったら以下の記事も参考にしてね
- 口コミ記事【ConoHaWING】おすすめの理由4つのポイント
- ムームードメインでの独自ドメイン取得方法
- ConoHaWINGに独自ドメインを紐づける方法
- ConoHaWINGにWordPressを導入する方法
- SSL暗号化WAF設定/セキュリティー設定やり方
![](https://nagi.blog/wp-content/uploads/2022/03/e83fa52eac00d47020c79e84425066c0-150x150.jpg)
WordPressするなら、WordPressテーマSWELLがおすすめだよ
![](https://nagi.blog/wp-content/uploads/2022/03/a6582866de12f3703c90b559d56f3cfe-300x168.jpg)
【動画】ネームサーバー設定DNS設定
![](https://nagi.blog/wp-content/uploads/2022/03/e83fa52eac00d47020c79e84425066c0-150x150.jpg)
良かったら見てね
![](http://image.moshimo.com/af-img/1762/000000038399.png)
![](http://image.moshimo.com/af-img/1762/000000030609.gif)