![](https://nagi.blog/wp-content/uploads/2022/03/e83fa52eac00d47020c79e84425066c0-150x150.jpg)
ロリポップ!レンタルサーバーに ムームードメインで取得した独自ドメインを紐づけていく方法 いわゆるネームサーバーの設定について解説していきたいと思います
ムームードメインで取得した独自ドメインは、ロリポップ!レンタルサーバーに紐づける時に、2つの方法があります
通常は、簡単に紐づけする方法がありますので、基本的にはそれで十分です。
ただし、対応できない事もあるので、その点についてもお話しますね
![](https://nagi.blog/wp-content/uploads/2022/03/975429aa9a80f4f9bc5ca68a5e46d0cf-150x150.png)
この記事を見ると、ロリポップレンタルサーバーと、ムームードメインの独自をメインを簡単に紐づけられます
ロリポップ!ムームードメイン簡単紐づけ方法。ネームサーバー設定
さきに、補足しておきますが、ムームードメインとロリポップは同じ会社のサービスになっていまして、簡単に設定する事が可能です。
ロリポップレンタルサーバーを使うなら、独自ドメインはムームードメインで取得するのが良いと思います。
![](http://image.moshimo.com/af-img/0003/000000011520.png)
![](https://nagi.blog/wp-content/uploads/2022/03/975429aa9a80f4f9bc5ca68a5e46d0cf-150x150.png)
ムームードメインでの独自ドメイン取得する方法については、コチラの記事を参考にしてみてね
ムームードメイン と ロリポップの組み合わせは、この記事の前半で解説するやり方で簡単に設定できます
このやり方以外の方法は、記事の後半で解説させて頂いてます
![](https://nagi.blog/wp-content/uploads/2022/03/49ef664720433fb37002b605195c5e9b-150x150.png)
まだ、良く分かってないけど…紐づける方法はいくつかあるのね
かんたんに、ロリポップレンタルサーバーと連携させる方法
![](https://nagi.blog/wp-content/uploads/2022/03/e83fa52eac00d47020c79e84425066c0-150x150.jpg)
まずは、 ロリポップレンタルサーバーのサイトに行きまして、ログインしてくださいね
左側の欄の一番上に、【サーバーの管理】 設定となっているところの中に
『独自ドメイン設定』という項目があると思いますので、コチラをクリックしてください
![](https://nagi.blog/wp-content/uploads/2022/03/359457bccbdbf92b93303436d9a2a33d.jpg)
![](https://nagi.blog/wp-content/uploads/2022/03/e83fa52eac00d47020c79e84425066c0-150x150.jpg)
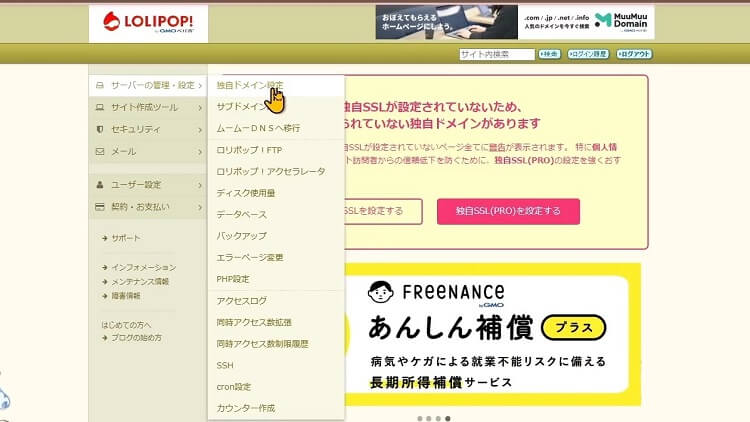
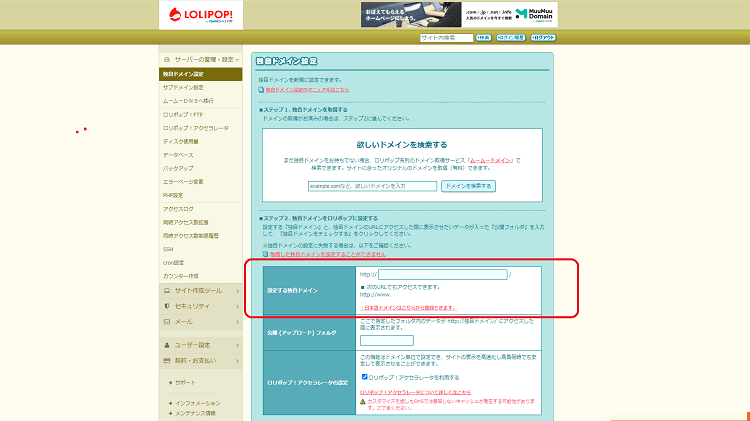
右側が、独自ドメイン設定の 画面に変わると思います。
![](https://nagi.blog/wp-content/uploads/2022/03/d59d89153af2415c15ba3b70e511735d.jpg)
コチラのステップ1の方は、独自ドメイン取得に関する事です。
![](https://nagi.blog/wp-content/uploads/2022/03/975429aa9a80f4f9bc5ca68a5e46d0cf-150x150.png)
ステップ1に関することは、独自ドメインの取得に関することなので別記事で解説させて頂きました。
![](https://nagi.blog/wp-content/uploads/2022/03/e83fa52eac00d47020c79e84425066c0-150x150.jpg)
ステップ2 独自ドメインをロリポップに設定する をやっていきます。
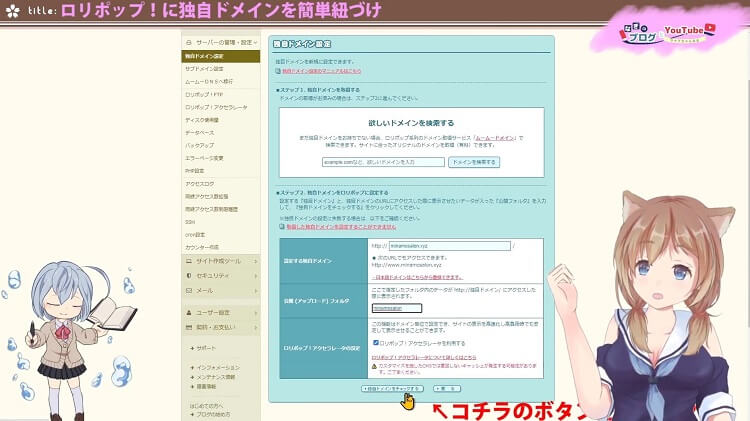
設定する独自ドメイン の欄の http:// の後の空欄に ムームードメインで取得した独自ドメインを入力してください
![](https://nagi.blog/wp-content/uploads/2022/03/69dcb7eaa82c3a3fed0a089f47280a6b.png)
力しましたら、今度は下の 公開 (アップロード) フォルダ の空欄に何か文字を入れます。
![](https://nagi.blog/wp-content/uploads/2022/03/49ef664720433fb37002b605195c5e9b-150x150.png)
なにかって、なんでもいいの?
![](https://nagi.blog/wp-content/uploads/2022/03/e83fa52eac00d47020c79e84425066c0-150x150.jpg)
うんうん、 大丈夫だよ。
公開(アップロード)フォルダの名前を決める際には、ドメインの”.”(ドット)より前の部分と似たような文字列にすると、分かりやすくて管理しやすくなりますよ。
そうしたら、下に 独自ドメインをチェックするというボタンがあるので、クリックしてください
![](https://nagi.blog/wp-content/uploads/2022/03/5645cf8fcd4f5699a961a4e06824bf2c.jpg)
そうしますと 新たに ネームサーバー認証という項目が表示されますので、こちらにムームードメインのIDと ムームードメインのパスワードを入力してくださいね。
![](https://nagi.blog/wp-content/uploads/2022/03/90d5572f6246dff13cd44c7473744cce.jpg)
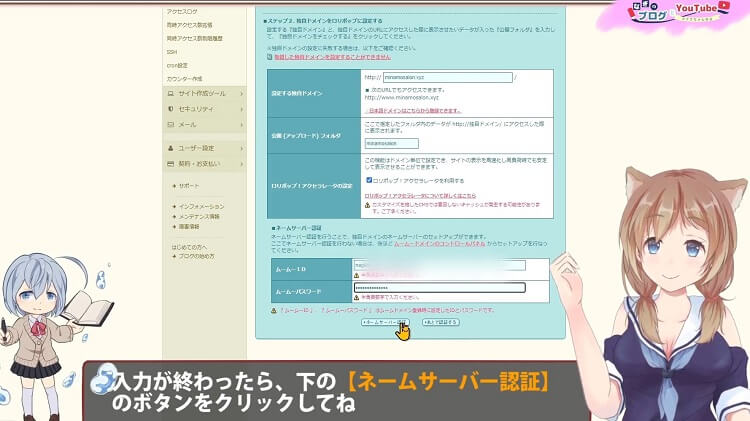
入力が終わったら、下のネームサーバー認証のボタンをクリックしてね
表示が変わりまして 設定ボタンをクリックしてください
![](https://nagi.blog/wp-content/uploads/2022/03/494bf5ba91a4799e3e3eb9df15086476.jpg)
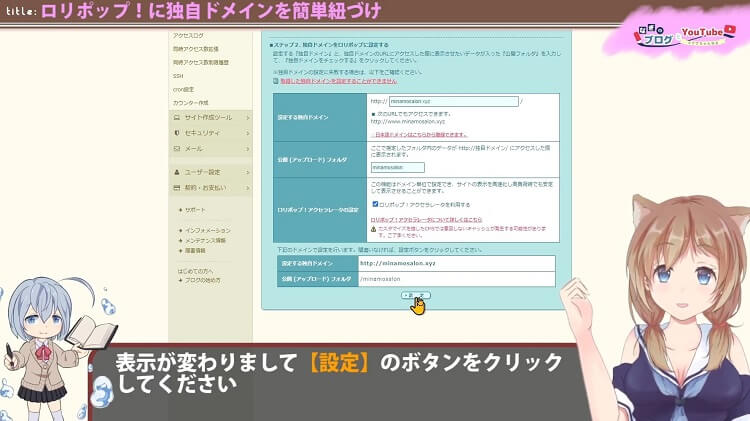
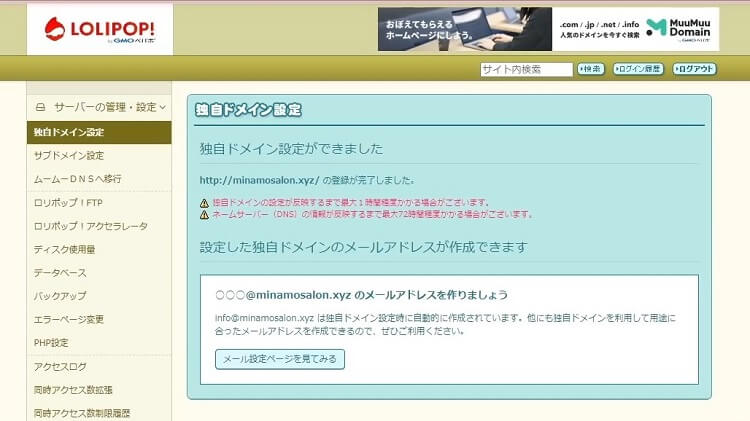
画面が切り替わりまして、「独自ドメインが設定できました」と以下の様な表示されましたら設定操作は完了です
![](https://nagi.blog/wp-content/uploads/2022/03/5ca264ff5082b09f2905227b572f787c.jpg)
![](https://nagi.blog/wp-content/uploads/2022/03/49ef664720433fb37002b605195c5e9b-150x150.png)
え、これで完成したの?
![](https://nagi.blog/wp-content/uploads/2022/03/e83fa52eac00d47020c79e84425066c0-150x150.jpg)
うんうん。
ムームードメインで取得した独自ドメインですと、ロリポップの場合 ここにムームードメインのIDと パスワードを入れるだけで、独自ドメインとロリポップとの紐づけが自動で設定してくれます
![](https://nagi.blog/wp-content/uploads/2022/03/e83fa52eac00d47020c79e84425066c0-150x150.jpg)
1時間くらい待てば 設定したものが反映され閲覧できるはずだよ
簡単に設定する方法は、これで終わりですが、ムームードメインと、ロリポップの組み合わせではない場合は、別の設定もあります。
興味ありましたら もしくは 必要になったら 以下の記事内容も見て頂けると嬉しいです。
ムームードメインのネームサーバ(ムームーDNSへ移行)を使用。カスタム設定のセットアップ情報変更
前の項目で解説したやり方では、「独自ドメインの管理的なこと」をロリポップ側ですることになります。
これで特に問題は起こりませんが、ドメインの所有権の証明が出来ないなどの事象がおこります。
これを解消するための方法として、独自ドメインをムームードメイン側で設定管理を行える権利を残したまま、ロリポップと連携する方法があるので解説します。
ムームードメイン側の設定
対象のドメインのネームサーバー設定変更を開いてください
![](https://nagi.blog/wp-content/uploads/2023/12/e4ff7095bc9b53712f10be21bc849801-1.jpg)
![](https://nagi.blog/wp-content/uploads/2022/03/e83fa52eac00d47020c79e84425066c0-150x150.jpg)
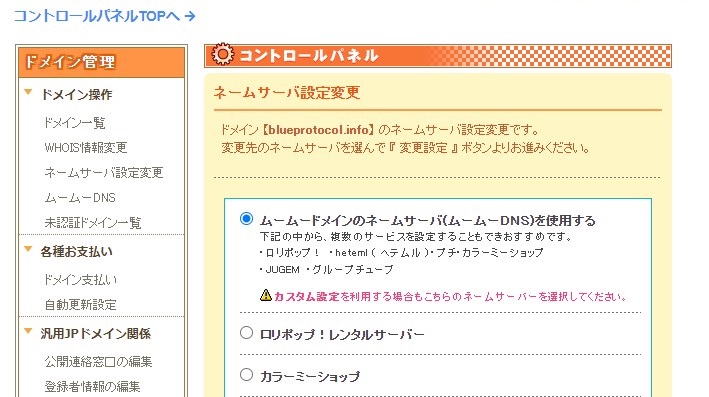
おそらく、ロリポップも併せて独自ドメインを取得した人は、ラジオボタンが「ロリポップレンタルサーバー」についていますよね?
すでに、ラジオボタンが「ムームードメインのネームサーバ(ムームーDNS)を使用する」に付いている人で、問題なくサイトが見れる方は、以下で説明する設定になっています。
この先を読み進める必要はないと思います
ラジオボタンが「ムームードメインのネームサーバ(ムームーDNS)を使用する」に付いていない方は、ラジオボタンを「ムームードメインのネームサーバ(ムームーDNS)を使用する」に変更してください
![](https://nagi.blog/wp-content/uploads/2022/03/975429aa9a80f4f9bc5ca68a5e46d0cf-150x150.png)
そして、下の方にある設定変更のボタンを押してね
ロリポップ側の設定
![](https://nagi.blog/wp-content/uploads/2022/03/e83fa52eac00d47020c79e84425066c0-150x150.jpg)
今度は、ロリポップ側の設定をします
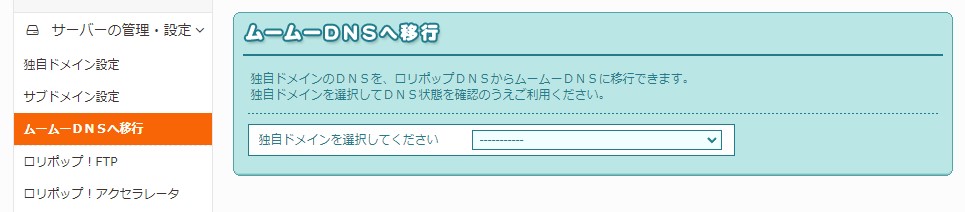
サーバーかの管理設定の中にある、「ムームーDNSへの移行」をクリック
移行させたい独自ドメインを選択できるボックスがありますので、選択肢てください
![](https://nagi.blog/wp-content/uploads/2023/12/eff1d1df41d9c2128eebcf959707ea1b.jpg)
![](https://nagi.blog/wp-content/uploads/2022/03/e83fa52eac00d47020c79e84425066c0-150x150.jpg)
ムームードメイン側に戻ります
ムームーDNSを開いてください
そうしますと、この様に選択できる項目が増えていると思います
![](https://nagi.blog/wp-content/uploads/2023/12/b6ddc26c28043462a51a649e6d710775.jpg)
ロリポップ側で使いたい項目だけを選択し、ラジヲボタンを「ロリポップ!」に移動させてください
終わりましたら、下の設定を変更するをクリック
インターネットのサーバーの設定は、1時間から72時間ほどかかるので少々待ちましょう
だいたいは1時間以内で設定が完了します
どうしてムームードメインのネームサーバを使用すの?
サーチコンソールのドメインの所有権を証明する時に、ロリポップ側のネームサーバーを利用していると、証明できない事があるためです
ネームサーバー設定DNS設定が済んだらやる事
もし、WordPressを使ってブログやサイトを作りたい場合は、設定した独自ドメインにWordPressを導入してみましょう
![](https://nagi.blog/wp-content/uploads/2022/03/9018aa8a555ebc8017098bf36e047f94-300x168.jpg)
![](https://nagi.blog/wp-content/uploads/2022/03/e83fa52eac00d47020c79e84425066c0-150x150.jpg)
改ざんや、乗っ取りを防ぐために、サーバー側のセキュリティ対策もしっかりやりましょう
![](https://nagi.blog/wp-content/uploads/2022/03/9018aa8a555ebc8017098bf36e047f94-300x168.jpg)
![](https://nagi.blog/wp-content/uploads/2022/03/e83fa52eac00d47020c79e84425066c0-150x150.jpg)
WordPressするなら、WordPressテーマSWELLがおすすめだよ
![](https://nagi.blog/wp-content/uploads/2022/03/a6582866de12f3703c90b559d56f3cfe-300x168.jpg)
ブログのアクセスを伸ばしたいなら、月額制WEBマーケティングスクール【Withマーケ】で学ぶのもおすすめですよ
![](http://image.moshimo.com/af-img/3773/000000058679.jpg)
動画も作りました
![](https://nagi.blog/wp-content/uploads/2022/03/e83fa52eac00d47020c79e84425066c0-150x150.jpg)
良かったら見てね
![](https://nagi.blog/wp-content/uploads/2022/03/975429aa9a80f4f9bc5ca68a5e46d0cf-150x150.png)
チャンネル登録お願いします
![](http://image.moshimo.com/af-img/0003/000000053730.png)