今日は「Stable Diffusion WebUIにVAEを設定する方法」と、「簡単にVAEを切り替えが出来る設定」について解説していきます

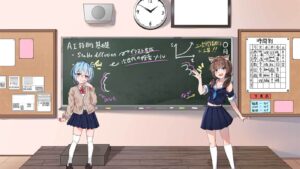
そもそも、VAEってなに?

VAEとは、変分オートエンコーダで、訓練データの特徴を学習し、似たような画像を作成する生成モデルの一種です
分かりやすく説明して
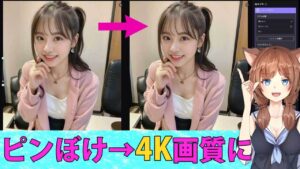
画像をきれいにするプログラムです
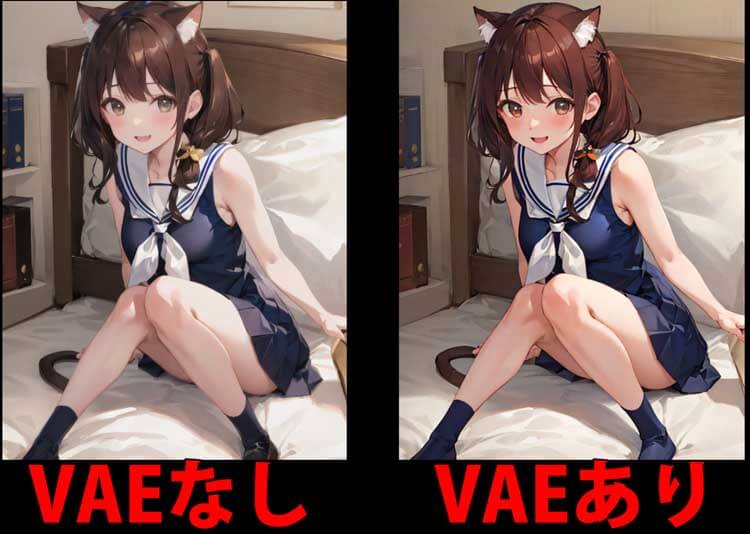

この様に、VAEをいれることでAIイラストをきれいに出力することが出来ます

現在、Stable Diffusionや画像生成AIに関する記事は、以下のものがありますので参考にしてね
この記事に、特に関連する記事はコチラ
【画像生成AIイラスト】2つのタイプのVAEのインストール
VAEには、大きく分けて2種類あります。
モデル専用の独自のVAEと、
汎用的に使えるVAEがあるんですよ。
独自のモデル専用に作られたVAEには、counterfeit-v2.5のVAEや、anything-v4のVAEがあります
因みに、独自のモデル専用のVAEがない場合もありますし、学習モデルとセットになっていている場合もあります
汎用的に使えるVAEは、どのモデルでも使えるVAEです。
StableDiffusionの開発に関連しているStabilityAI社のVAEで、FT-mse-840000という物があります
counterfeit-v2.5のモデルでは、どっちを使った方がいいの?
counterfeit-v2.5は、専用モデルがありますので、専用のVAEをいれてみます
やり方はほとんど一緒なので、汎用性のあるVAEも説明するね
StableDiffusion WebUIの設定をすこしいじると、手元で簡単に使い分けられるようにできますよ
またVAEによって、生成される画像にも変化が起きるためです
因みに、StableDiffusion WebUIバージョン1.6.0 SDXL1.0のVAEに関しては、こちらの記事を参考にしてね(速報版・編集中)
VAEをStableDiffusion WebUIへの導入・インストール方法
それぞれの、VAEをStableDiffusion WebUIへの導入・インストール方法を解説していきます
モデル専用の導入方法から、説明しますね
VAEを入手するために、検索か、ご用意しましたリンクで、Hugging Faceのサイトに行きましょう
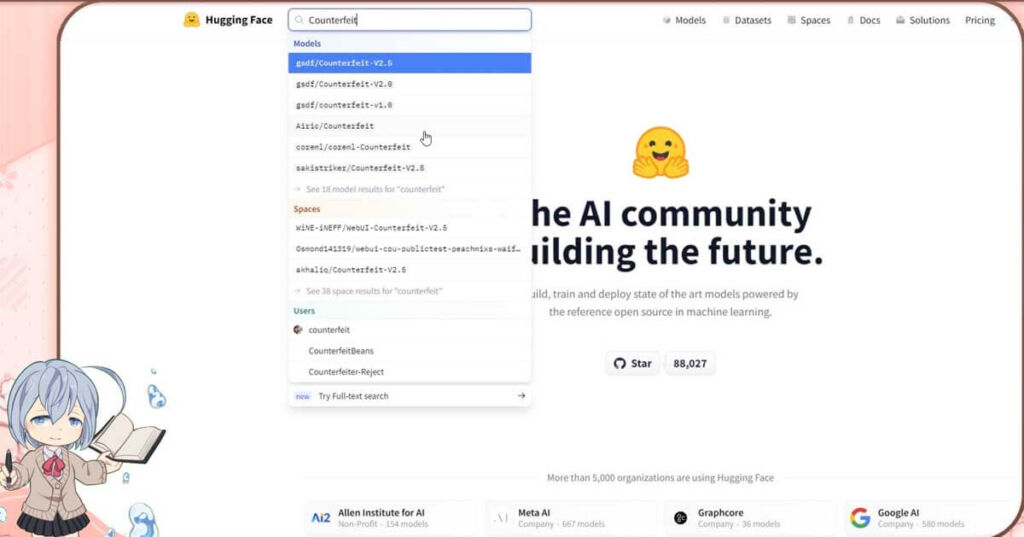
Hugging Faceの検索窓でCounterfeitと入れて、Counterfeitのページに行きましょう
Files and Versionsのタブを表示させます
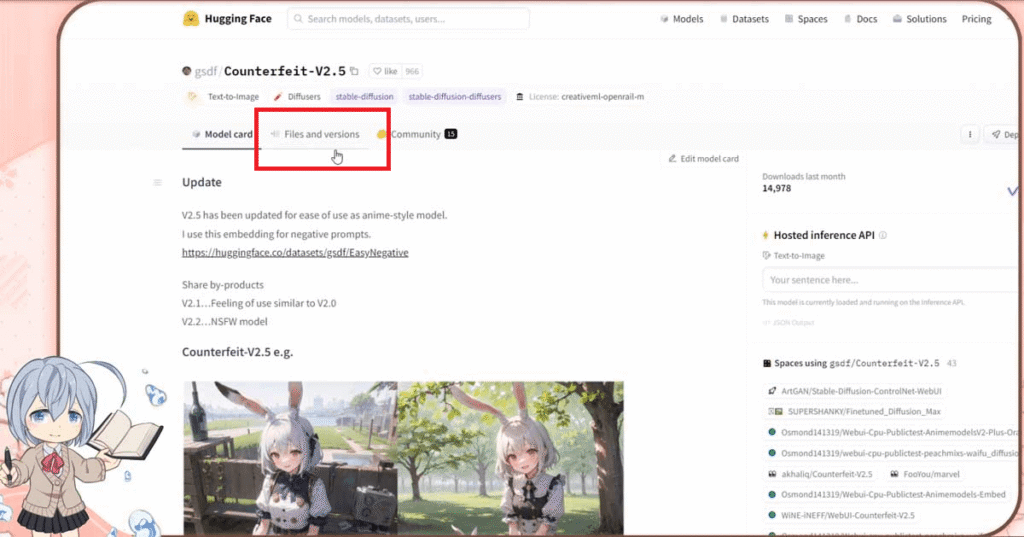
Counterfeit-V2.5のモデルをダウンロードした場所ですね
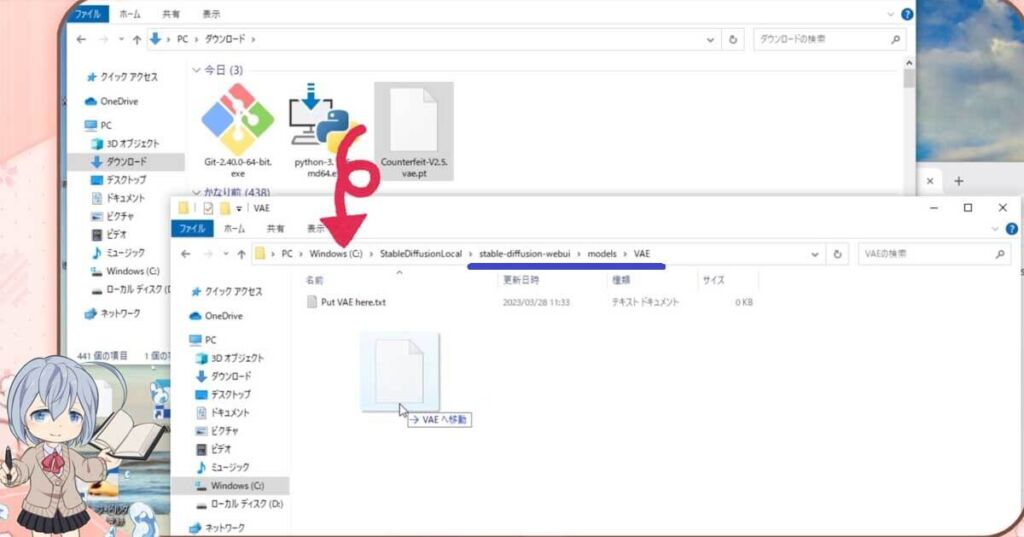
そうです。モデルをダウンロードした場所の近くに、Counterfeit-V2.5.vae.ptというファイルがあります。
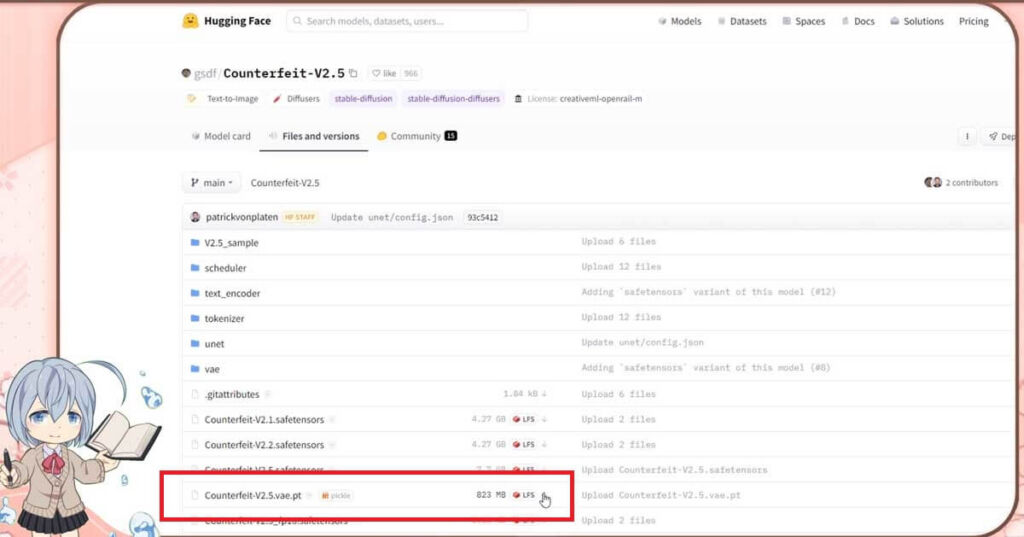
モデルと同じ名前がついていて、vaeと表記ていることが多いので分かりやすくなっています
これをダウンロードします
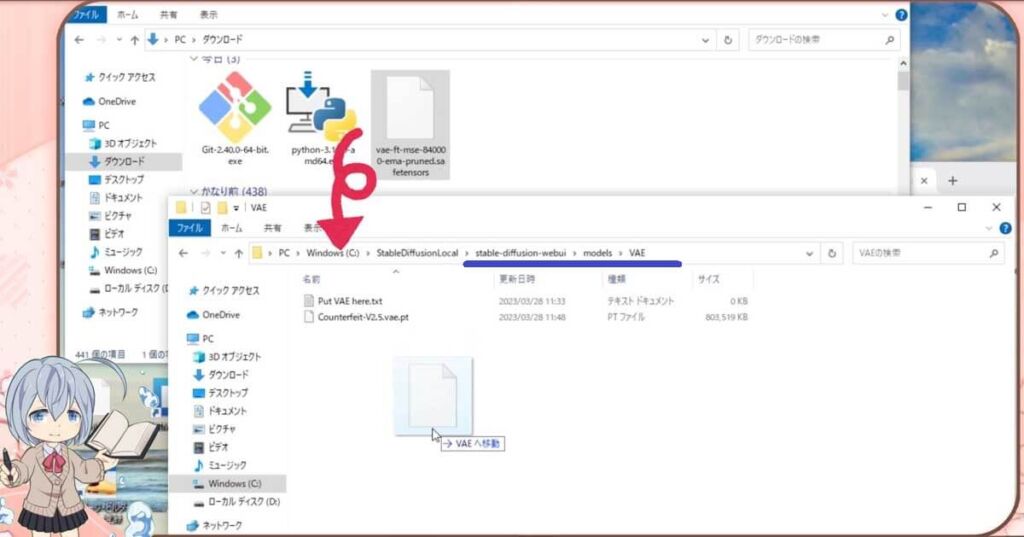
ファイルをダウンロードしたら、Stable Diffusionをインストールしたフォルダの中にあるStable Diffusion WebUIフォルダを開いて、「models」というフォルダを開きます
その中の、VAEフォルダの中に入れてください
ダウンロードの設定のほうは、これで大丈夫です。このあと、Stable Diffusion WebUIのセッティングを行います。
その前に、汎用性の高いVAEもダウンロードしておきましょう
汎用的なVAEの導入方法も解説しますね
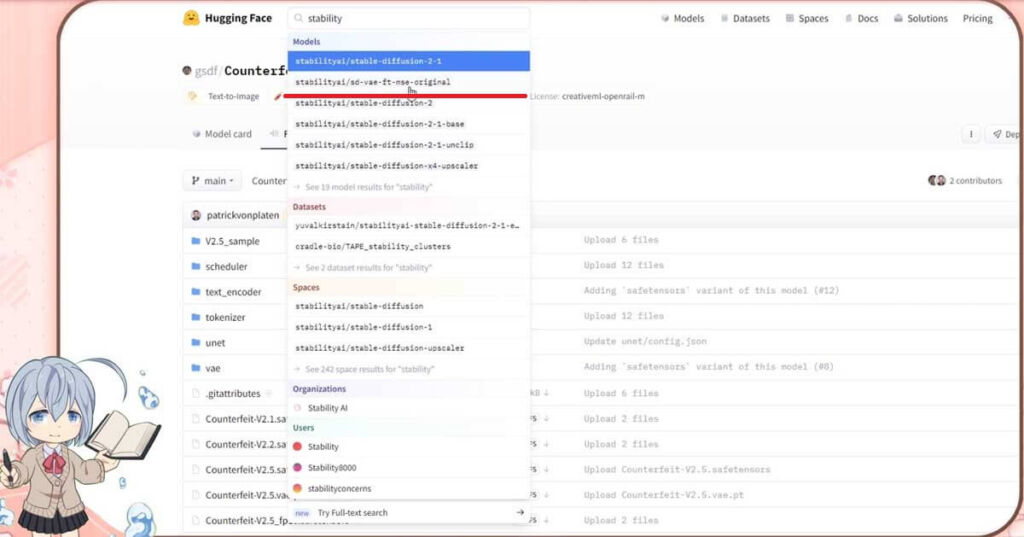
汎用性のあるVAEはいくつかあるんですが、今回はStable Diffusionとなじみが深いStability AI社のものをインストールしてみましょう。
Hugging Faceで「Stability AI」を検索すると、sd-vae-ft-mse-originalという項目が出てきます。
sd-vae-ft-mse-originalのページに来ます
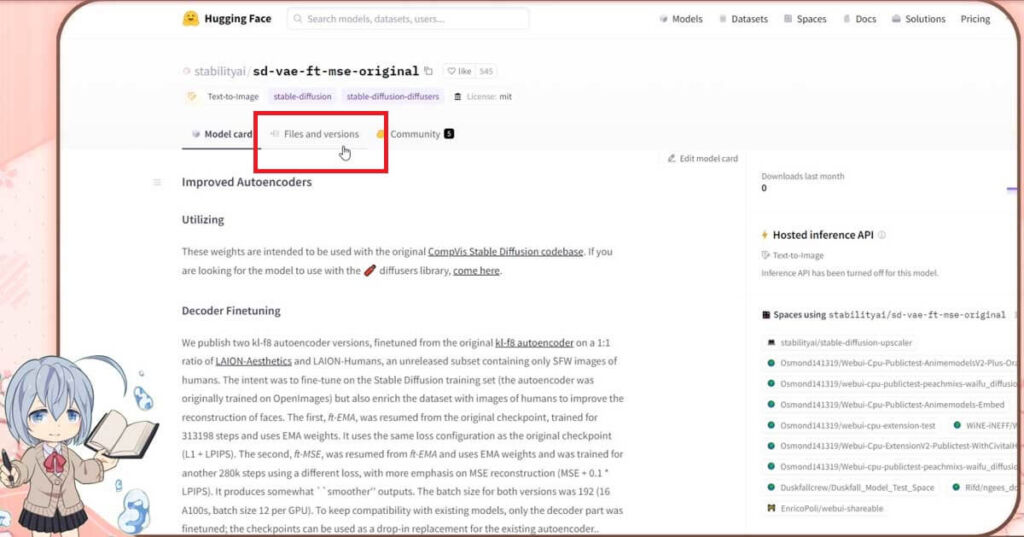
Files and Versionsのフォルダを開いてください
そこからvae-ft-mse-840000-ema-pruned.safetensors
というファイルをダウンロードできます。
これがVAEのファイルです。
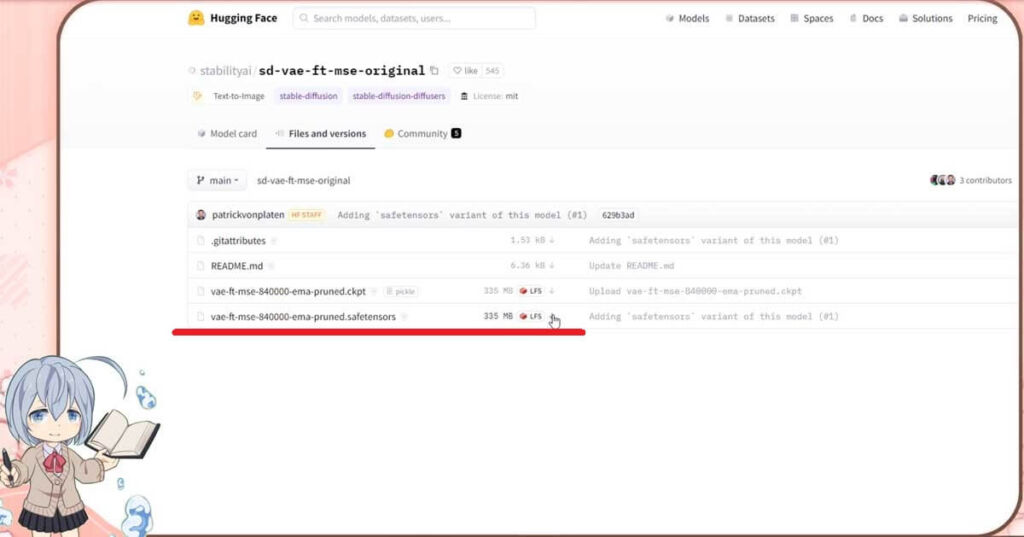
ファイルをダウンロードしたら、先ほどと同じくStable Diffusionをインストールしたフォルダの中にあるStable Diffusion WebUIフォルダを開いて、「models」というフォルダをひらきます
その中の、VAEフォルダの中に入れてください
汎用性のあるVAEのダウンロードの設定のほうも、これで大丈夫です。
このあと、Stable Diffusion WebUIのセッティングを行います。
VAEの使い方 StableDiffusion WebUIの画面で設定方法
VAEを実際に動かすためには、適用させる必要があります
そのVAEの適用方法は、2つありますよ
自動適用する方法と、手動適用する方法です
自動と聞くと、自動でやってくれる方が簡単のように聞こえますが、手動適用の方がStable Diffusion WebUIの画面で設定や、手元で簡単に設定変更できるので、手動適用する方法をおすすめします
ちなみに自動適用は、モデルとVAEを同じ名前にして、モデルと一緒にフォルダに入れると、自動でVAEが適用されます
手動適用の方法を説明しますね
先ほどの説明通りに、手順を進めていくと、インストールしたフォルダ内の「models」フォルダの中の「vae」というフォルダの中にvaeのファイルが置いてありますよね
はい、ダウンロードしたVAEファイルを、VAEフォルダの中に置きました
手動適用の方法は、Stable Diffusion WebUIを起動したのちに、インターフェースの画面の中で行います。
Stable Diffusion WebUIを起動してください
初めて、Stable Diffusion WebUIを起動する方は、パソコンのスペックに寄りますが、10分から30分以上かかります
初期の起動を済ませてくださいね
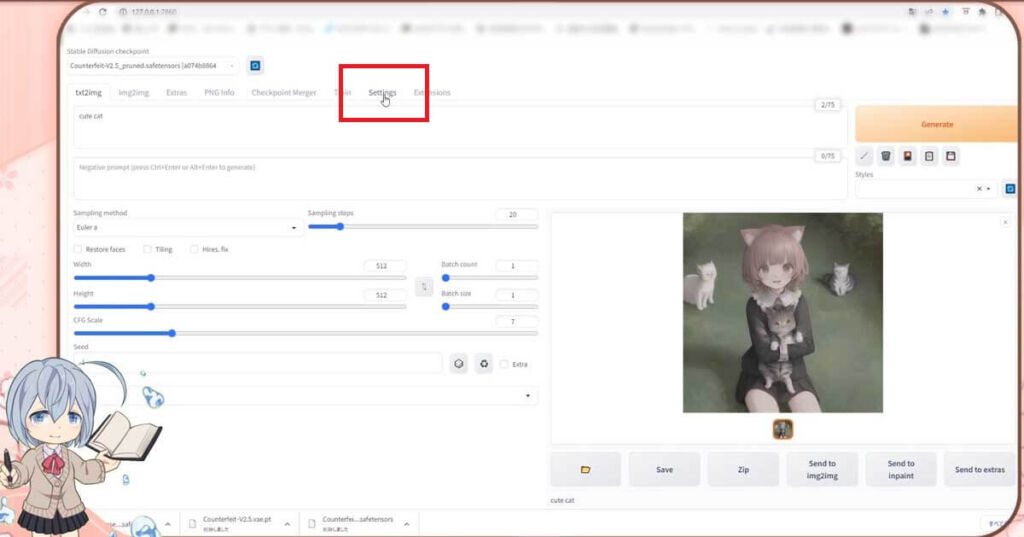
Stable Diffusionが起動しましたら、セッティングタブを開いてください
え、英語ばかりだね…
そんなに難しくないので、大丈夫だよ

左側の欄に「Stable Diffusion」と書かれている場所があるので、クリックしてください。
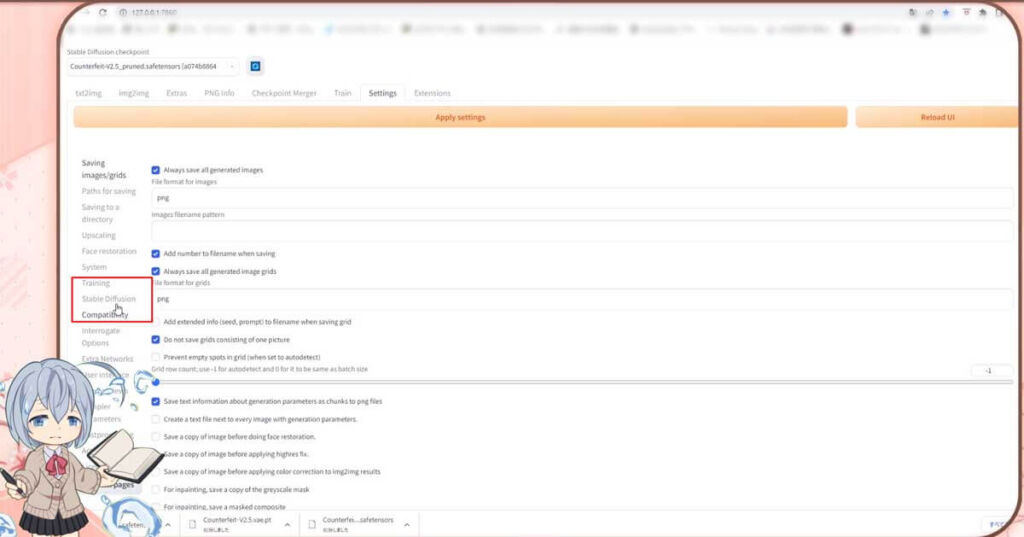
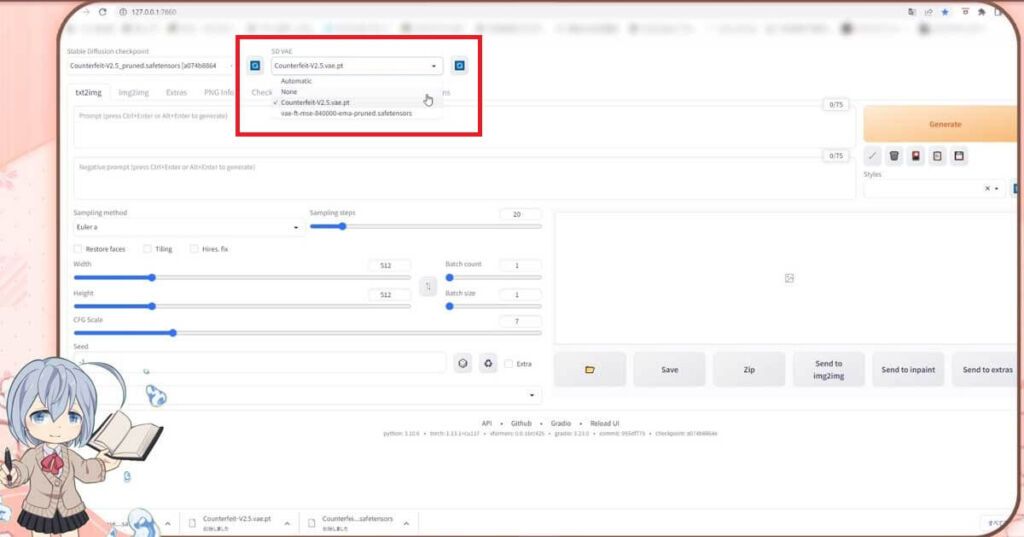
コチラの画面になるので、真ん中より少し上のあたりに「SD VAE」という項目があるのが分かりますか?

「SD VAE」ありました
デフォルトでは「Automatic」になっているとおもいます。
ここを開くと、先ほどダウンロードして、VAEのフォルダに入れたVAEが選択できるようになっています。
Counterfeitと、Stability AIのVAEが選択できるようになっているね
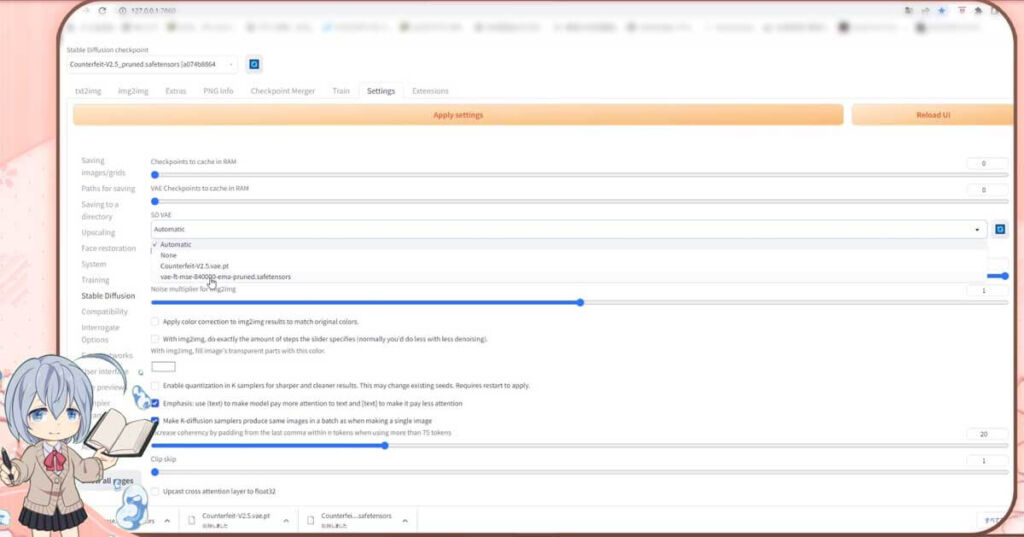
では、先ほどフォルダに入れた使いたいモデルの専用VAEか、汎用的に使えるVAEに変更しましょう。
今回は、Counterfeitに設定してみたいと思います
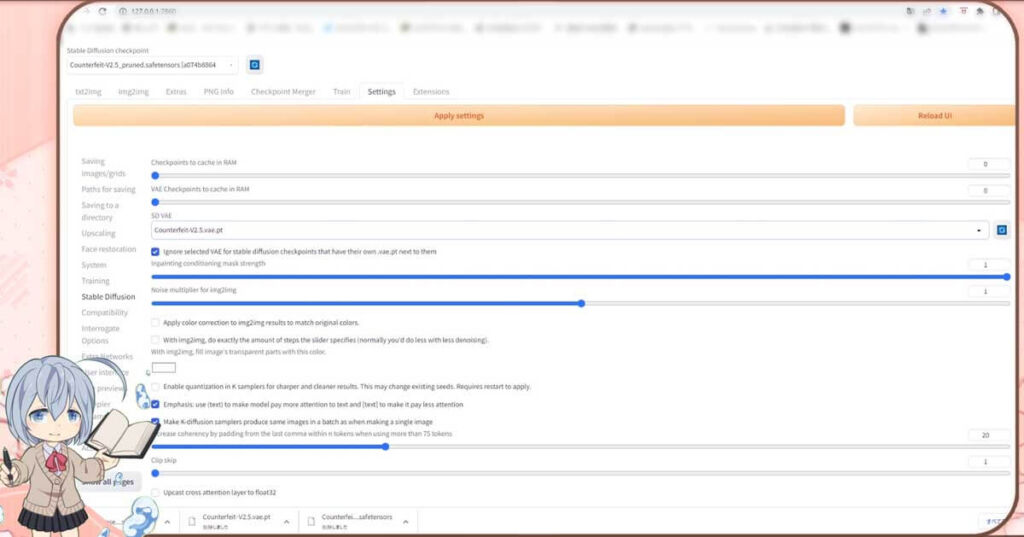
変更したら、上にある「Apply Settings」を押して適用してください。

そして、コマンドプロンプトの画面と、Stable Diffusion WebUIを両方とも再起動してくださいね
これで、手動適用できるようになりました。
説明ありがとう。でも、ちょっとモデルに合わせて毎回この作業するの面倒だな
では、もっと簡単にVAEを便利に使いこなす設定をしておきましょう
より簡単にStable Diffusion WebUIで、VAEを便利に使いこなす
Stable Diffusion WebUIは、インターフェイスを変えることが出来ます。
起動時のこの画面のページ上部で、インストールされているVAEを便利に切り替えることが出来る様にしてみましょう
Stable Diffusion WebUIを起動し、セッティングタブを開いてください。
下の方にある「User interface」をクリックしてください。
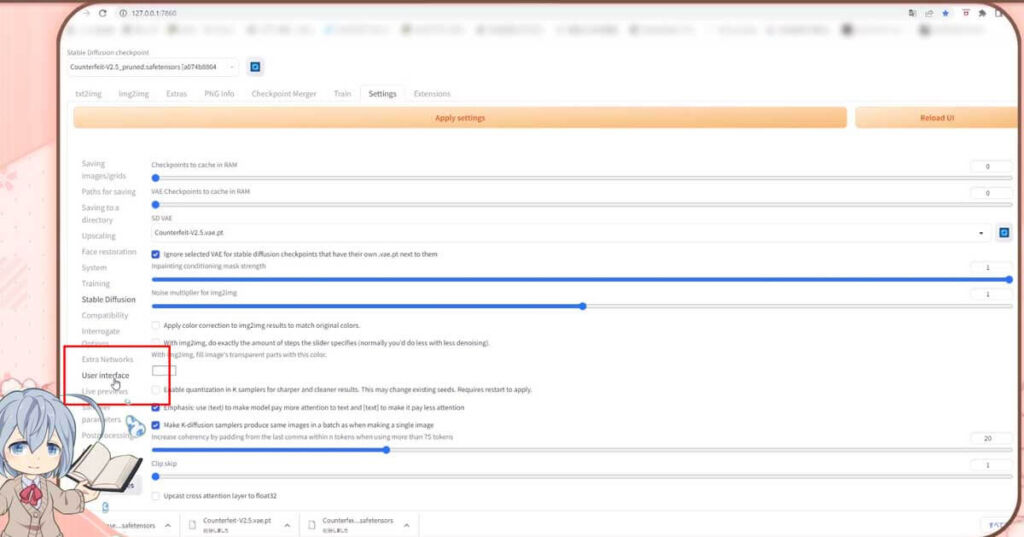
こちらのページが開きましたでしょうか?
下の方に、Quicksettings lisstの項目がありますが分かりますか?
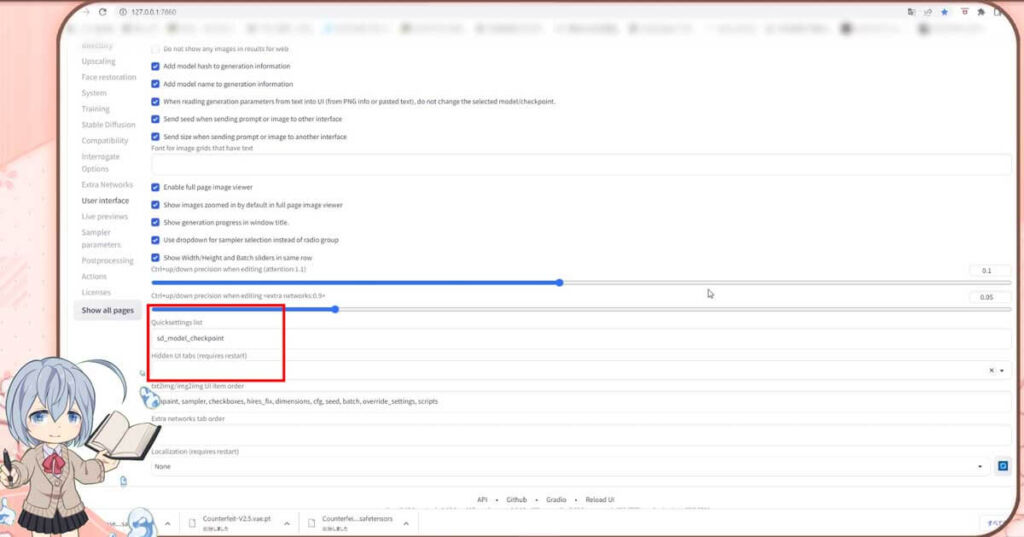
ここに、この様にsd_model_checkpointと記載されていると思いますが、sd_vaeを追記します

この様な形になりましたか?
はい、書き換えました
変更したら、上の「Apply Settings」を押して適用してください
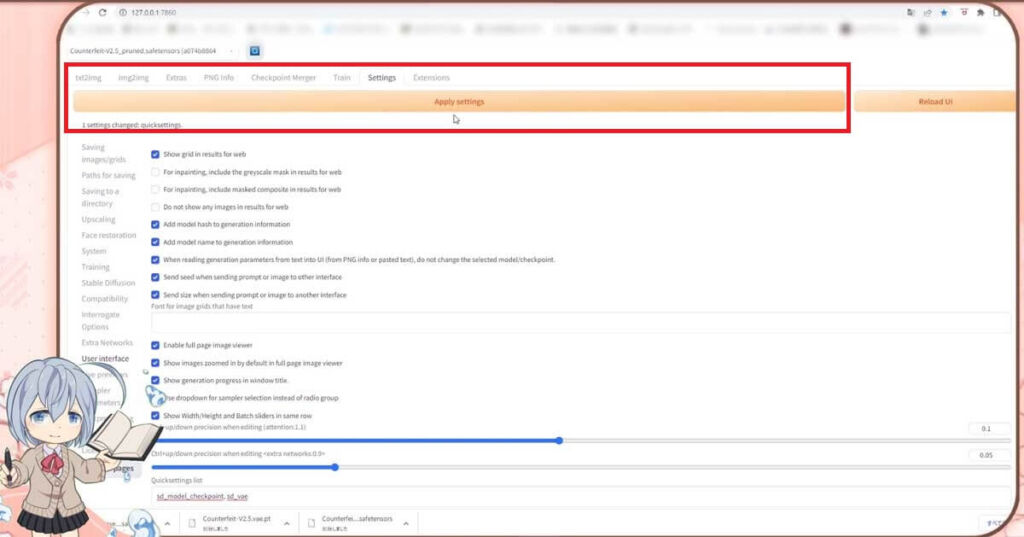
そうしましたら、Stable Diffusion WebUIを「Reload UI」のボタンを押すか、再起動してください
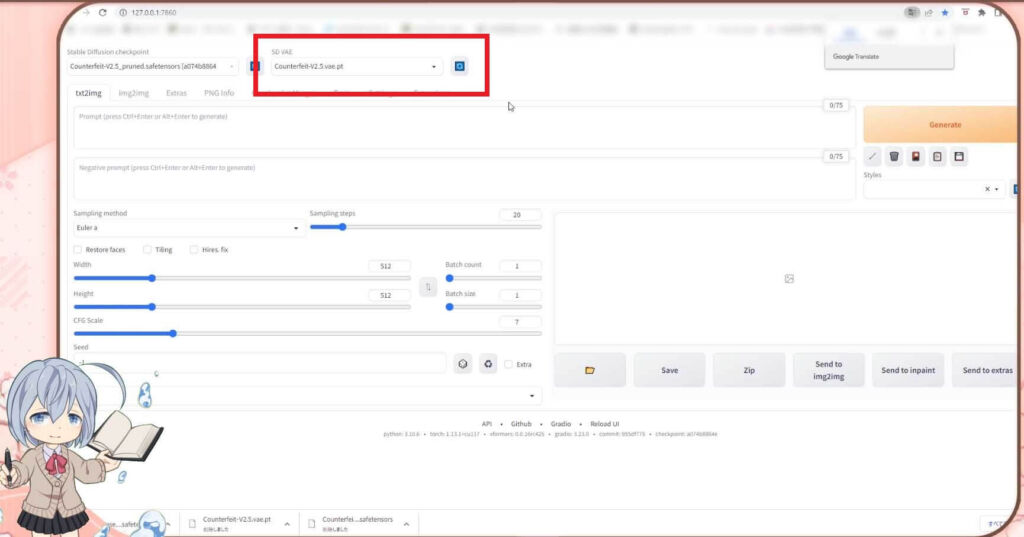
Stable Diffusion WebIiの左上の、モデルの隣にVAEの表示と切り替えが出来る様になりました
これで、モデルを変更した時に、便利にVAEも変更できるようになりますよ
これは便利だね
より詳しくは、コチラの記事で動画付きで、解説していますよ
以下のコンテンツとコラボさせて頂いてますので、ご興味ありましたら覗いてもらえたら嬉しいです

動画版:【画像生成AIイラスト】VAEインストール方法と便利な使い方♪
StableDiffusion WebUI v1.6.0(随時更新リサーチ中)
- StableDiffusion WebUIバージョン1.6.0リリース速報まとめ
- 【SDXL1.0のVAE】StableDiffusion WebUI v1.6.0 導入&設定方法
- StableDiffusion WebUI ver1.6.0「VAE」切り替えを便利なインターフェイス
StableDiffusion webUI基本設定
- StableDiffusion WebUIをローカル環境で使う設定のやり方♪
- StableDiffusion WebUIバージョンアップ方法。更新手順や注意点
- StableDiffusion WebUIバージョンの確認方法
- 【操作画面の解説・txt2img】分かりやすくパラメータの使い方を説明
- 【画像生成AIイラスト】VAEインストール方法と便利な使い方
- 「VAE」かんたんに切り替えするインターフェイス
- 【日本語化】StableDiffusionWebUI インターフェイス設定方法。
- 大きく、キレイな画像を出力する方法Hires.fix使い方。解像度アップ!
- 操作画面の5つのボタン解説
- 【X/Y/Z plot】使い方。プロンプトや設定を調整し比較してみよう!
- 【img2imgインペイント】画像生成AIイラストを修正/inpaintのパラメータ
- 【学習モデルの追加と変更】かんたん切り替え
- StableDiffusion WebUIバージョン1.3。LoRAを使う方法
- 【まとめ】画質が悪いを改善する7つの機能の使い方!
【学習モデル・checkpoint】
- 【実写系学習モデル・3選】写真の様なリアルな美少女が作れるモデルまとめ
- 【BracingEvoMix】日本人風の顔に特化した最新学習モデル
- 【BeautifulRealisticAsiansV5通称BRAV5】
プロンプト
- Stable Diffusionプロンプト(呪文)に関しての書き方。
- 【画質を上げる・画質に美しく芸術性を持たすプロンプト】呪文の書き方
- 【Tag complete】プロンプトのコツを掴める入力補助機能。
【ControlNet】
- 【ControlNet】使い方とインストール方法。画像生成AIイラストに便利な神機能。
- 【ControlNet-V1.1206】最新バージョンアップデート&モデル更新方法。
- 【ControlNet】不具合?表示されない…反映されない時には?
- 骨(棒人間)を使い、思い通りの姿勢をとらせた方法。
- 原画の絵と同じ姿勢(ポーズ)のAIイラスト生成のやり方♪
- AIイラストから線画を抽出する方法♪
- AIイラストを手描きで修正し、生成するやり方♪
- 【ControlNet】自作の線画イラストを画像生成AIに色塗り(ペイント)させる方法
- 自作の線画イラストをAIイラストに色塗り(ペイント)させる方法♪
【その他 拡張機能について】
- 【Eagle-pnginfo】画像やプロンプトを自動で一括管理できる拡張機能
- 【eagle】画像管理おすすめアプリ使い方
- 【eagle】公式サイト
- 【EasyNegative v2】導入&使い方♪設定方法
- 【EasyNegative V2】反映されないときには?原因と対処方法
- 【EasyNegative V2】【LoRA】にサムネイルを付ける方法
- 【LoRA】画像生成AIの追加学習データの使い方。
- 【Dynamic Prompts】ダウンロードとインストールの設定方法と特殊構文の使い方