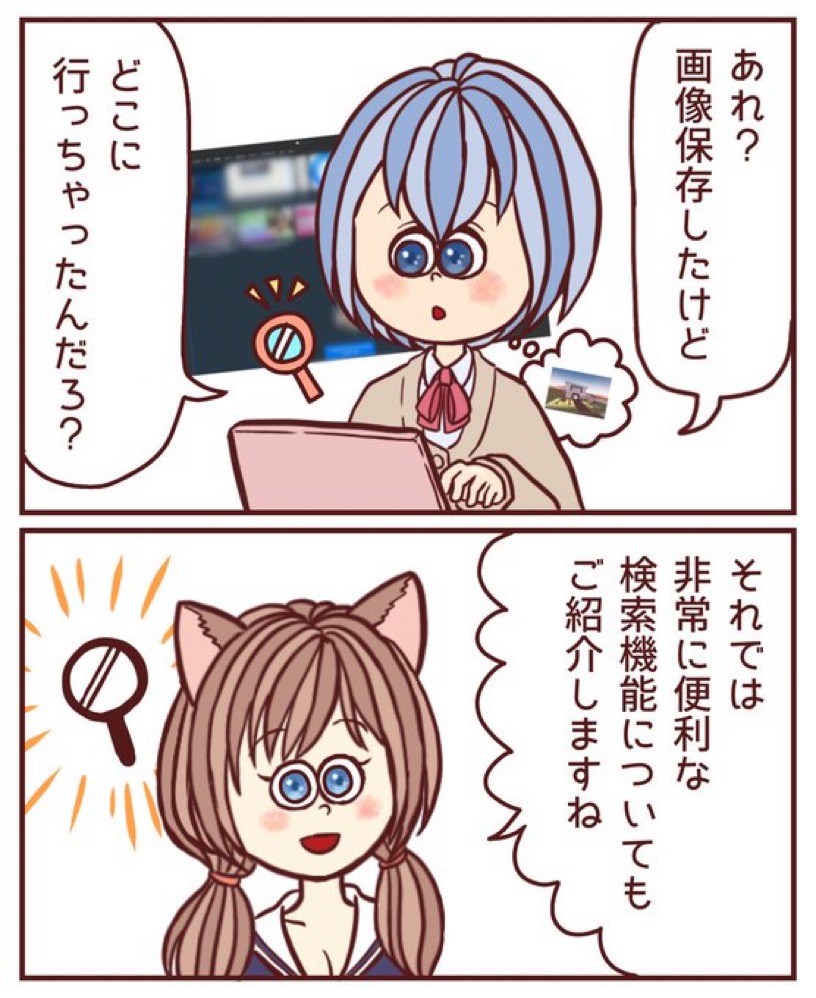
パソコンのフォルダにデータを保存したケド、保存先のフォルダを忘れちゃう時ありませんか?
そんな悩みを抱えるファイルや画像の管理アプリ・eagleを解説しますね


本記事を読むと、パソコンのなかの画像管理が、見やすくかんたんに、管理できるようになりますよ
画期的やーん!【eagle】無料で始められる画像管理アプリ
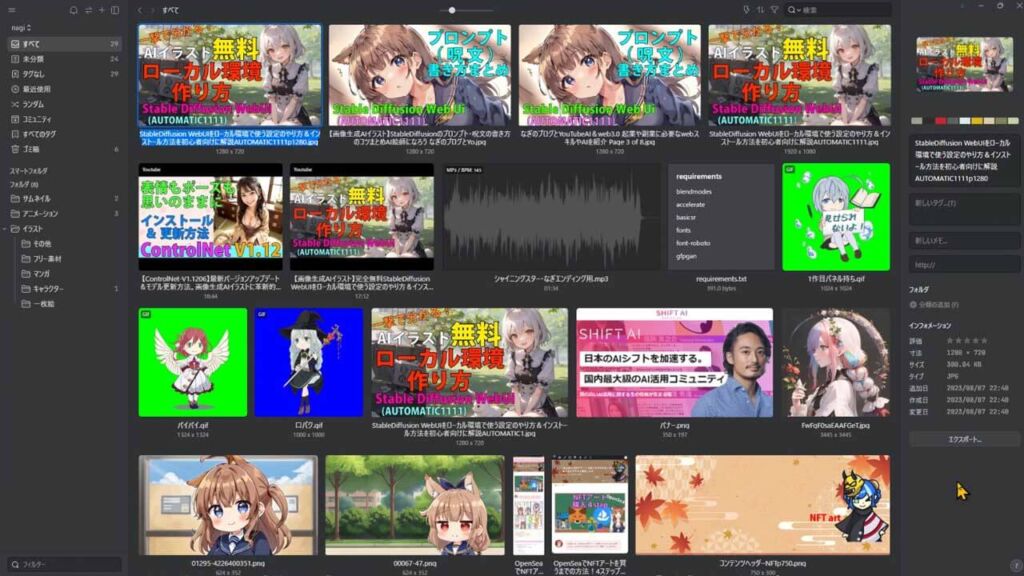
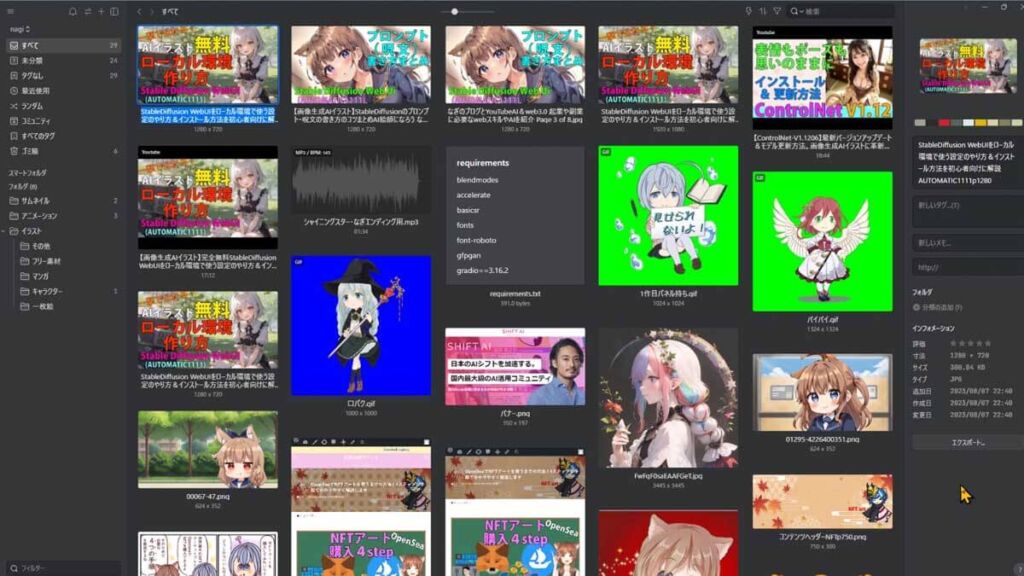
eagleでは、ふつうのパソコンのフォルダの様にファイルや画像をを保存も出来ますが、管理するための機能がスゴくすぐれています。
画像の検索機能では、下の写真の様に画像に使われている色をベースに探し出すことも出来るし、画像のアスペクト比や、タグなどの詳細欄に書き加えた情報で検索をかけることも出来ます。
さらに、この画像がwebサイトからダウンロードしたモノであれば、どこのサイトから保存した画像データなのか、URL(リンク)も同時に保存されているんだよ

この検索機能、ファイル名とかタグとかなくても検索できるの?

そうなんですよ!ファイル名とかタグとか、プロンプトでも検索もできるよ
その他にも、お気に入りのサイトのURLとか、YouTube動画とかも管理できます
自分だけの再生リストを、自分のパソコンに作れちゃうグレードアップ版って感じかな
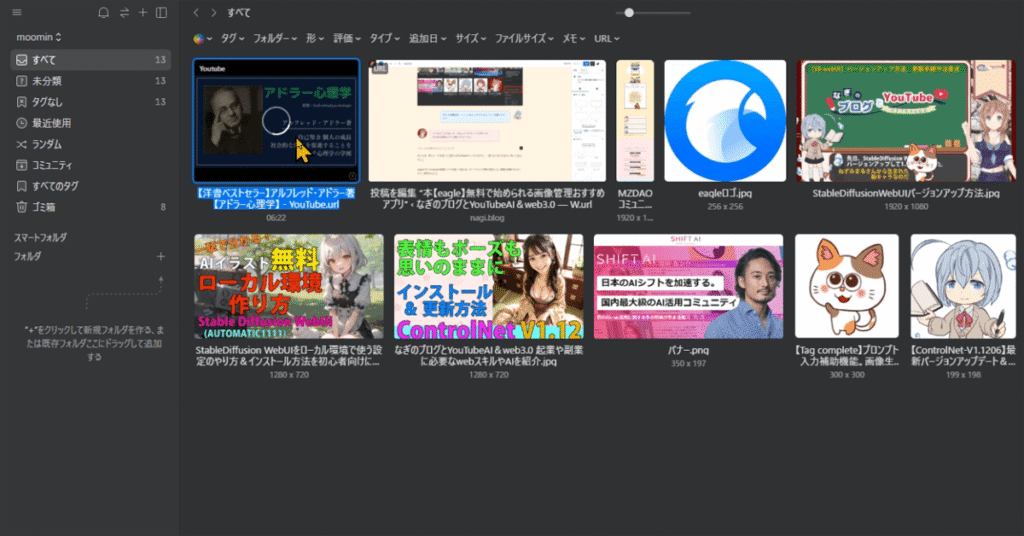
YouTubeのリンクのデータや、動画やアニメーションファイルの時は、サムネイルとか静止画だけでなく、マウスオーバーするだけでプレビュー再生もここからできます
たとえば、同じテーマを扱ってる別々のYouTubeチャンネルの動画を、テーマごとに一括でまとめておきたい時ってあるでしょ
eagleの中にYouTubeの動画リンクを置いて置けば、テーマごとに何度か見返したい動画を管理するのにすごく便利なんだよ
このツールを使うと、画像管理だけでなく、パソコンの中のいろいろなデータや、web上のデータ、最近では、AI関連のプロンプトなどの管理にも活用できるのが凄いところです
一気にたくさん出来上がってくる、画像生成AIのデータやプロンプトとかを管理できるのは、整理しやすくていいカモ
既に、eagleにビビッと来ちゃった人は、eagle公式サイトからお試しできるので触ってみてね
【eagle】おすすめな5つの便利機能
eagleには、さまざまな機能がありますが、今回は特に便利なこちらの3つの使い方と、2つの機能の紹介、合計5つを紹介させて頂きます
まずは、本記事で解説する3つの機能はコチラです
- eagleは1つの作業で、一瞬で多くの画像の保存をすることが出来ます
- 保存したデータを管理するための,便利機能が多くあります
- 対応しているデータの種類が豊富で、画像以外の、動画データや、音楽データや、各ソフトで作った保存しているデータも管理ができます
あと、2つの機能を紹介だけさせて頂きます。
- Google drive に対応しているため、他のパソコンと画像を簡単に共有することが可能です
- StableDiffusion WebUIの出力先をeagleにすることで、プロンプトなどの生成データが自動で書き込めることです
さらに詳細を、知りたい場合にはeagle公式サイトも併せてご覧ください
 みけねこまる
詳しく知りわいのだ
それでは、1つずつ実際にみていきましょう
1つの作業で、一瞬で多くの画像保存が可能
まずは、説明不要かもしれませんが、普通にフォルダとして使う事も可能です。
eagleにドラッグ&ドロップすれば、eagleのフォルダの中で管理できます
webサイトから画像を保存してみよう
今度は、webサイトから画像を保存する時の場合ですが、マウスのみで一瞬で画像を保存することが出来きます
実際にやってみますね。
こちらのweb上の画像をドラッグしますと、この様な四角のマスが現れます。
そして、ここにドロップするだけです
こちらのeagleのフォルダの中に、表示されましたよね
これは、かんたんに画像保存が出来ていいね
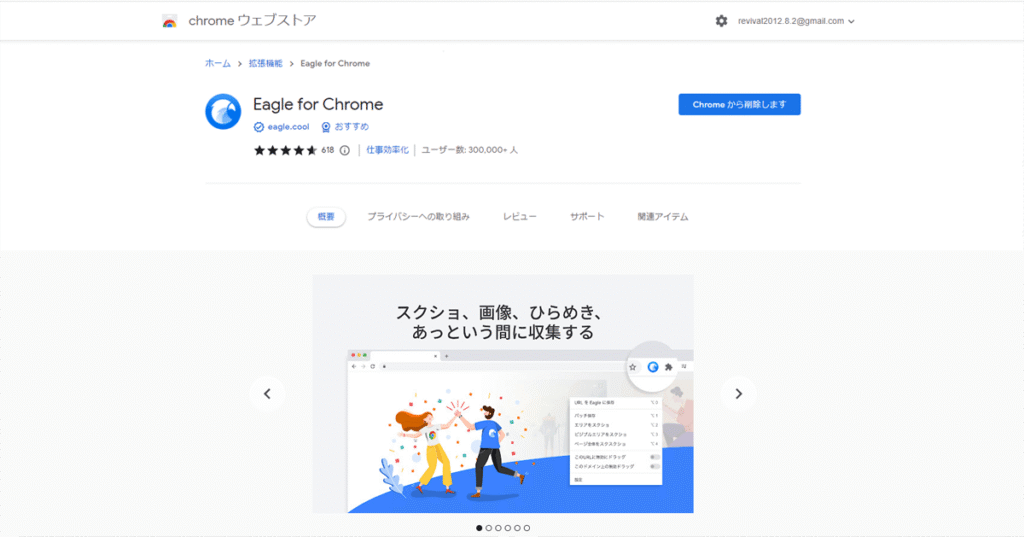
webサイトから、画像をかんたんにeagleに保存するためには、拡張機能が必要です
拡張機能は、検索すれば、すぐに拡張機能を入れるためのストアが見つかると思います。https://chrome.google.com/webstore/detail/eagle-for-chrome/lieogkinebikhdchceieedcigeafdkid
この動画の概要欄にも、リンクを載せておきますね
Chrome Edge Safari Firefox Operaに対応していますので、お好きなブラウザの拡張機能を加えてみてくださいね
eagleの拡張機能を入れると、eagleの便利機能がより便利になります
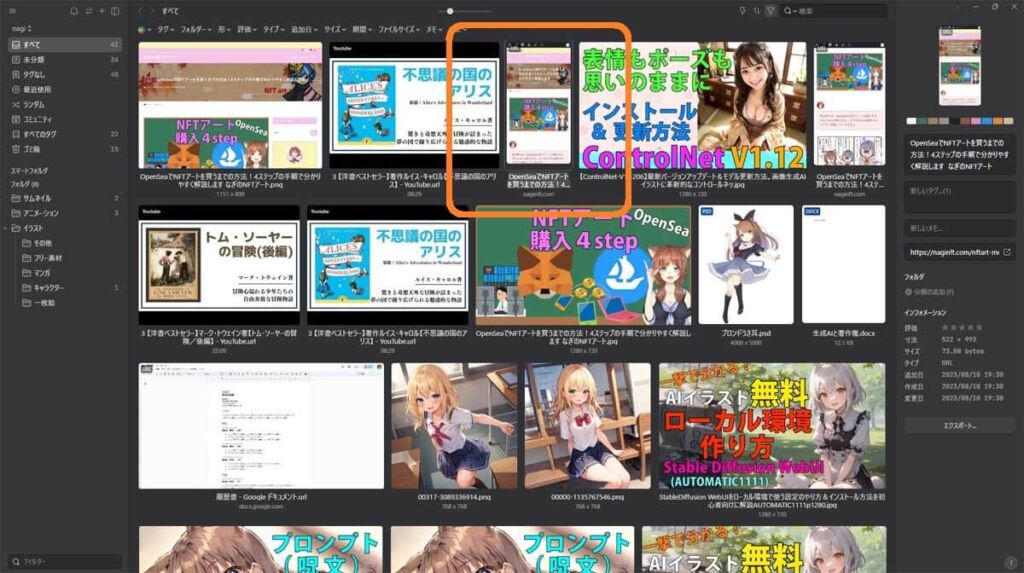
webページにある全ての画像を一括ダウンロード
保存方法には、ほかにも「webページにあるすべての画像を一括ダウンロード」するなど、いろいろ種類があります。
このサイトの画像を一括でダウンロードして、保存する方法を解説していきますね
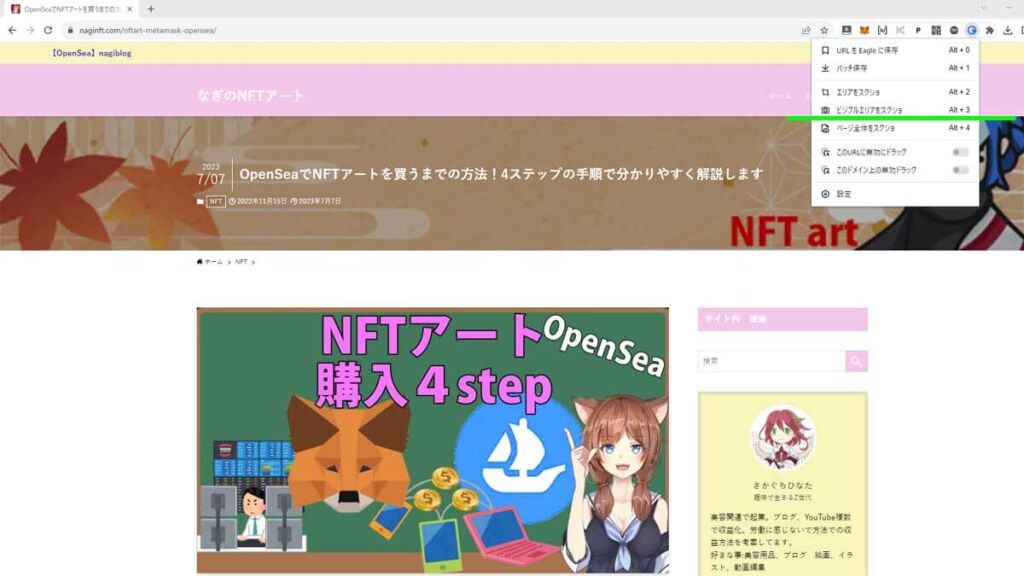
eagleの拡張機能のマークをクリックしますと、この様な表示が出ます

コチラの「バッチ保存」をクリックしますと、このwebページにある すべての画像がeagleにダウンロードされます

この中から保存したいものを選ぶか、または、上にある「すべて選択」のボタンを押すと、全ての画像が選択されます。
今回は、eagleに保存したい画像をこの様に選択していきますね
そして、下にある「インポート」のボタンを押すだけでeagleに一括で保存することが出来ます
なに、このチート過ぎる機能は
めちゃめちゃ便利過ぎる
webページをスクリーンショットしてみよう
画像のダウンロードじゃなく、現在画面に表示されている部分や、このwebページ全てのスクショを撮りたい時ってありますよね
webサイトのスクショをしたい時にも、eagleはとても便利です
表示されている部分をスクショする 「ビジュアルエリアをスクショ」
現在画面に表示されている部分をスクショしたい時には、eagleの拡張機能マークをクリックしまして、「ビジュアルエリアをスクショ」をクリックします
そうしますと、このようにeagleに保存されます
 みけねこまる
この機能は、よくある機能だけど地味に便利なのだ
webサイト全てをスクショ「ページ全体のスクショ」
webサイト全てをスクショしたい時には、eagleの拡張機能マークをクリックしまして「ページ全体のスクショ」をクリックしてください。
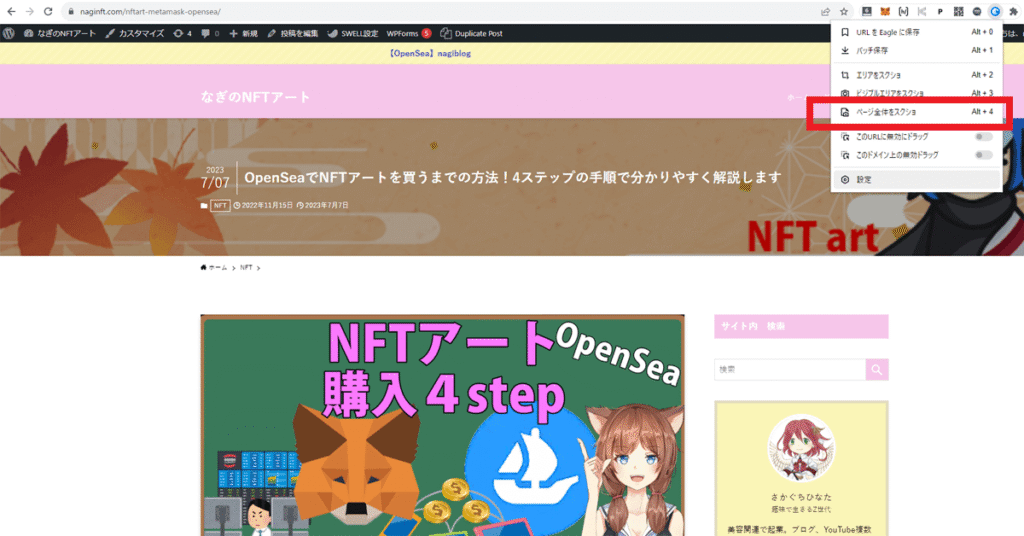
そうすると、サイトの情報量によりますが、数秒でwebページ全体のスクショが取れ、保存されます
ボタン1つでページ全体のスクショが取れるのは、とても使い勝手がいいですね
ここまで、直接フォルダに入れる方法に加え、webサイトから画像を保存する4つの方法について解説させて頂きました
- 画像1枚ずつ保存する方法
- 一括ダウンロードする方法
- 表示されているエリアのスクショ
- ページ全体のスクリーンショットで保存する方法
これだけでも、便利さは感じてもらえたのではないでしょうか?
みけねこまるすごく便利そうなのだ
URLやYouTube動画の保存ができ、プレビュー再生も可能

eagleは、ファイルや画像だけでなく、URLやYouTube動画の保存ができます
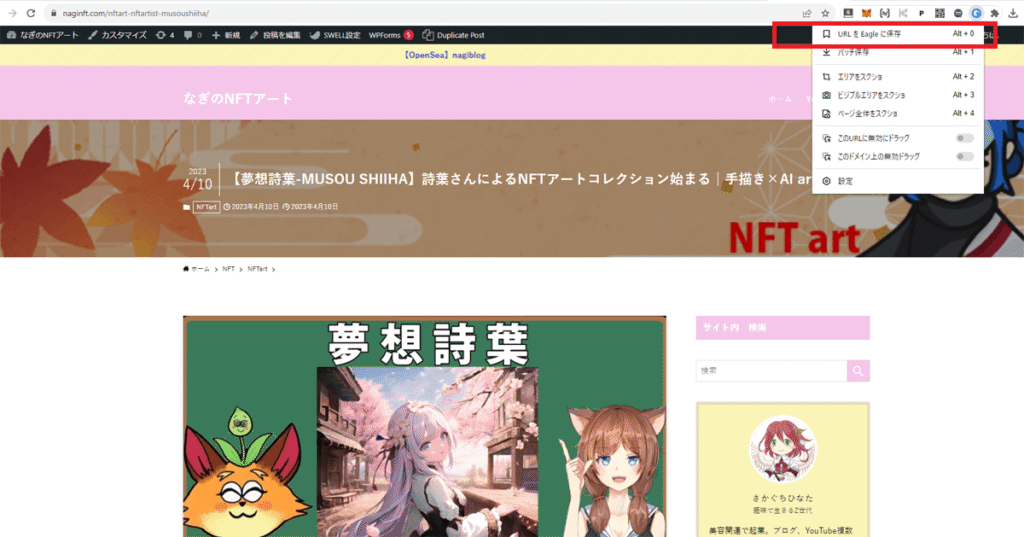
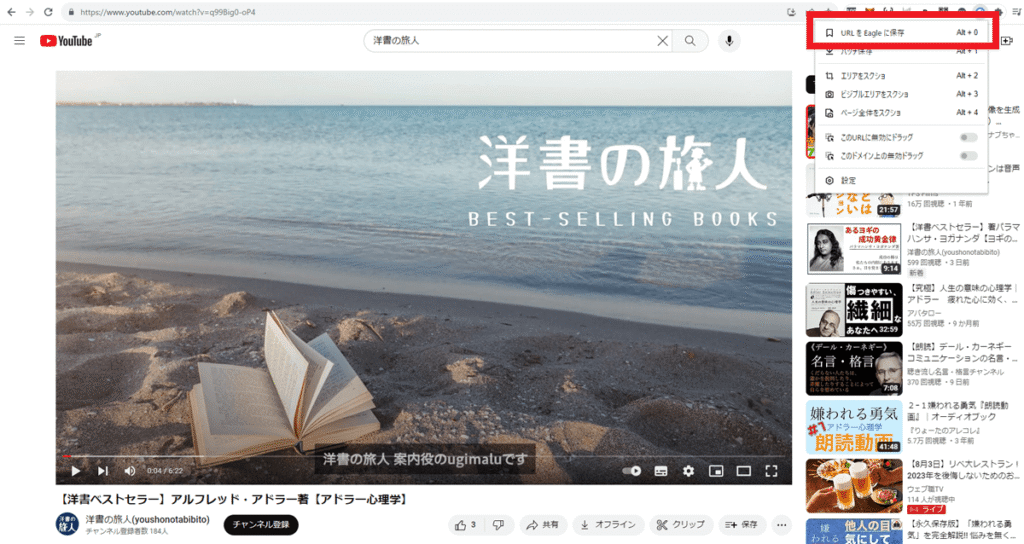
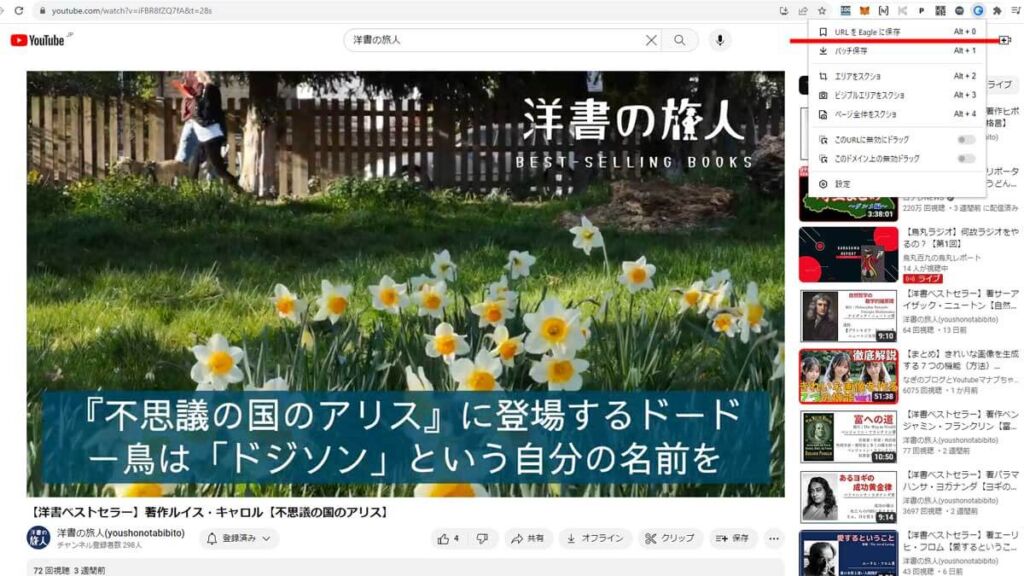
URLを保存したいページの上で、eagleの拡張機能マークをクリックします
そして、「URLをeagleに保存」をクリックします
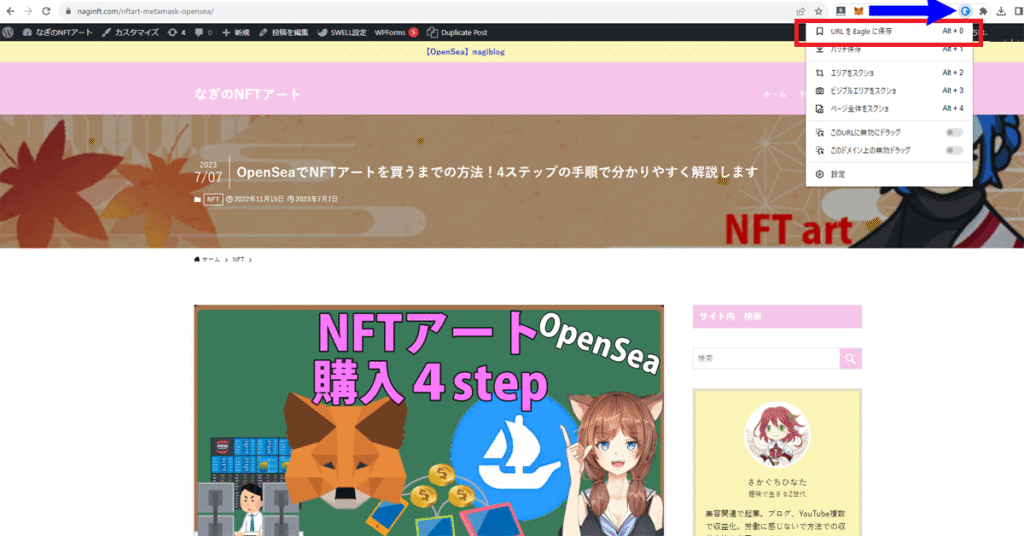
そうしますと、URLが保存されます。
ブックマークでもいいケド、目で見て分かる様に保存されていると分かりやすくていいね
サムネイルの様に保存されていますが、ダブルクリックしてプレビューすると、この様にeagleの中でwebサイトが見れます
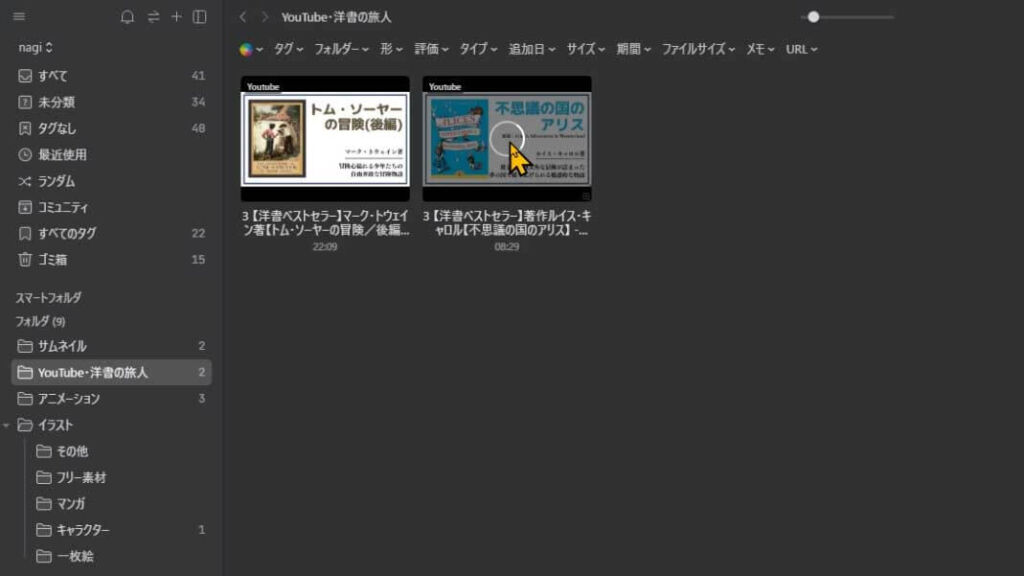
YouTubeの動画の方も、動画のURLを同じように保存が出来ます
YouTube動画のURLですと、動画の再生も行えますので、このあと説明しますが、フォルダを作って何度も見たい動画を集めておけば、自分だけの再生リストが作れますよ
ファイルや画像を管理するための便利機能
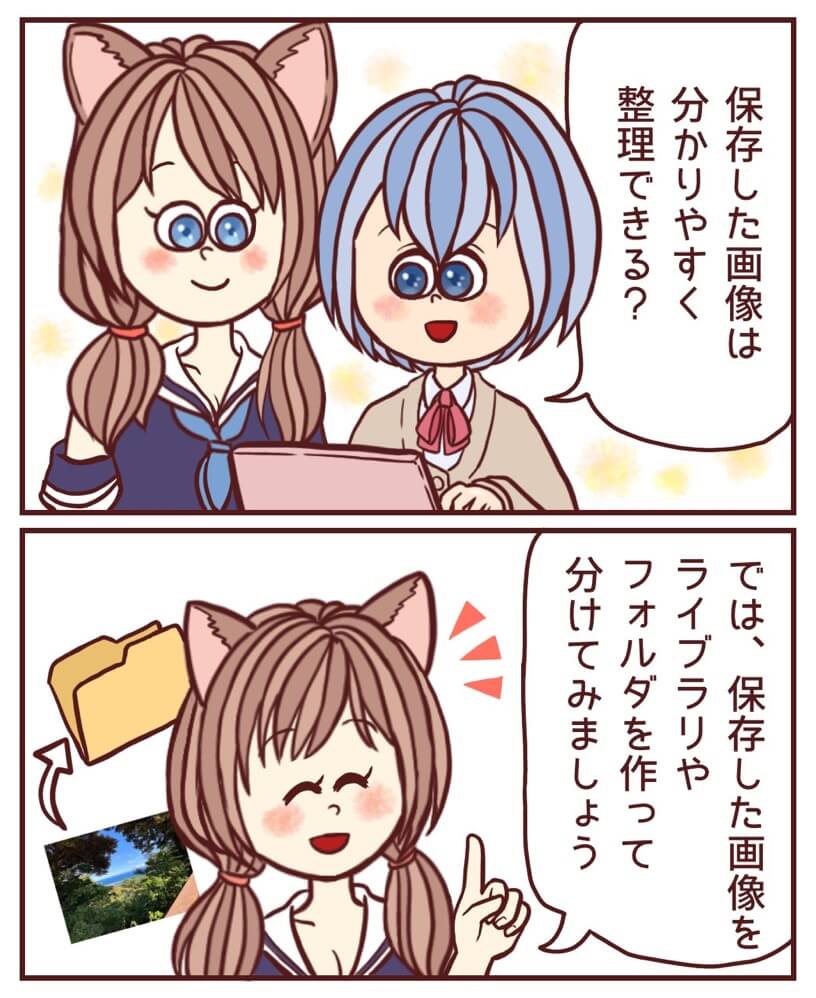
ここでは、ライブラリー機能や、フォルダデータを管理する方法をご紹介します
ライブラリーを作ってファイルを整理する方法
まずは、ライブラリ機能の解説になります
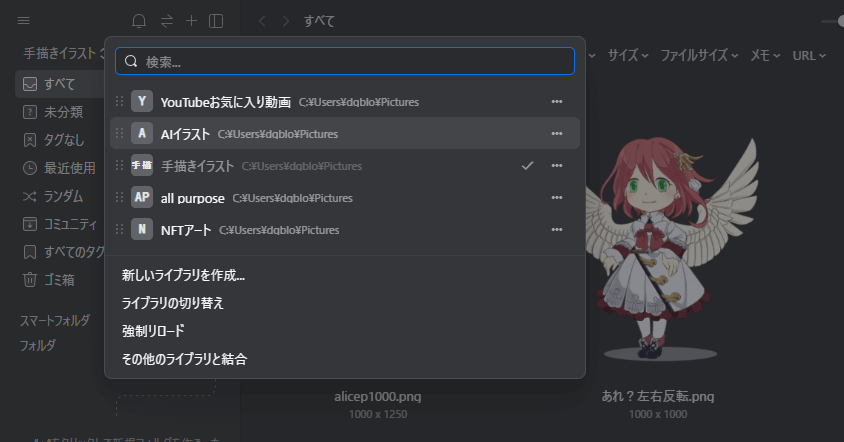
eagleは、複数のライブラリを設定することができます
そして、簡単に切り替えも可能です
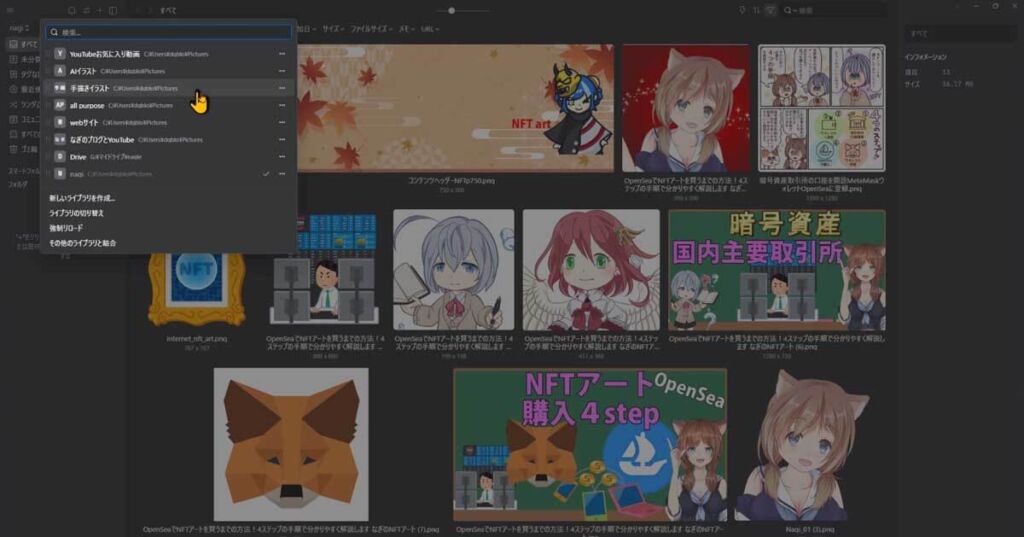
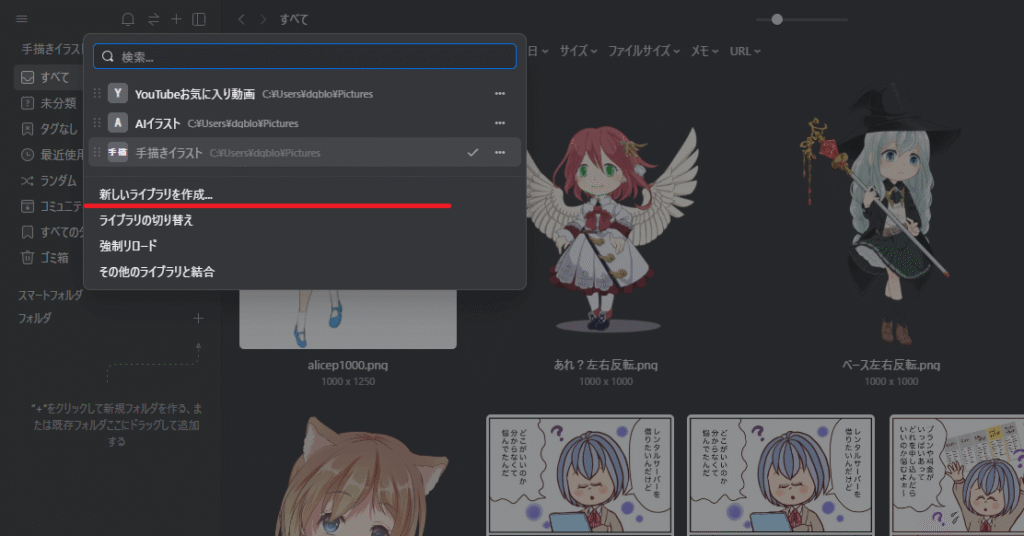
ライブラリーの切り替え
左上のタイトルと上下のマークが付いている部分をクリックしてください
ライブラリを選択出来たり、新規ライブラリーを作るためのウインドウが開きます
ライブラリを切り替えてみますね
手描きイラストのライブラリを選択してみます
そうしますと、ライブラリーが変わったので、保存されている内容も変わりましたね

例えば、画像ライブラリとか、動画ライブラリ、音声ライブラリなど、ジャンルごとにライブラリを分けておくと、使い勝手がすごくよくなりますよ
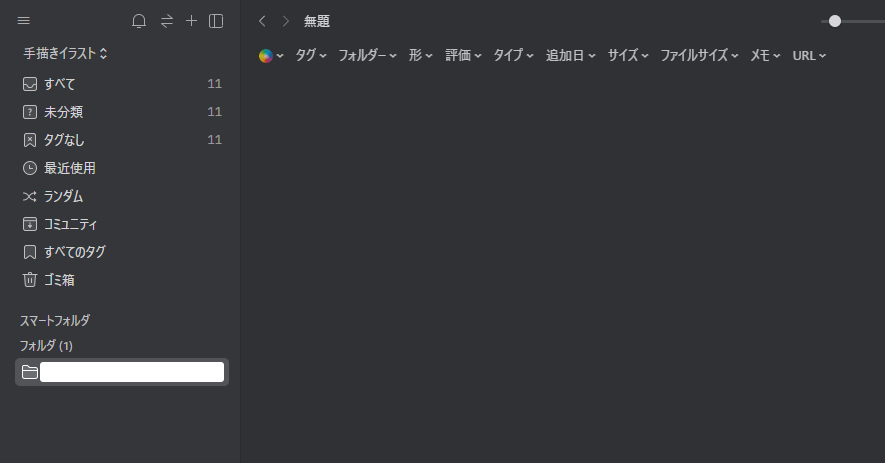
新規ライブラリーの作り方
新規ライブラリーの作り方ですが、先ほどの左上の上下矢印アイコンをクリックします
そして、新しいライブラリを作成を選びライブラリ作成を選択します
ライブラリーを作成のための、小さなウインドウが出ますので、ライブラリー名を入れましょう
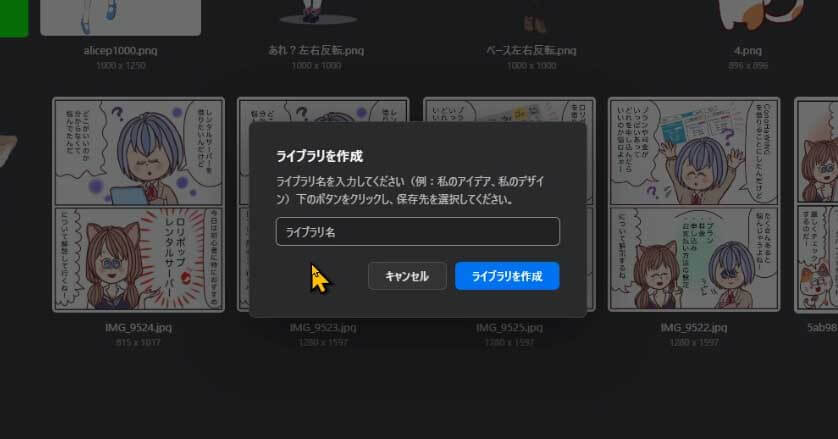
コチラに、ライブラリーの名前を「NFTアート」にして作成してみます
ライブラリー名の入力が終わりましたら、下の青いライブラリーを作成ボタンをクリック
そしてこのライブラリを保存する場所を選択します
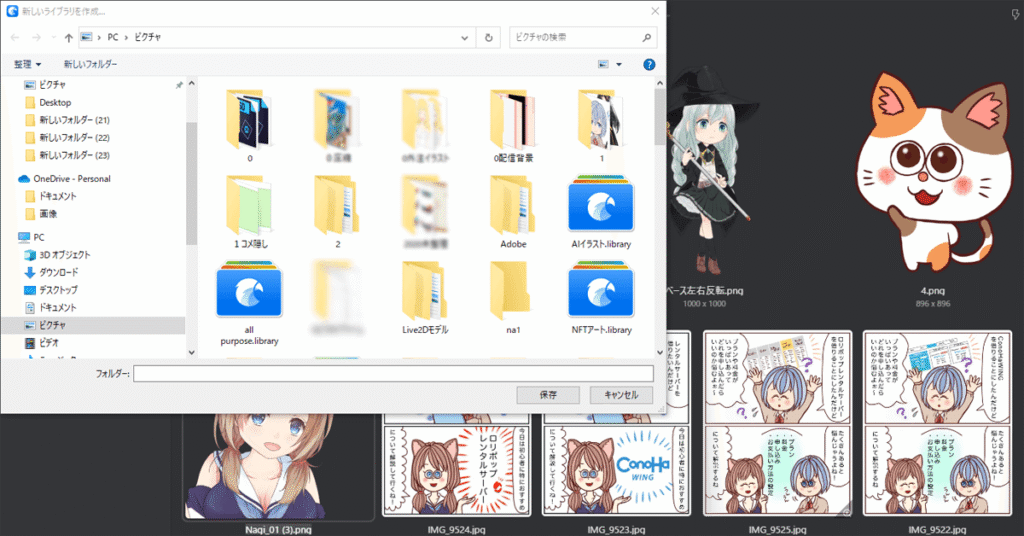
これで複数のライブラリが出来ましたので、目的に応じて切り替えることが可能になりました
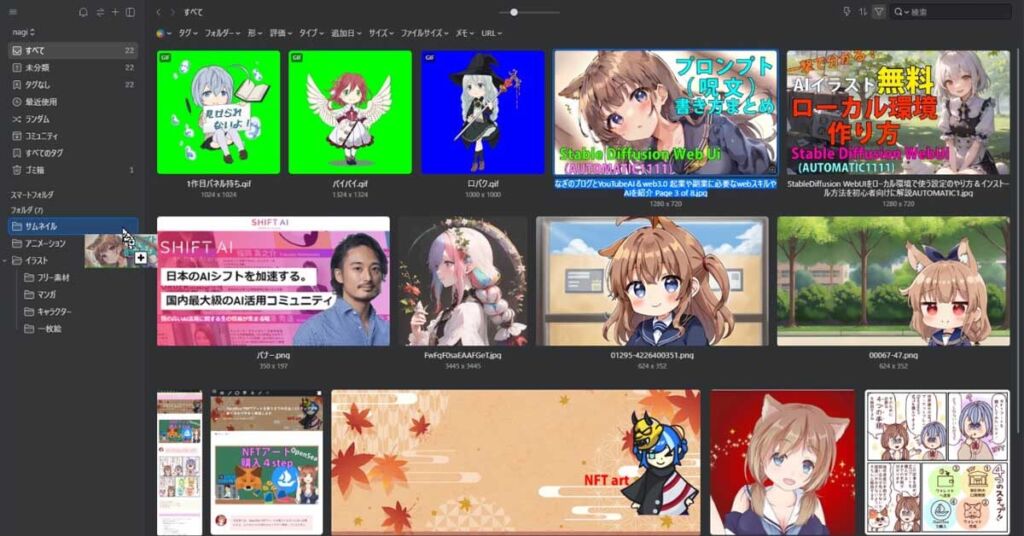
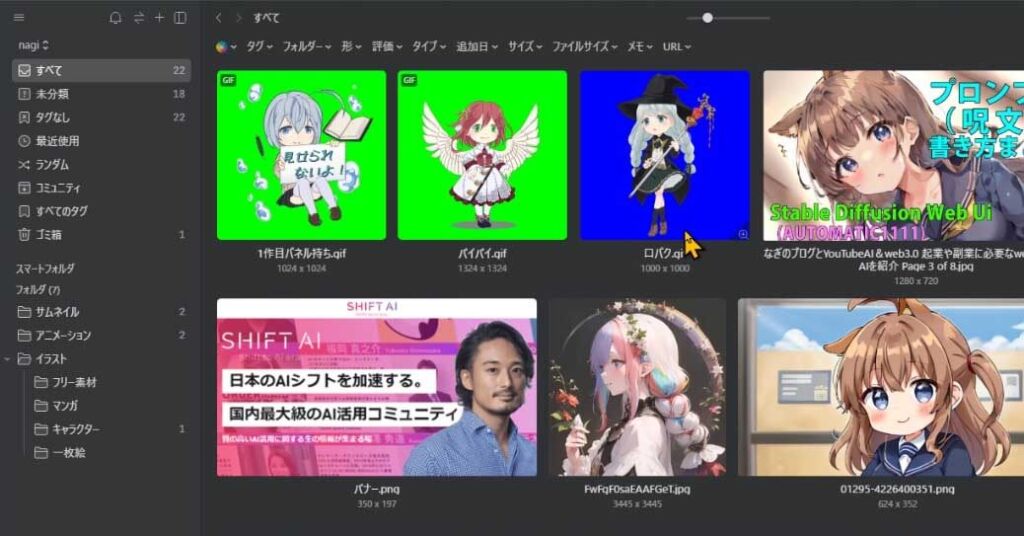
フォルダを作ってファイルを整理する方法
次は 保存したファイルや画像をフォルダに分けて整理する方法についてです
新規フォルダの作り方
イーグルの左側のメニューの、フォルダの所にある 【 + 】 ボタン押すと、新たなフォルダを作ることが出来ます
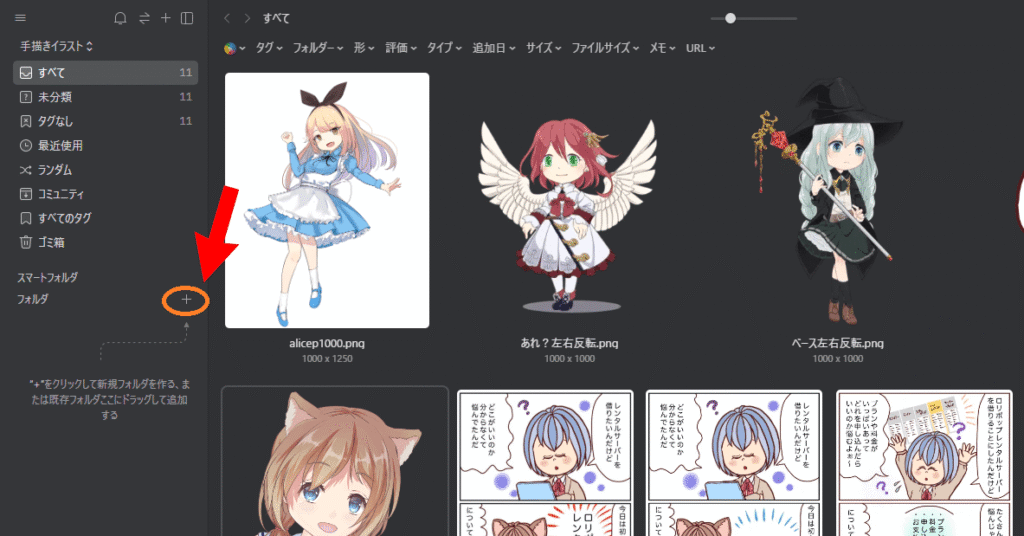
こちらをクリックして、フォルダ名をつけて、種類ごとに分けていけますよ
フォルダは、いくつでも作ることが出来ますし、階層も作って行くことが出来ます
試しに、フォルダ名を付けて、フォルダをいくつか作ってみます
サムネイルフォルダと、アニメーションフォルダ、イラストフォルダ、を作ってみました
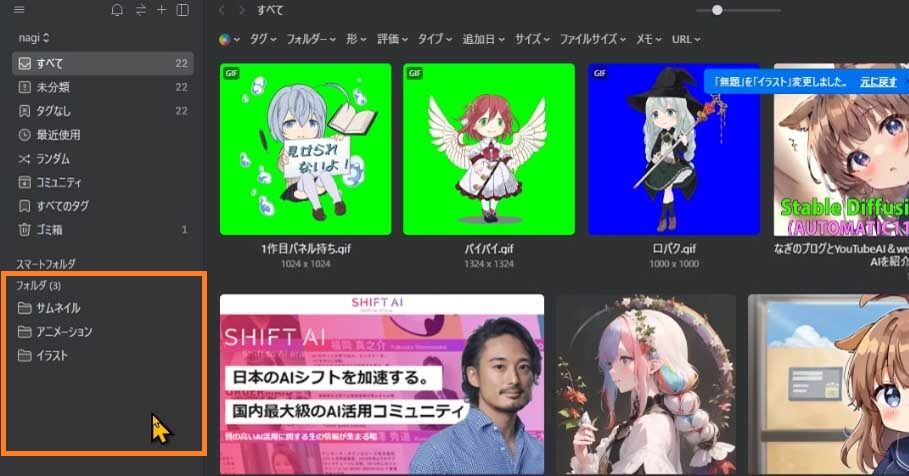
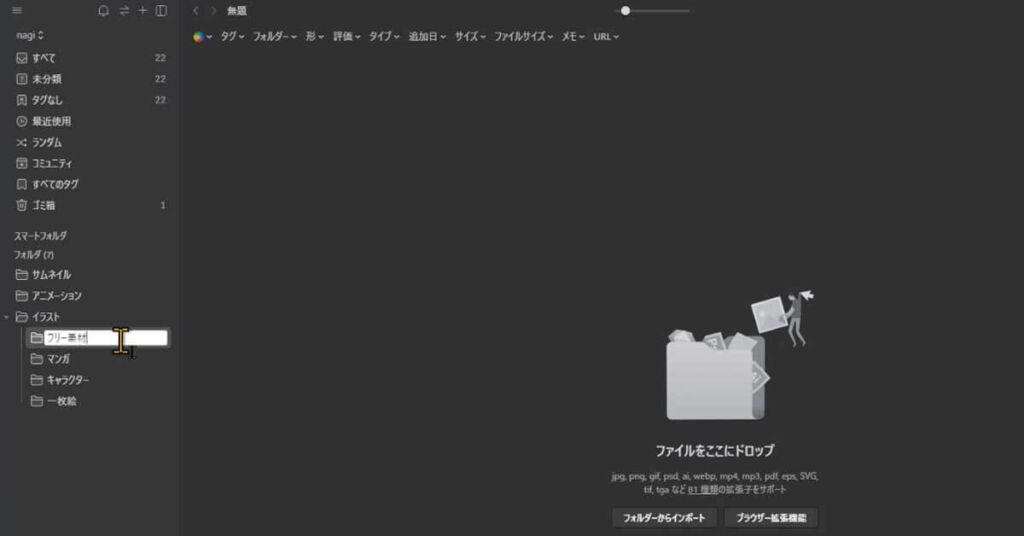
新しいサブフォルダの作り方
下の階層にもフォルダを作れるので、今作ったイラストフォルダの下に、いくつかフォルダを作ってみますね
下の階層を作りたいフォルダの上で、右クリックをしますとウインドウが開きますので、あたらしいサブフォルダ をクリックします
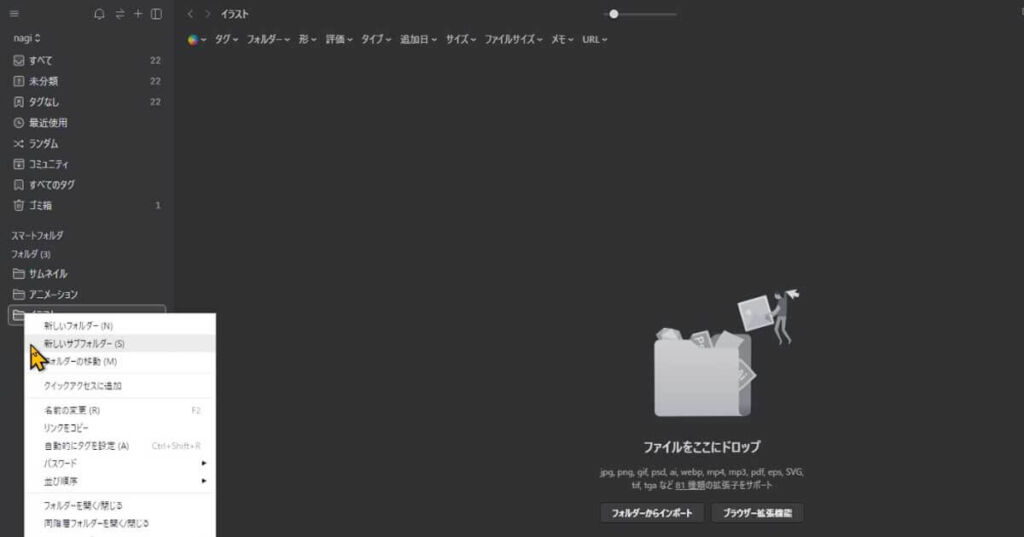
そうしますと、下の階層が作られ、フォルダ名を付けられるようになります
イラストフォルダの下の階層に
- 一枚絵
- キャラクター
- マンガ
- フリー素材
以上のフォルダを作ってみました
eagleならではの、フォルダに振り分けのメリット
ここから、画像データを各フォルダに振り分けていくのですが、eagleならではの良さがここにもあります
画像データをジャンル別に、それぞれのフォルダに入れてみます
まずは、パソコンのフォルダの様にドラック&ドロップで、こちらの画像をサムネイルフォルダに入れます
こちらの、イラストはGIFアニメーションですので、アニメーションのフォルダに入れたいところですが、キャラクターのフォルダにも入れたい気がしちゃいます
こういう時迷うよね
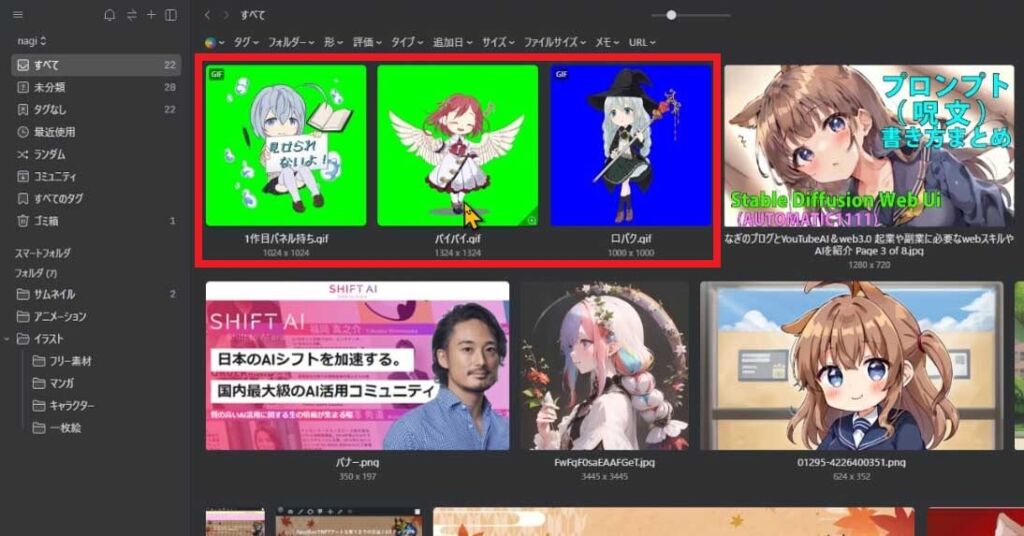
そんな時には、画像の上でFを押します
そうしますと、この様なチェックボックス付きのフォルダのウインドウが開きますので、入れたいフォルダにチェックをします
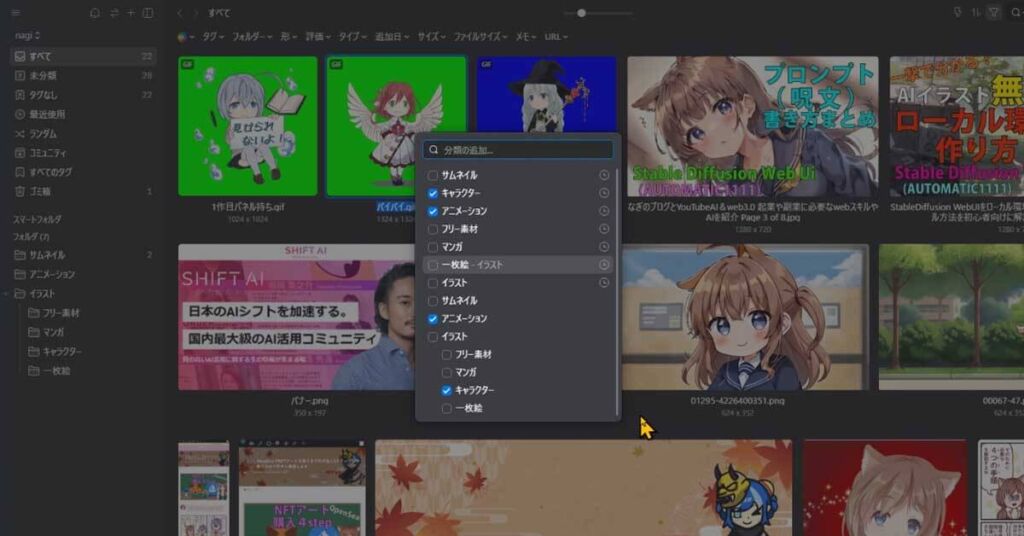
これで、2つのフォルダに画像が存在するようになります
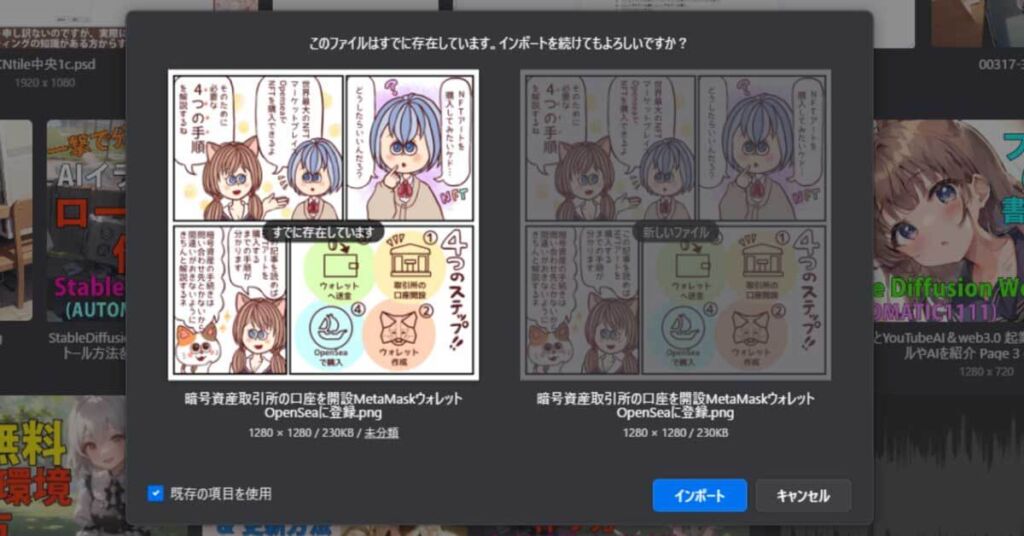
これだと、データが2つの所にコピーされただけにならないの?
パソコンのフォルダだと別のフォルダに入れると、そのような保存状態になりますが、eagleの場合はそうならないんですよ
これは1枚の画像を、それぞれのフォルダにコピーして保存しているわけではなく、オリジナルの画像を参照してフォルダ分けしている状態になります
タグのような概念なんだね
タグ機能は別にあるんだけど、イメージ的にはそんな感じだね
eagle内に同じ画像がいろんな場所に保存されてしまうのを防げますよ
ちなみに、同じ画像を保存しようとすると、この様な画面が出まして、教えてくれます
フォルダから画像の削除
間違って、目的じゃないフォルダに入れてしまった場合には、ドラック&ドロップでゴミ箱にいれます。
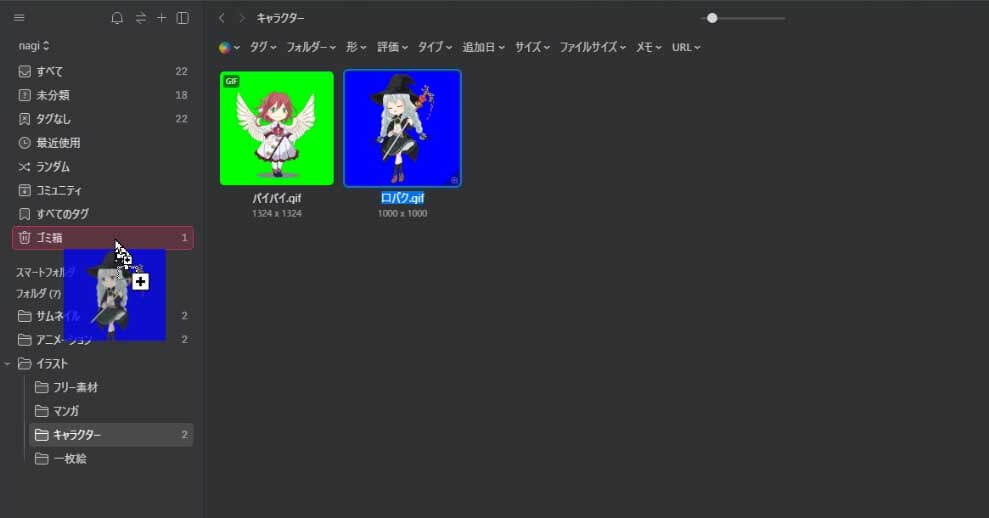
この際に、現在のフォルダから削除をするのか、データを削除するか選べますので、現在のフォルダから削除する を選択して、削除の確認ボタンを押せば、フォルダからなくなります
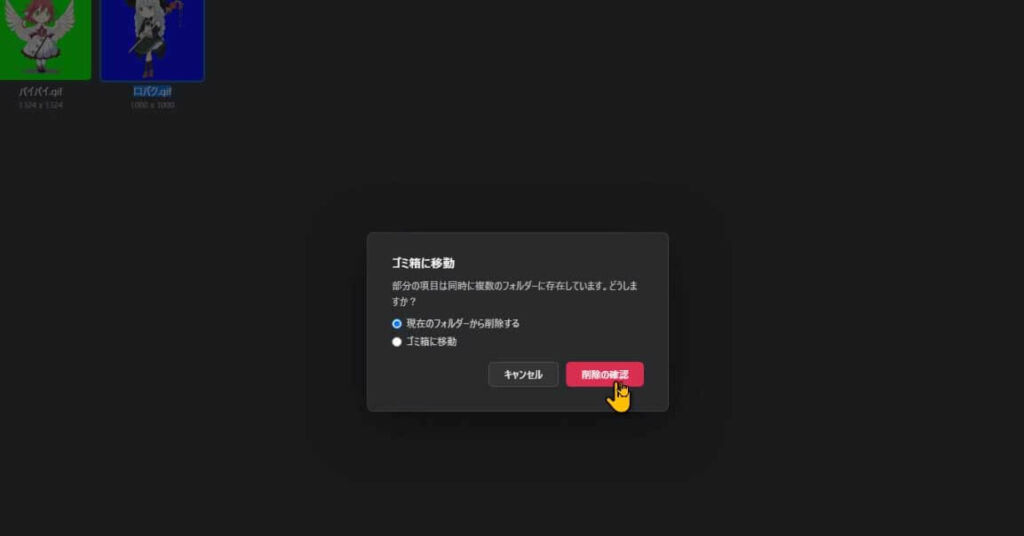
ですが、データは消えていませんので安心してね
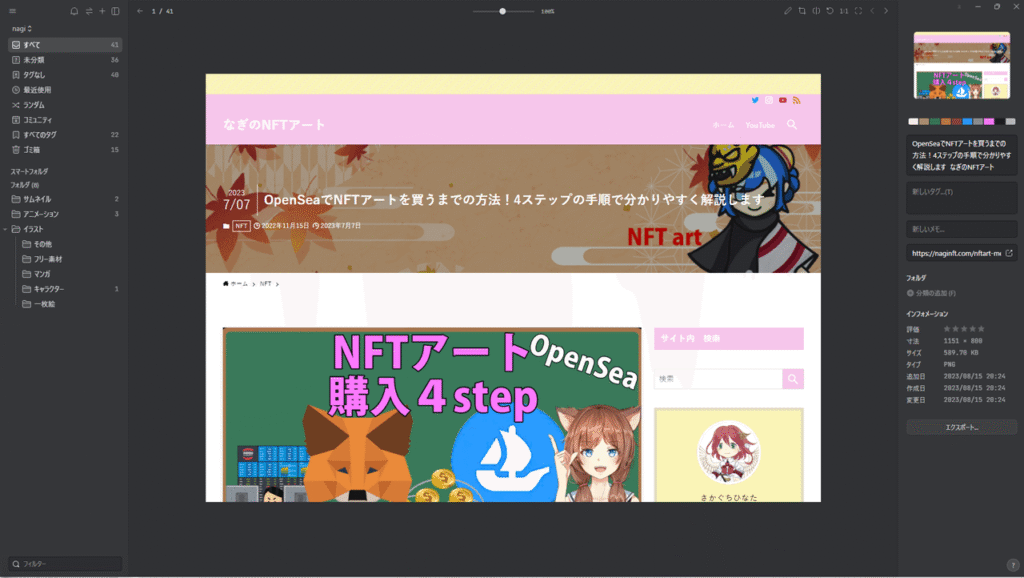
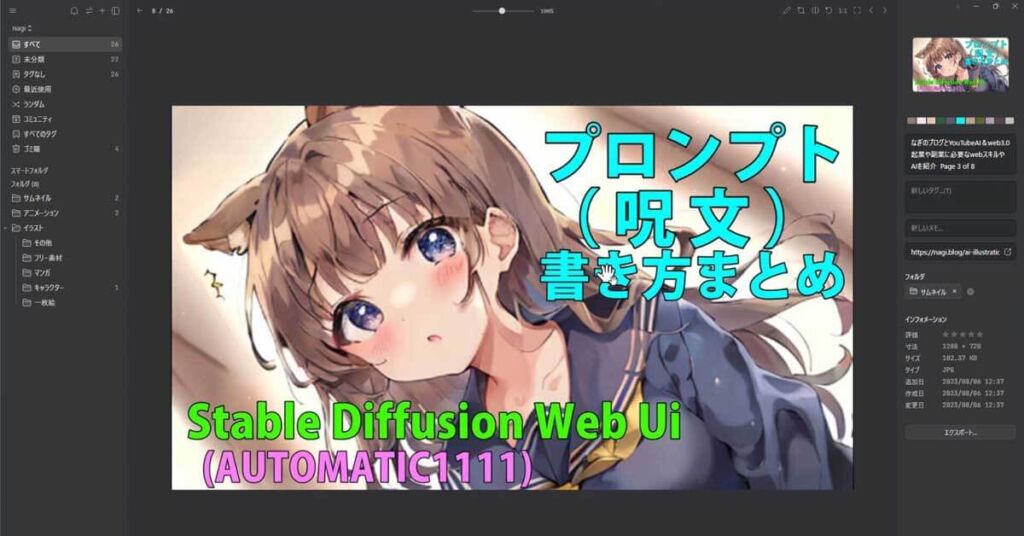
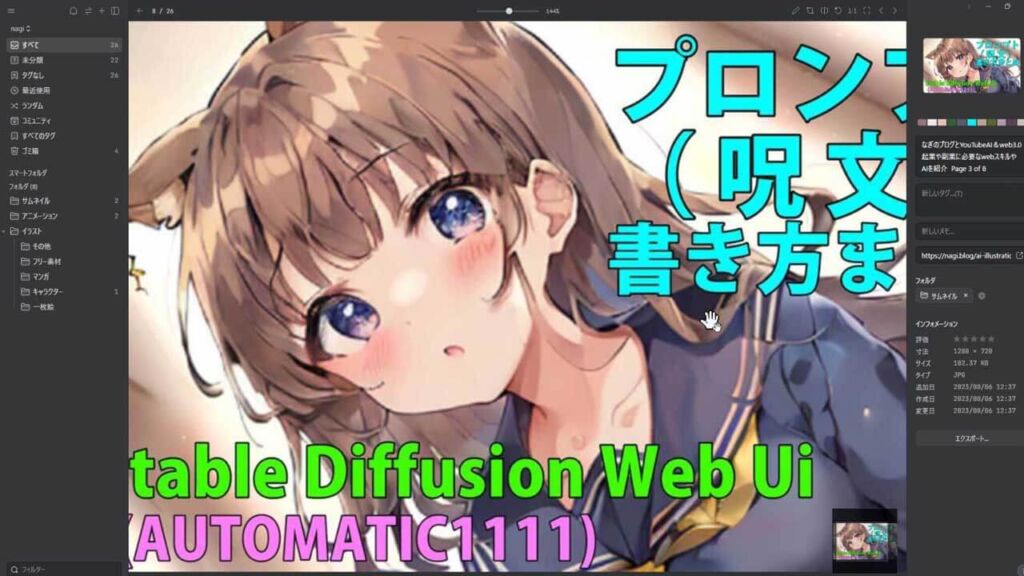
ファイルや画像データのプレビュー機能

それでは、eagleに保存した画像をプレビューしてみましょう
プレビュー方法
プレビューは、見たいファイルや 画像を選択して、ダブルクリックか、キーボードのスペースキーを押します
そうすると拡大表示されます
アニメーションのファイルだと、マウスオーバーしただけで、アニメーションの再生もしてくれるんだね
そうですね、GIFアニメーションのファイルだけでなく、音楽ファイルもマウスオーバーした時に再生が始まります
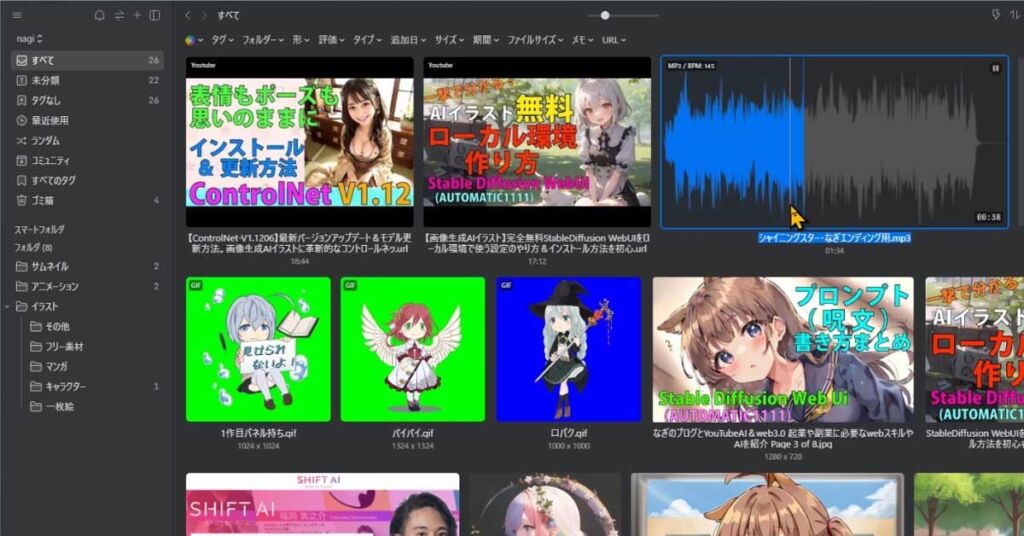
また、YouTubeのリンクを保存しておくと、YouTubeのプレビュー再生も行えますよ
拡大表示した時には、マウスのホイールで画像の拡大表示や、スクロールすることも出来ますよ
プレビュー時に拡大やスクロールができない
あれ?わたしの環境では、マウスホイールで拡大もスクロールも出来ないんだけど
もしかするとですが、グラフィックボードが入っているパソコンですと、上手く拡大縮小表示が出来ない事があるかもしれません。
そんな時には、左上の3本線の所をクリックしますと、eagleの機能の設定を行えます
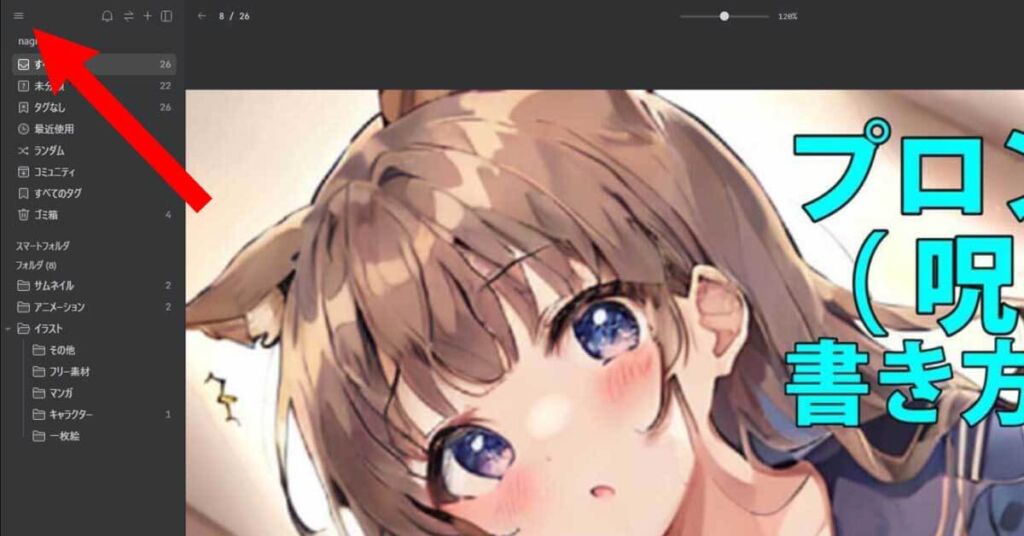
そして、より詳細な環境設定を行うためには、この項目の中にある環境設定で行うことが出来ます
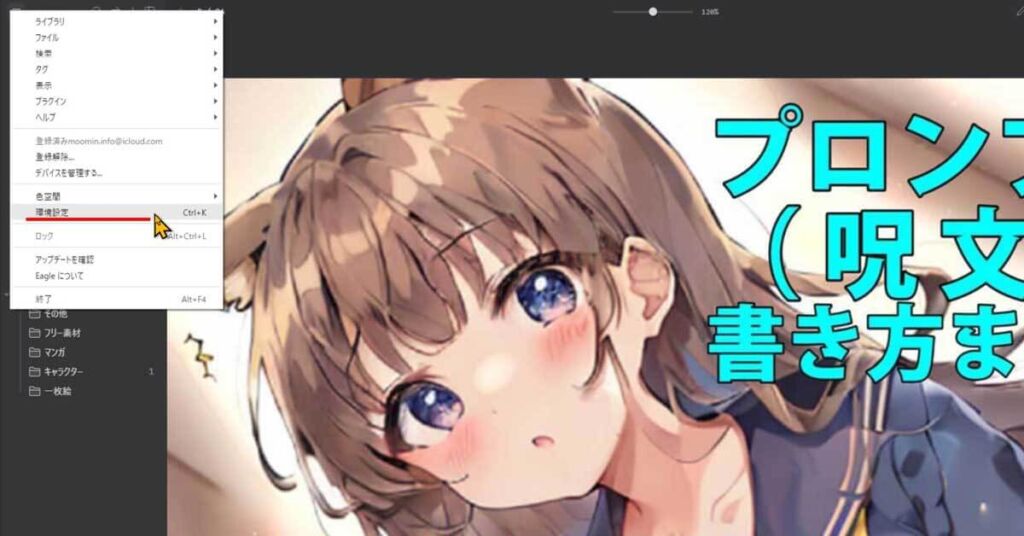
このなかの、よく使うの項目の中にGPUアクセラレーションという項目があるのはお判りでしょうか?
コチラにチェックが入っていると、上手く動かない事がありますのでチェックを外してください
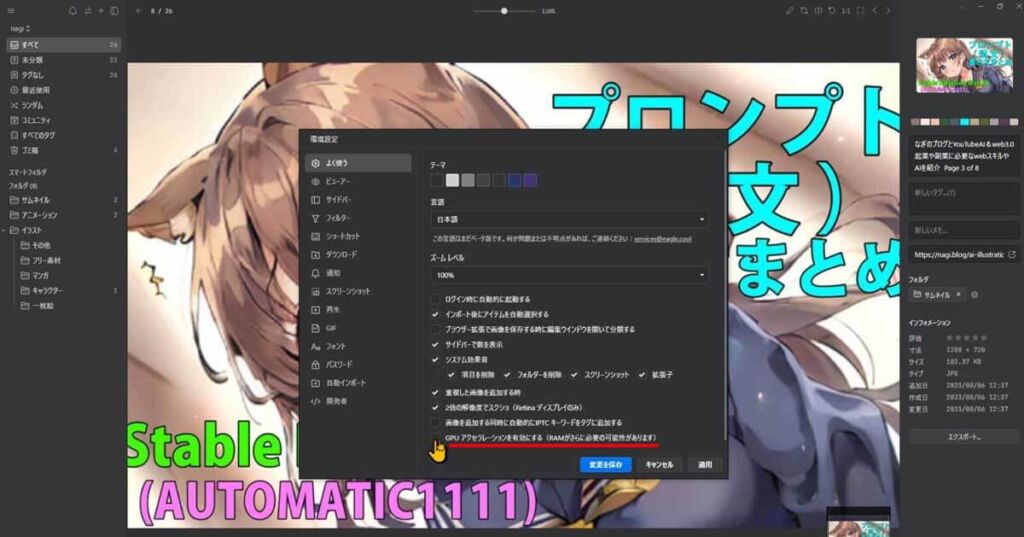
それで、再起動しますと、拡大縮小表示が出来る様になると思います
あ、本当だ。動くようになったよ
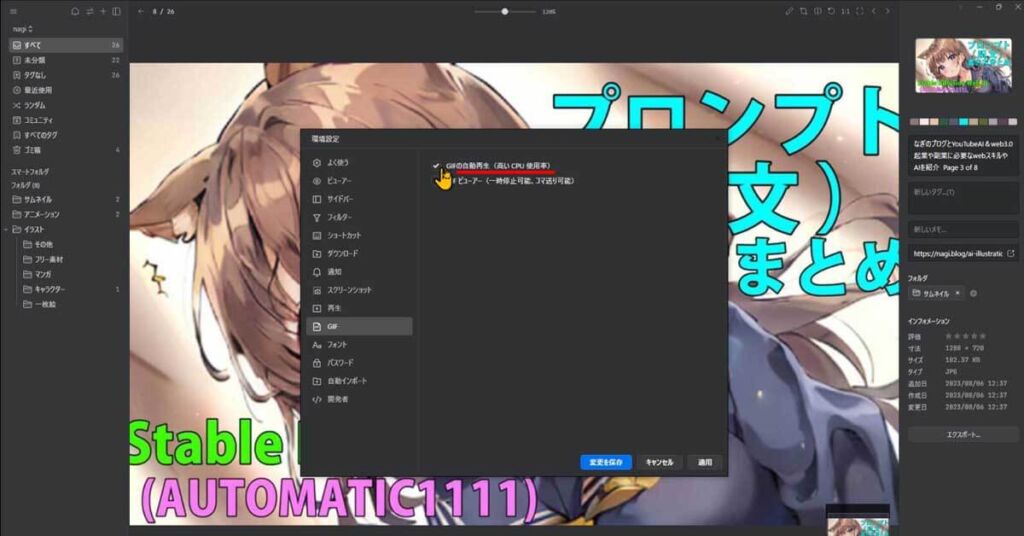
アニメーションのプレビュー
ちなみに、先ほどの左上の3本線からメニューを開き、環境設定を開いて頂いて、GIFの項目の、コチラの「GIFの自動再生」項目にチェックを入れますと、マウスオーバーなしでも常にアニメーションするようにできます。
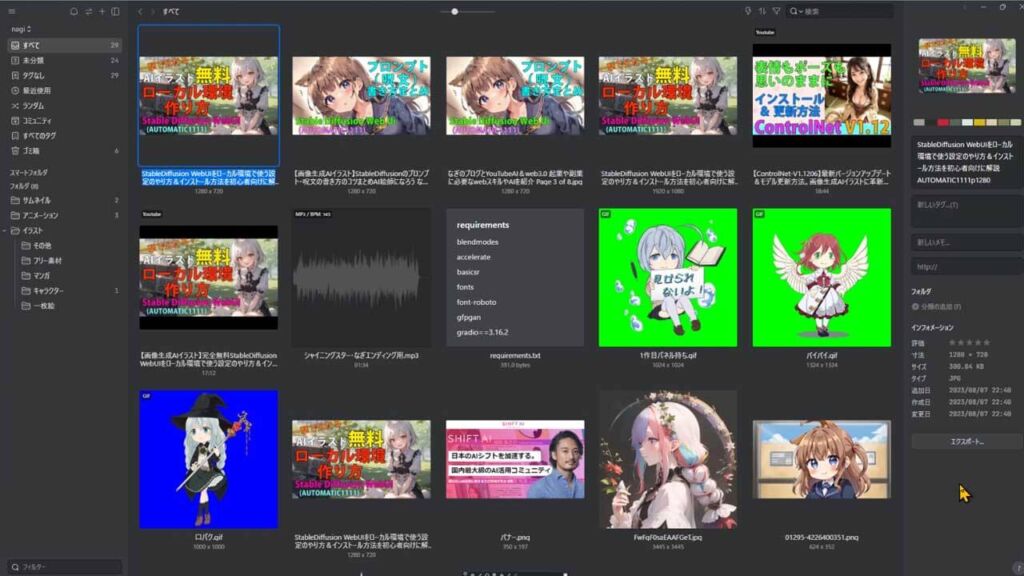
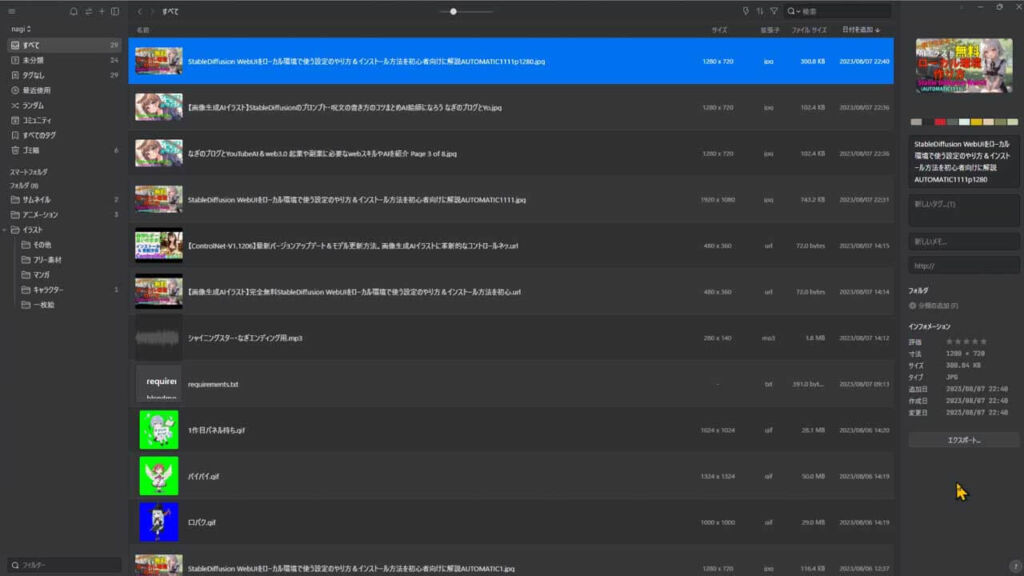
表示方法を変えてみよう

現在この様に表示されている画面の表示方法ですが、別のアイコンの表示方法や、リスト表示に変えることが出来ます
eagleでは、表示方法が4種類用意されていまして、ALTキーと 数字の1,2,3,4のどれかの同時押しをすると表示の形式が変わります
【ALTキー + 1】の表示
横幅が統一された長さで表示
縦に長い画像が見やすく反家されています
【ALTキー + 2】の表示
デフォルトの表示
元のサイズを縮小表示されたようなスタイル
【ALTキー + 3】の表示
パソコンのフォルダにある正方形の表示
【ALTキー + 4】の表示
リストと詳細の表示
お好きな形式で、表示してみてくださいね
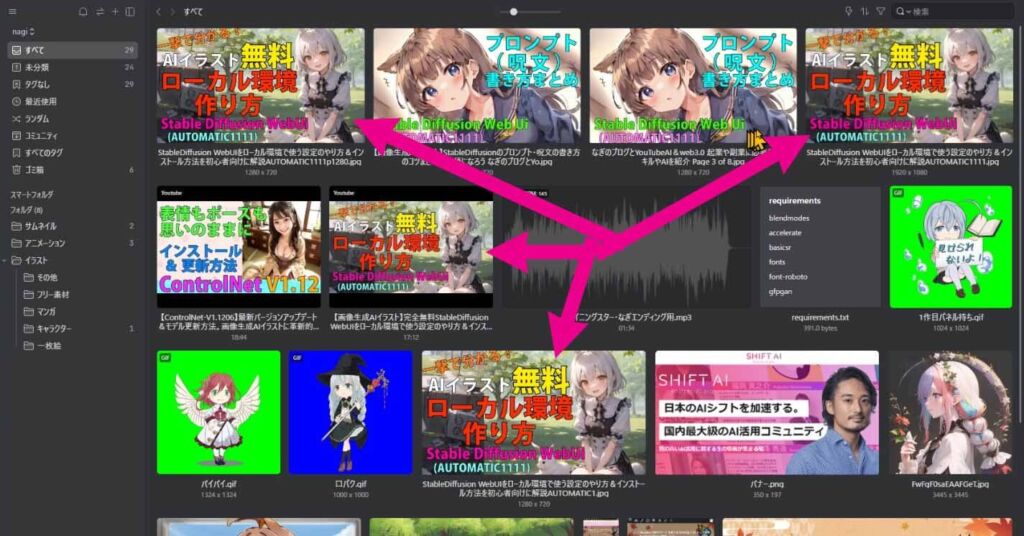
検索機能で、ファイルや画像を探してみよう
eagleの豊富な検索機能
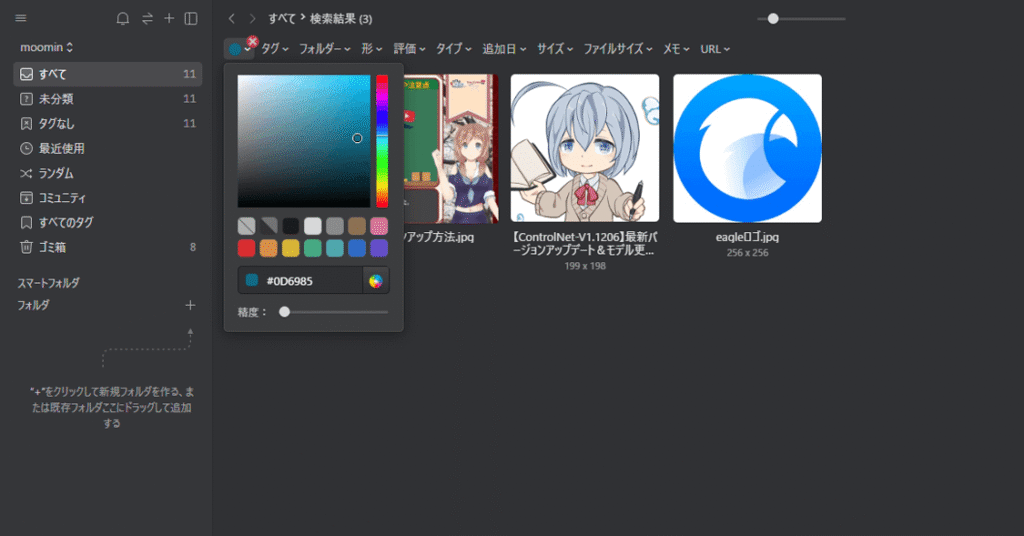
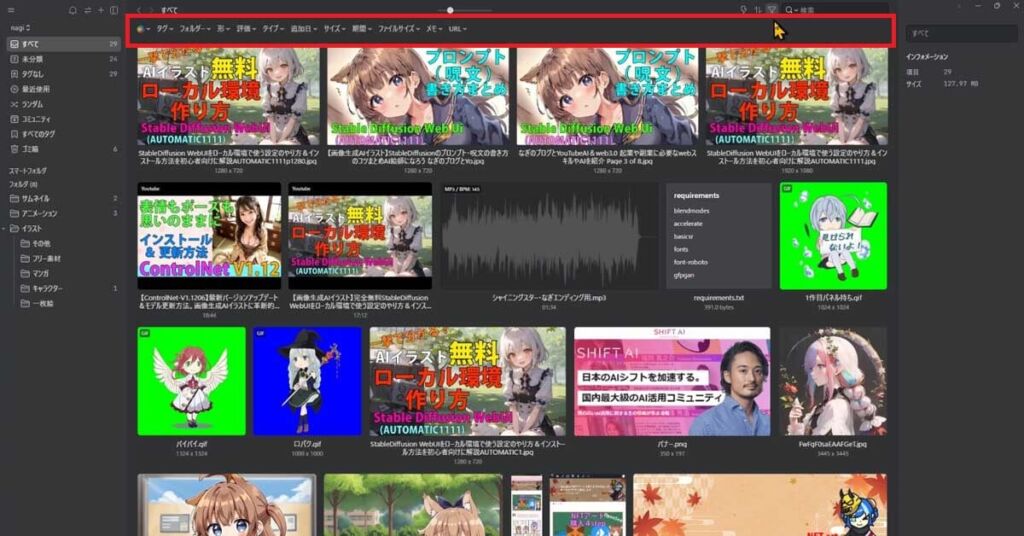
まず、画面右上の方のヘッダーメニューの中にある、こちらのロートみたいなフィルターのアイコンをクリックしてね
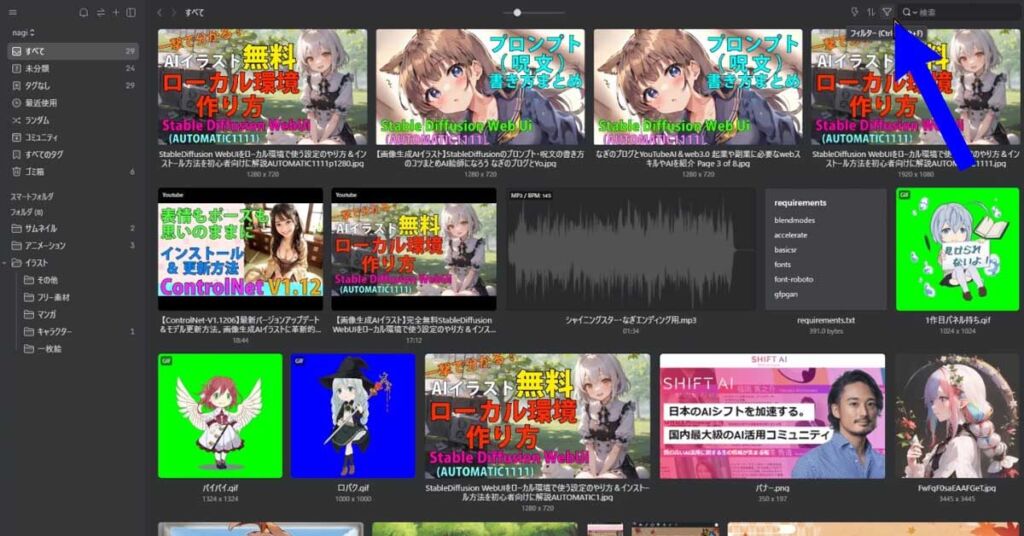
メニューの表示が、一行追加されました
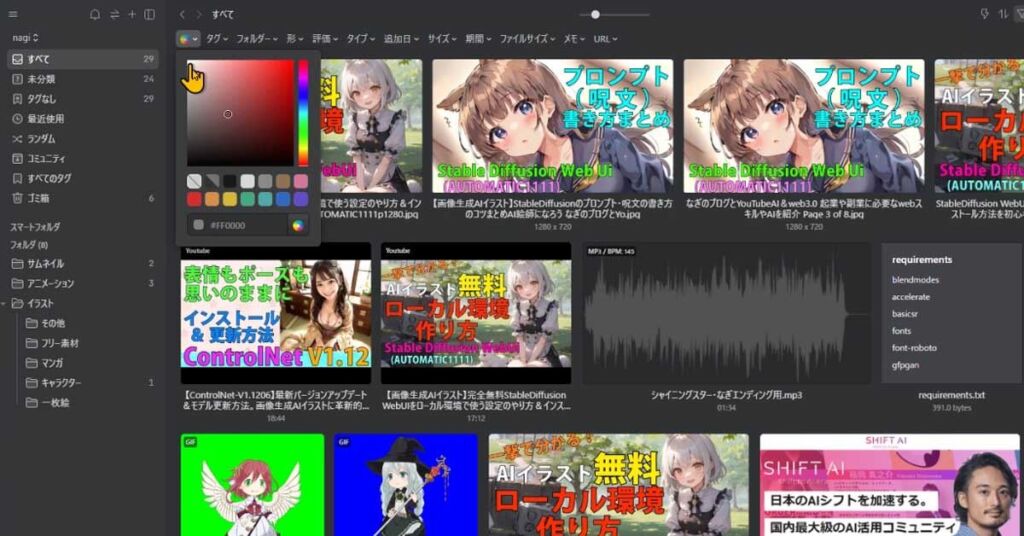
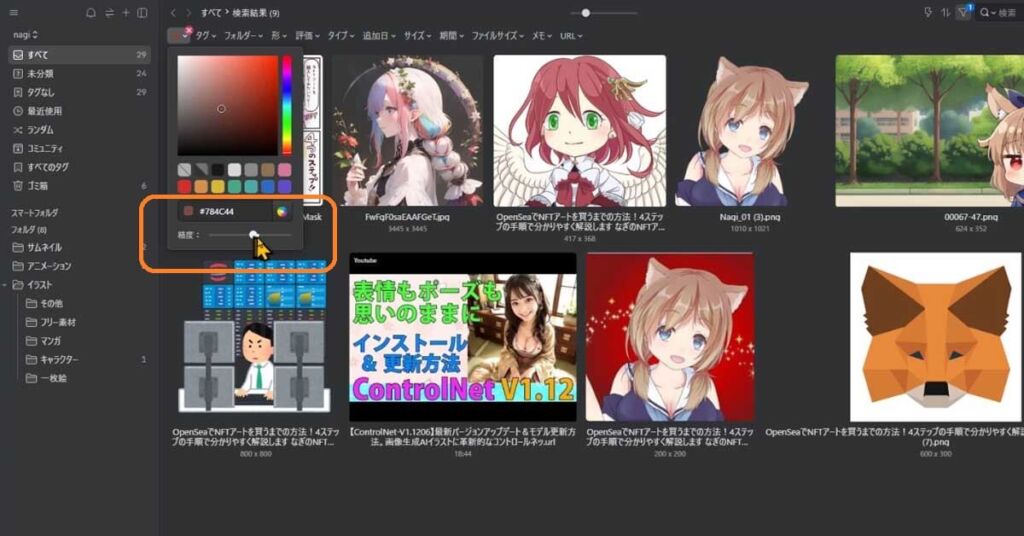
一番左にある、カラーボールの様なアイコンをクリックしますと、色を選択するようなウインドウが出ます
ここで、色を指定すると、指定された色が使われている画像を検索してリストアップしてくれます
ファイル名や、タグなどなくても検索できちゃうんだね
みけねこまるこれは画期的なのだ
下の、バーになっている所は、色の精度になっていまして、左にすると制度が甘くなり広範囲の画像を検索結果に表示され、右にすると制度が高まりより絞られる感じになっています
カラーでフィルターをかけられるって便利だね
みけねこまるよくどこにしまったのか、忘れちゃうのだ
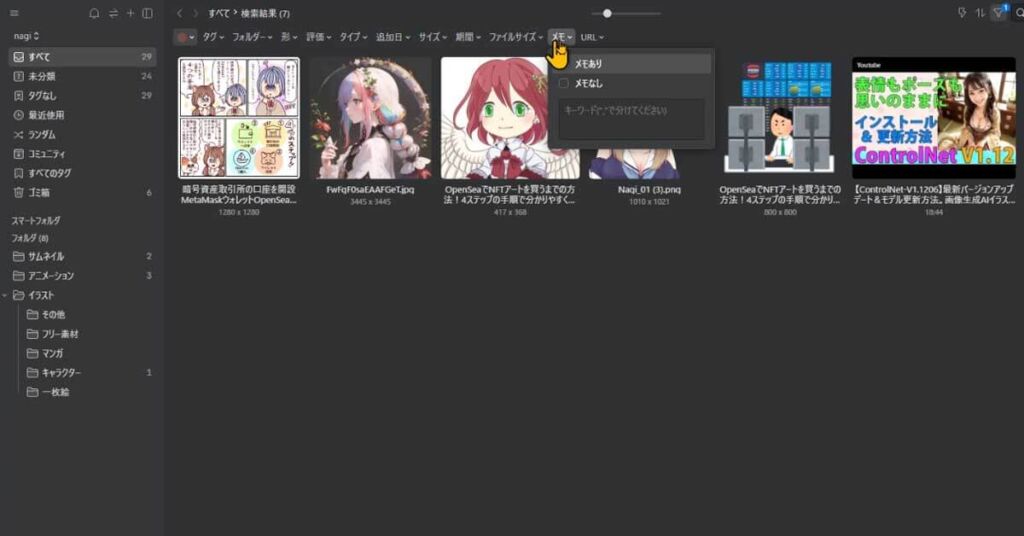
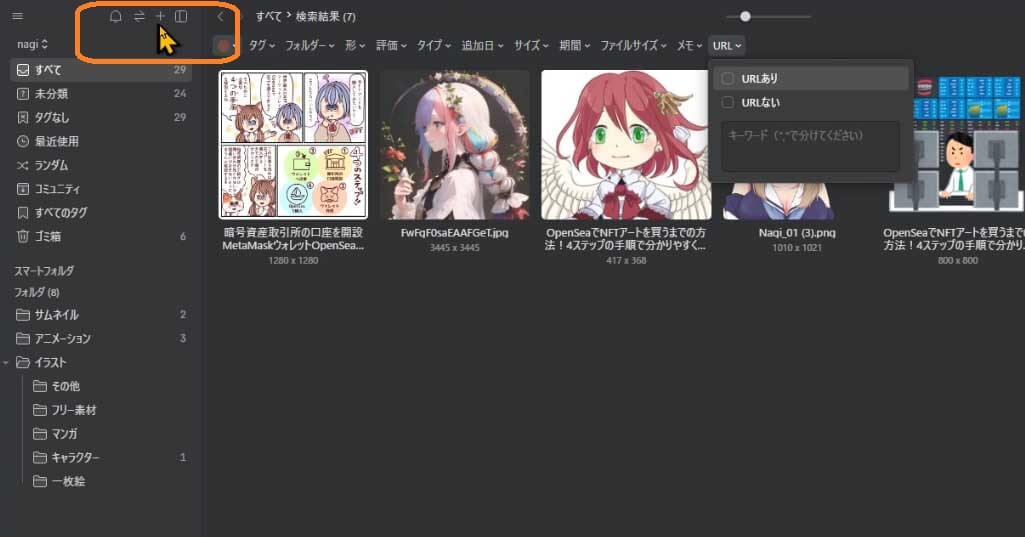
もちろん、タグや、フォルダ、ファイルのタイプなどからも探すことが出来ます
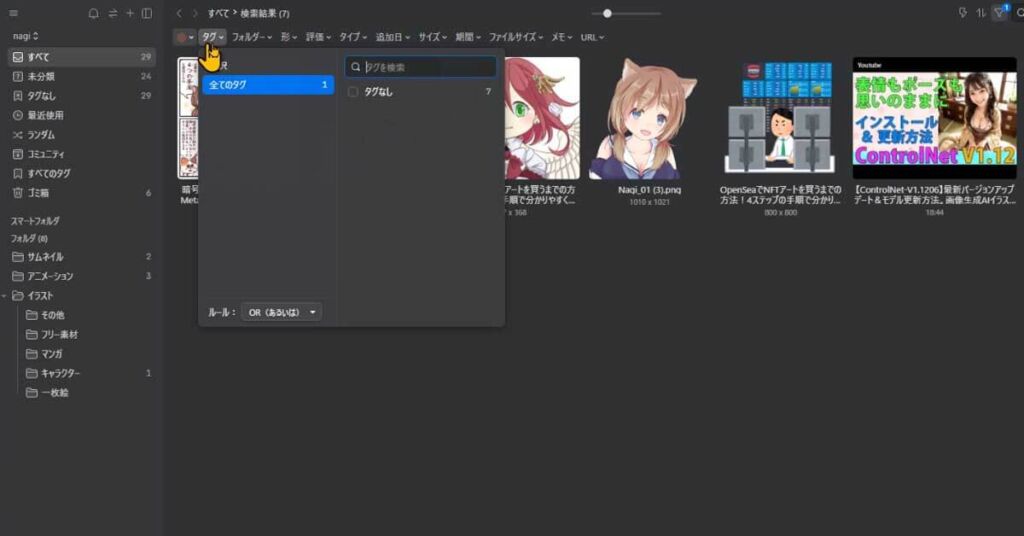
そのにのも、画像の形状や、評価、画像の情報にメモやURLが含んでいるか?などから検索をかけることが出来ますよ
重複するファイルを検出
また、重複するファイルを手動で、探すことも出来ます
ヘッダーにある【 + 】を押すと、ウインドウが開きます
このウインドウのなかに「重複ファイルを検索」があります
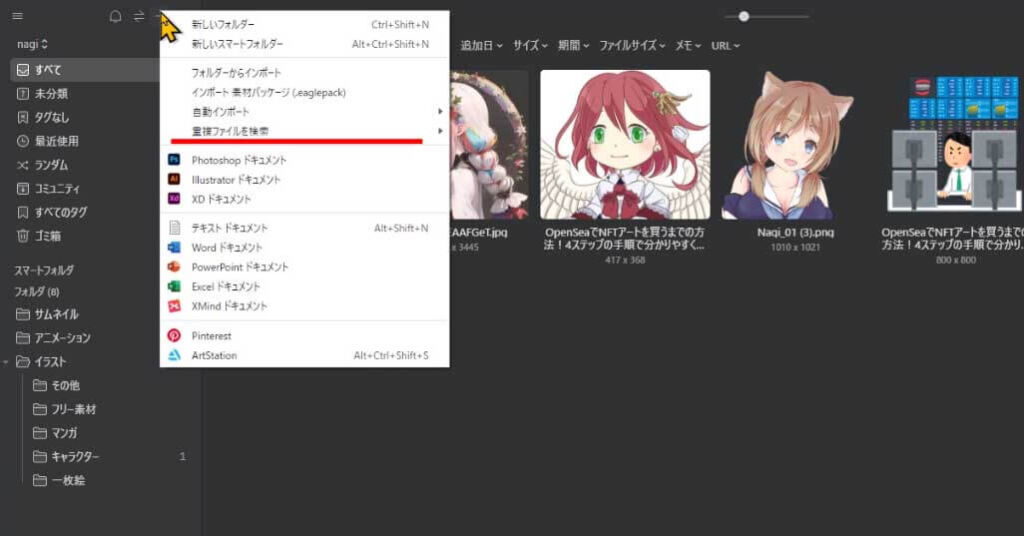
「すべてを検索」を選択すると、重複しているデータがあった際には表示してくれますよ
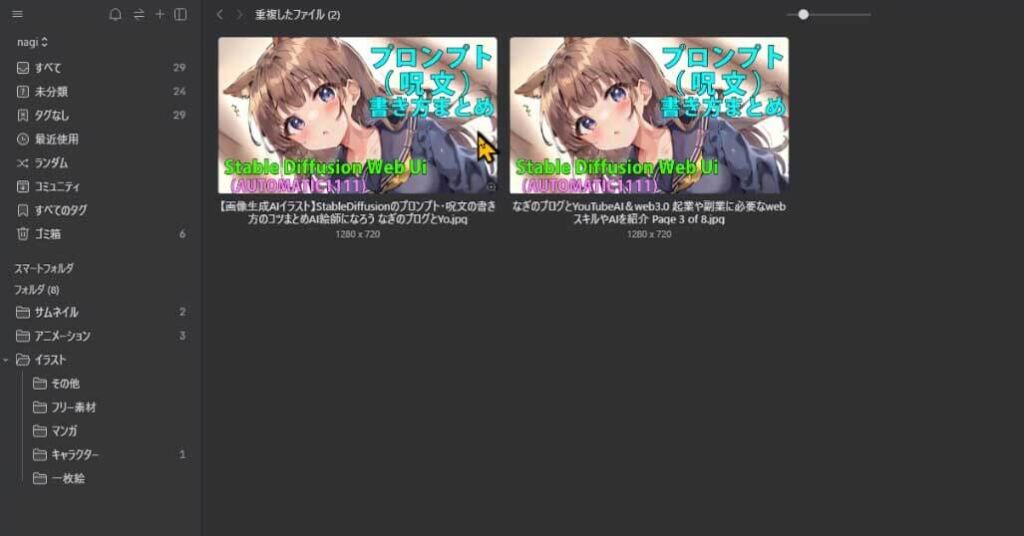
ちなみに、この様に同じ画像であっても、ファイルの名前やサイズが変わると同じものではなくそれぞれの画像データとして処理されているようですね
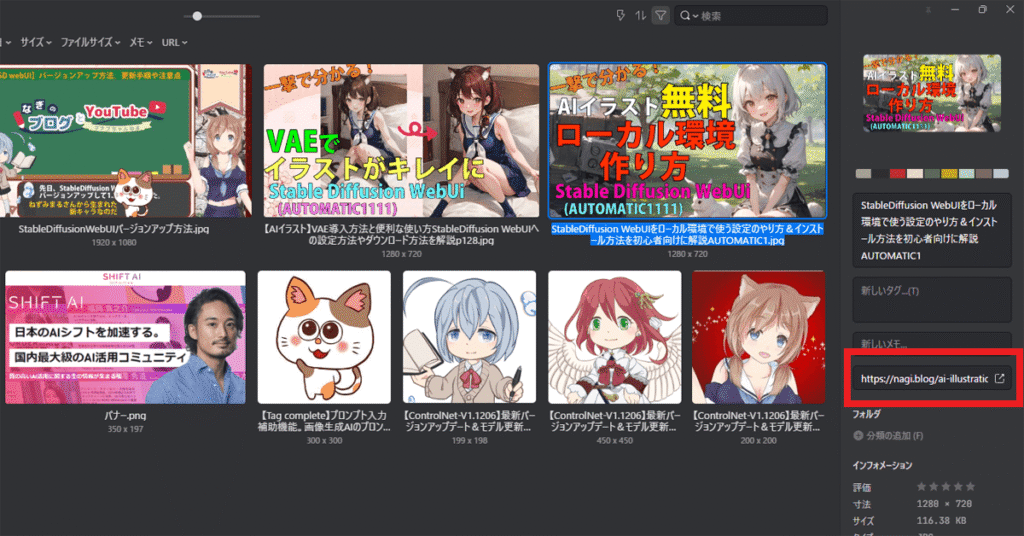
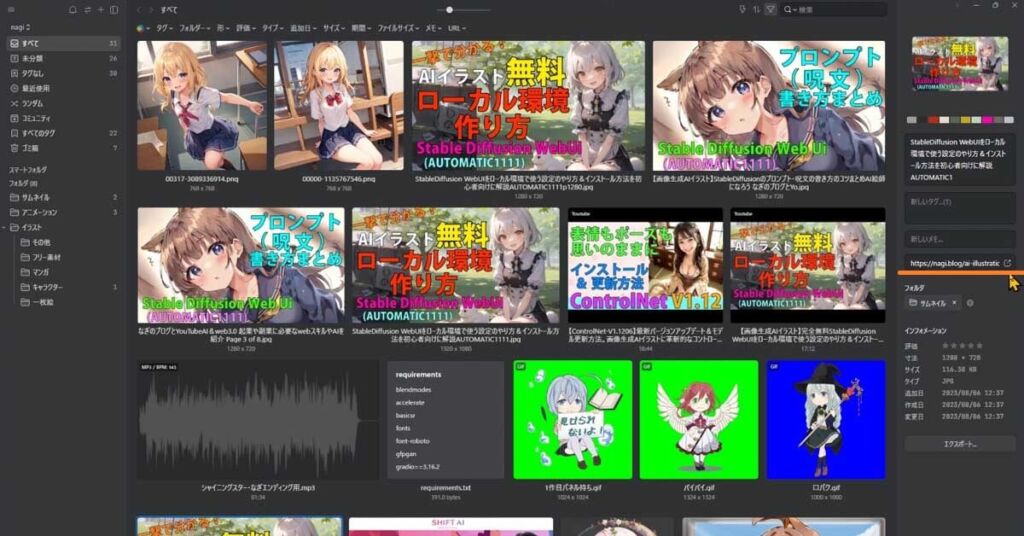
情報欄で画像の詳細データを管理しよう
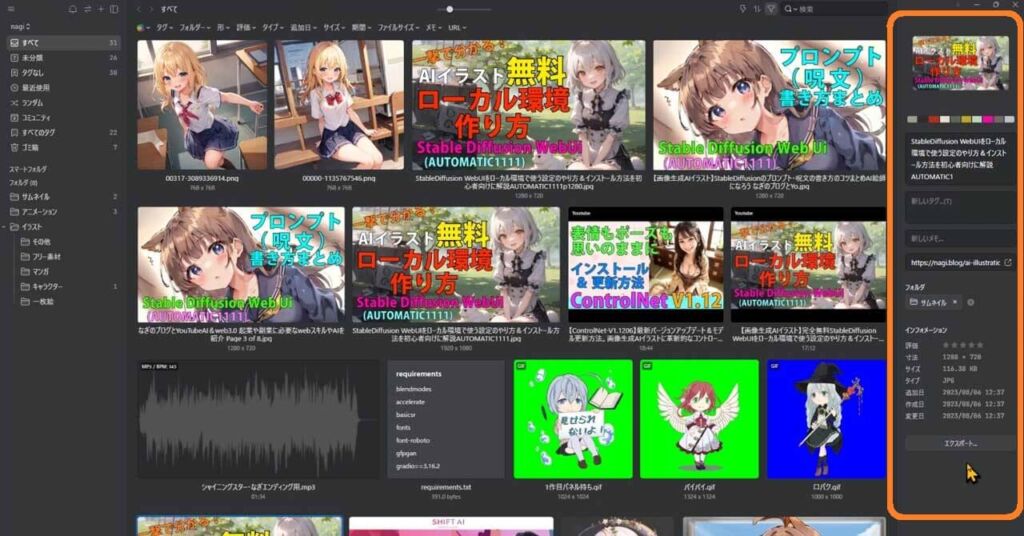
画面右側がファイルの情報内容や、詳細データを書き込める欄となっています
この情報欄はとても便利ですね
タグを付けたり、メモ機能でメモを残せるのは、とても便利に感じます
情報欄にメモやタグ URL(リンク)も保存
webサイトから、取得した画像は、画像をどこから取得したのかURLが自動で書き込まれるので、のちにこのサイトを見たくなった時にも、すごく手間が省けます
こちらのURLはリンクになっていますので、右端にあるアイコンをクリックしますと、サイトが開けますよ
StableDiffusionの出力先をeagleに
こちらは、eagleの公式による機能ではないような情報なんですけど、個人的に、ものすごく画期的に感じた事があります
画像生成AIで作られたイラストの場合は、プロンプトからタグを作ってくれることや、さらに、メモ欄には生成した時の詳細なパラメータが自動で書き込ませることも可能なんです
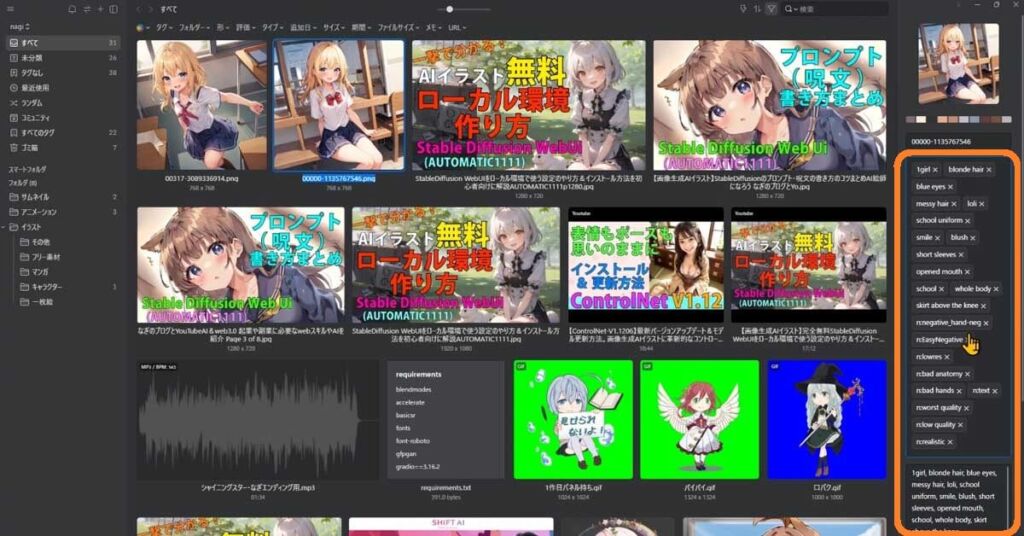
ちなみに、生成済みのイラストではなく、StableDiffusionなどで生成した際の出力先をeagleにする必要があります
これは、プロンプトの管理がかなりはかどりますね
みけねこまるタグで検索かけれるから、プロンプトを少し変化させるときとかにもすごく便利そうなのだ
さすがに公式の機能ではなさそうなので、残念ながら、生成済みのイラストからは、プロンプト情報は読み込めませんでした
詳しくは、別記事にて、StableDiffusion webUIの拡張機能のインストール方法や設定方法を解説しています

この機能は現在は、私の知る限りStableDiffusionからでしか行えないようですが、現在、ものすごい勢いで生成AIが進化していますので、今後ますます便利になることが期待されますね
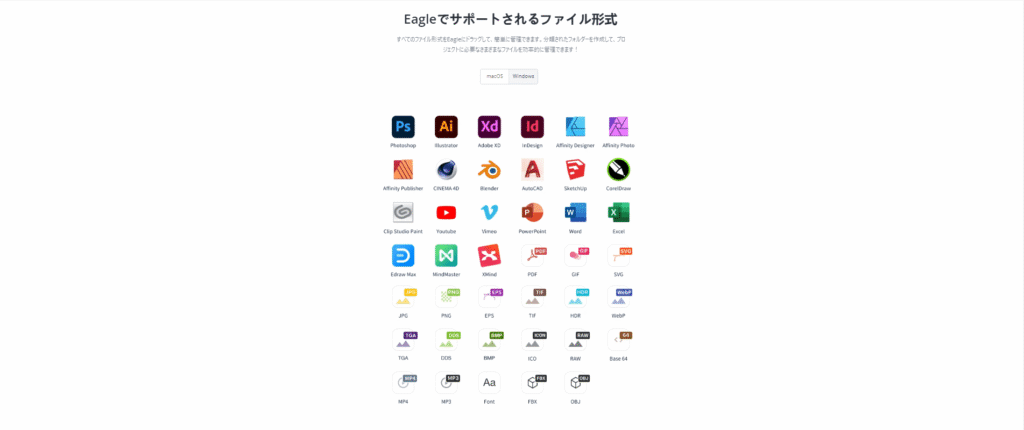
いろいろなファイル形式に対応

これまでご紹介した、ファイル形式以外にもイーグルは様々なファイル形式に対応しています。
例えば、Googleドキュメントのファイルも、wordのデータも保存できます
また、AdobeのPhotoshopやIllustratorのデータも保存して置けます
eagle公式webサイトによると、これらのファイル形式をサポートしている様です
 みけねこまる
たくさんあるのだ
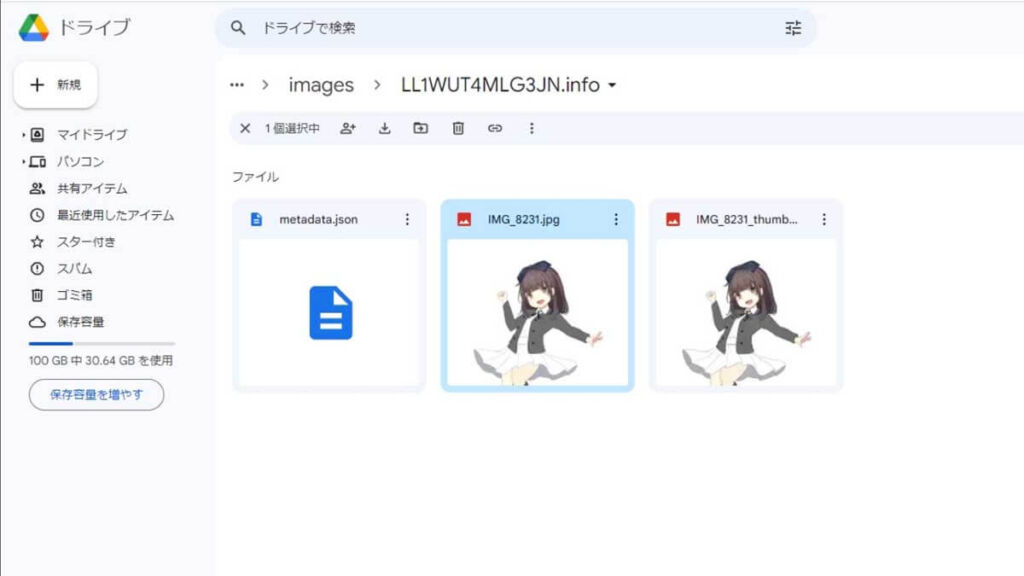
クラウドで、パソコン間で共有も出来る

先ほど、機能を紹介している中でイーグルのデータの保存場所を選択する説明があったと思いますが、保存先をGoogleドライブにすることも可能です
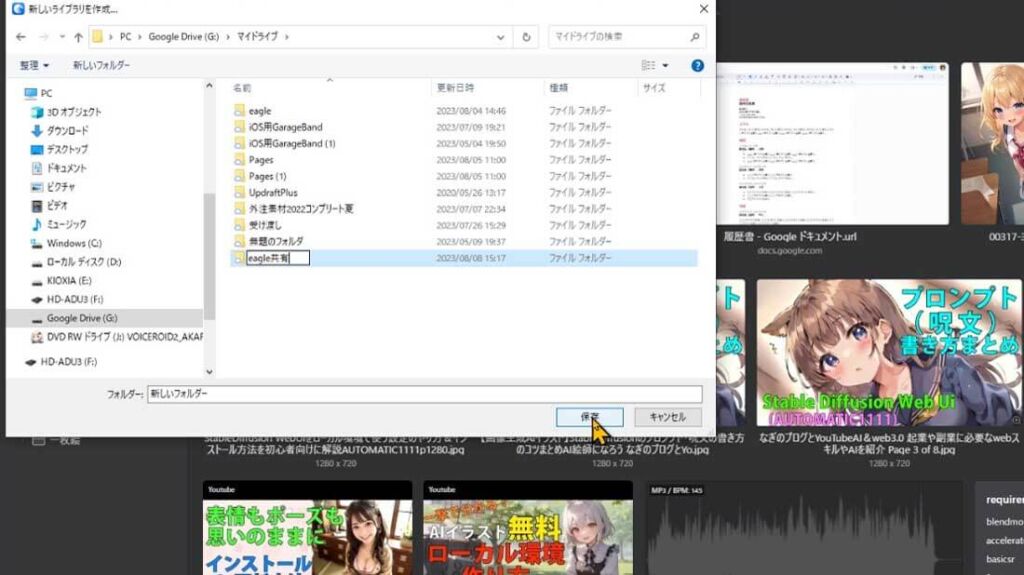
保存先をGoogleドライブにすることで、ほかのパソコンとの間で保存ファイルを共有することも出来ますよ
eagleは30日間は、無料で使えますので、ぜひ試してみてください
想像以上に便利だと思います
因みに料金は、サブスクじゃなく買い切りの永久ライセンスで29.95ドルです。
より詳しい情報は、eagle公式ページを見てくださいね
この動画で紹介してきた、拡張機能やeagleに関するリンクは、動画説明欄に記載してありますのでご活用ください
お値段も高くないし、サブスクでない所がいいね
みけねこまるサブスクは、長い間使う事を考えると、悩んでしまうのだ
共有のためには、2つ以上のライセンスが必要になるのかな?と思っていましたが、1つのライセンスで2台のパソコンに使える所もありがたい仕様です
eagleに是非、機能追加してほしいこと
eagleに是非、機能追加してほしいこともあげておきたいと思います
android iPhone スマホ でも使いたい
現在のところ、パソコン版だけですので、是非ともスマホやタブレットでも使えるようになると嬉しいですね
これは本当に、スマホでも使いたい
生成AIのプロンプトの自動で保存・読み取り
2つめは、これはeagle側だけで解決できるものではないかもしれませんが、今後はさまざまな生成AIサービスとの連携や、拡張機能により、先ほど例に挙げたStableDiffusionのケースの様に、プロンプトや生成方法などを自動で取得してもらえると嬉しいですね
また、生成済みのAIデータからもプロンプトの情報とか読み取れたら嬉しいですね
このあたりが出来ると、生成AIツールとの相性が抜群だし、必須なツールになってきそう
本日は、ファイルや画像データを便利に管理するEagleのご紹介でした

動画でもEagleの便利な機能と、使い方を解説
StableDiffusion WebUI v1.6.0(随時更新リサーチ中)
- StableDiffusion WebUIバージョン1.6.0リリース速報まとめ
- 【SDXL1.0のVAE】StableDiffusion WebUI v1.6.0 導入&設定方法
- StableDiffusion WebUI ver1.6.0「VAE」切り替えを便利なインターフェイス
- ControlNet ver1.14バージョンアップSDXLに対応…しかし
- SDXL1.0環境のEasyNegative【negativeXL 】ネガティブプロンプト省略embeddings
StableDiffusion WebUI や拡張機能のダウングレード
StableDiffusion webUI基本設定
- StableDiffusion WebUIをローカル環境で使う設定のやり方♪
- StableDiffusion WebUIバージョンアップ方法。更新手順や注意点
- StableDiffusion WebUIバージョンの確認方法
- 【操作画面の解説・txt2img】分かりやすくパラメータの使い方を説明
- 【画像生成AIイラスト】VAEインストール方法と便利な使い方
- 「VAE」かんたんに切り替えするインターフェイス
- 【日本語化】StableDiffusionWebUI インターフェイス設定方法。
- 大きく、キレイな画像を出力する方法Hires.fix使い方。解像度アップ!
- 操作画面の5つのボタン解説
- 【X/Y/Z plot】使い方。プロンプトや設定を調整し比較してみよう!
- 【img2imgインペイント】画像生成AIイラストを修正/inpaintのパラメータ
- 【学習モデルの追加と変更】かんたん切り替え
- StableDiffusion WebUIバージョン1.3。LoRAを使う方法
- 【まとめ】画質が悪いを改善する7つの機能の使い方!
- 【StabilityMatrix】StableDiffusionWebUI簡単インストーラー
【学習モデル・checkpoint】
- 【実写系学習モデル・3選】写真の様なリアルな美少女が作れるモデルまとめ
- 【BracingEvoMix】日本人風の顔に特化した最新学習モデル
- 【BeautifulRealisticAsiansV5通称BRAV5】
プロンプト
- Stable Diffusionプロンプト(呪文)に関しての書き方。
- 【画質を上げる・画質に美しく芸術性を持たすプロンプト】呪文の書き方
- 【Tag complete】プロンプトのコツを掴める入力補助機能。
【ControlNet】
- 【ControlNet】使い方とインストール方法。画像生成AIイラストに便利な神機能。
- 【ControlNet-V1.1206】最新バージョンアップデート&モデル更新方法。
- 【ControlNet】不具合?表示されない…反映されない時には?
- 骨(棒人間)を使い、思い通りの姿勢をとらせた方法。
- 原画の絵と同じ姿勢(ポーズ)のAIイラスト生成のやり方♪
- AIイラストから線画を抽出する方法♪
- AIイラストを手描きで修正し、生成するやり方♪
- 【ControlNet】自作の線画イラストを画像生成AIに色塗り(ペイント)させる方法
- 自作の線画イラストをAIイラストに色塗り(ペイント)させる方法♪
【その他 拡張機能について】
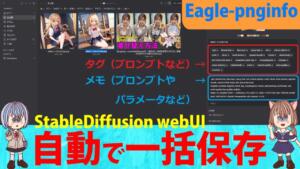
- 【Eagle-pnginfo】画像やプロンプトを自動で一括管理できる拡張機能
- 【eagle】画像管理おすすめアプリ使い方
- 【eagle】公式サイト
- 【EasyNegative v2】導入&使い方♪設定方法
- 【EasyNegative V2】反映されないときには?原因と対処方法
- 【EasyNegative V2】【LoRA】にサムネイルを付ける方法
- 【LoRA】画像生成AIの追加学習データの使い方。
- 【Dynamic Prompts】ダウンロードとインストールの設定方法と特殊構文の使い方
- SDXLでも使える?【ADetailer】手や顔の崩れを自動できれいに修正できる拡張機能
画像生成で収益化方法
- AIイラストを生成して販売する方法(わどさん・外部リンク)♪
- 未経験でも10分で!AI美女をStableDiffusionでの作り方
- AI美女などの画像販売で稼ぐ方法/AIグラビアをStableDiffusionWebUI で作る