AIイラストに興味あるんだけど、いろいろなソフトやアプリがあってどれを使っていいのか分からないなぁ
ChatGPTの登場でAI業界は一気に注目が集まり、さまざまな種類のAIが登場してますよね

今日は、その中でも注目のStable Diffusionを使いやすくした Stable Diffusion WebUIというAIイラスト生成の方法をローカル環境で使う設定のやり方について解説しますね
Stable Diffusionは、前にローカル環境でコマンドプロンプトに入力してやったことあるんだけど…こんな絵しか生成されなくて、心折れたんだよね
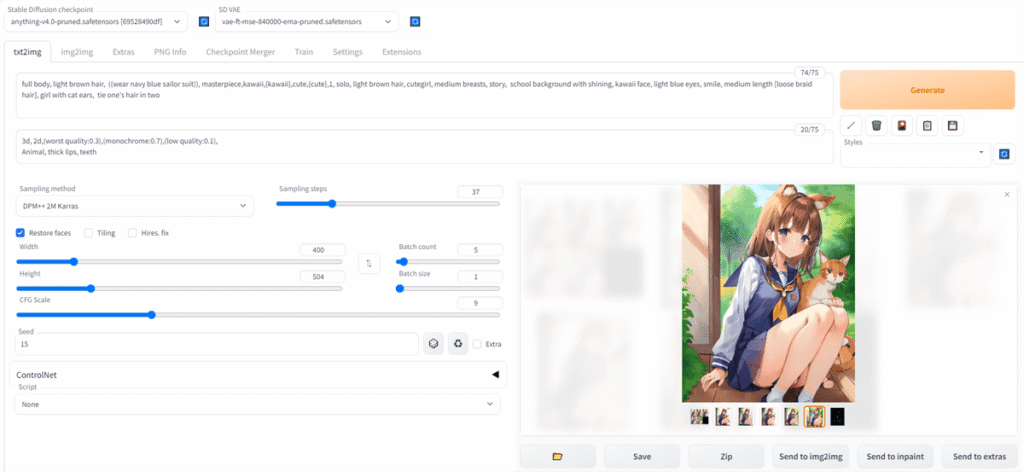
Stable Diffusionを、Stable Diffusion WebUIを使う方法では、この様なWebブラウザのインターフェイスでプロンプトやパラメーターを操作するだけで、こんなにきれいなAIイラストを簡単に生成できるんですよ
しかも、Stable Diffusionは、条件を満たした自分のパソコンにインストールして、ローカル環境で使えば、何枚生成しても完全無料で使うことが出来ます
ただ、Stable Diffusion WebUIはブラウザで使うのですが、Webサイトではなくて自分のパソコンにローカル環境を構築する必要があるので、パソコンの知識がないと作るのが大変です
なので、本日は、初心者の方に向けたStable Diffusion WebUIをインストールする方法を解説します…
ChatGPTさんが!
説明もAIにさせるんかい

ヨロシクオネガイシマス
よ、よろしくお願いします

現在、Stable Diffusionや画像生成AIに関する記事は、以下のものがありますので参考にしてね
この記事に、特に関連する記事はコチラ
StableDiffusion WebUIを環境構築する時の注意点
StableDiffusion WebUIを環境構築する時の注意点を説明します
この点を抑えないと、めちゃくちゃに環境構築されてしまうので、絶対に知っていて欲しいことがあります
StableDiffusion WebUI(AUTOMATIC1111)にしても、その他の付随する拡張機能も、基本的にダウンロードすると気には、最新バージョンがダウンロードされ、インストールすることになります
2023年11月の最新バージョンでは、StableDiffusionはSDXLというバージョンになっております
SDXLは以前の、SDver.1に比べ、キレイな画像を作れるようになりました
しかし、SDXLは以前のSDver.1やSDver.1.5とは別物と言っていいくらいの環境変化があります。
現在、多くのwedサイトやYouTube動画に投稿されているものは、StableDiffusion WebUI(AUTOMATIC1111)の解説と言っても、ほとんどがSDver.1やSDver.1.5をベースにしたものです
ですが、通常の手続きを踏むとインストールされるものは、SDXL版なのでこの違いに気が付けづに手続きをしてしまうと、正しい動作や結果が得られません
さらにSDXLは、SDver.1やSDver.1.5の頃よりも要求スペックが高いので、以前よりも高めのスペックが求められているので、かなりハイエンドなパソコンが必要になるので、並のゲーミングパソコンでも動かないレベルです
もしSDXL版のStableDiffusion WebUI(AUTOMATIC1111)をそのまま使いたい時には、インストールしてそのままお使いください
SDver.1やSDver.1.5のStableDiffusion WebUI(AUTOMATIC1111)を使いたい際には、ダウングレードして使ってください
今のところ、周辺の拡張機能などのアップデートが済んでいないことや、StableDiffusionの旧バージョン(SDver.1やSDver.1.5)の使い勝手の良さから、StableDiffusion WebUI(AUTOMATIC1111)も旧バージョンを使う人が多い面があります
旧バージョンを使いたい人は、インストール後に旧バージョンにダウングレードする必要があります
やりかたは、「StableDiffusion WebUIバージョンを戻すの記事 https://nagi.blog/stablediffusionwebui-downgrade/ 」を参考にしてください
Stable Diffusion WebUIをローカル環境を構築するためのスペック
まずは、Stable Diffusion WebUIを自分のパソコンにローカル環境で使うためのスペックをご紹介しますね
最低限必要なスペックは3点ありまして以下の通りです
- OSはWindows 64ビット版 10/11
- NVIDIA製のグラフィックボード(最低でもVRAM8GB以上のビデオメモリ/SDXLは最低VRAM10GB以上)推奨はVRAM12GM
- SSDで50GB以上が推奨(HDDでも出来なくはない)
詳しく説明しますね
OS
まずは、OSですがWindows 10以降が推奨されています。
Windows 10か11ってことね
NVIDIA製のグラフィックボード
そして、NVIDIA製のグラフィックボードが必要で、最低でもビデオメモリが8GB以上あることが望ましいです。
SDXL版はVRAM10GB以上になりますが、NVIDIA製のグラフィックボードはVRAM10GBあまり種類がないので、結果的にVRAM12GB以上が必要となります
GPUの性能が低いとエラーが起こることが多くなり、動作も遅くなります
イラスト生成だけなら8GBで大丈夫ですが、学習機能を使う場合は12GB程度が理想です。
具体的な製品名で言うと
どんな感じですか?
グラボは、GTX1660Tiは、普及しててコスパが良いグラボになりますが、使用感としてはギリギリの感じで、止まったり動作が遅かったりすることもあるようです
NVIDIAのGeForce RTX20シリーズ以降のグラフィックボードがあると理想的ですが、できればGeForce RTX 3060 12GBより上あたりが推奨ラインになりますね
AIに追加学習させるためには、GeForce RTX 3060 12GB以上が欲しいという所ですね
因みに、私はGeForce RTX 2070 SUPERを使っていまして、そこそこ快適に動いています
因みに、CPUについては、あまりこだわらなくて大丈夫です
CPUはグラボとのバランスが合うモノを選ばれたものが搭載されていると思いますので、NVIDIAのGeForce RTX20シリーズ以降のグラフィックボードが搭載されているパソコンなら気にしないでも大丈夫です
これは、Stable Diffusion WebUIでの画像生成はGPUに依存しているためです
VRAMが足りないパソコンでもStableDiffusionWebUIを動かす方法
webui-user.batにを開き
set COMMANDLINE_ARGS=の欄に「–medvram –xformers」を付け足して以下のようにしてください
@echo off

set PYTHON=
set GIT=
set VENV_DIR=
set COMMANDLINE_ARGS=--medvram --xformers

call webui.bat
medvramはVRAMの処理速度を落として、スペック不足のグラフィックボードでもスペック不足を補う方法です
それでも足りない場合には、–medvramを–lowvramに変えてください
–lowvramにするとかなり処理速度は遅くなりますが、VRAM6GBでも使えるようになると思います
ドライブの空き容量
まずドライブは、ハードディスクでは動作が遅すぎるので、SSDへのインストールをお勧めします
ドライブの空き容量は、あればあった方がいいですが、最低でも50GB以上は確保しておくことが推奨されます。
たくさんのモデルを使い分けたい人や、たくさんの画像を生成したい人は、できればもっとあるといいと思いますよ
いろんなモデルを試していると、すぐにいっぱいになってしまいそうだね
 みけねこまる
SDXLになってからは、拡張機能のデータも大きくなりつつありますね
これは、モデルの容量が1個あたり4~8GB程度と大きいためハードディスクだと、待ち時間が凄く長くなりますよ
拡張子の表示設定
他に注意することはありますか?
そうですね。インストールの手順を始める前に、拡張子を表示する設定にしておきましょう。。
エクスプローラーを開いて、画面上部の「表示」タブをクリックし、「ファイル名拡張子」にチェックを入れた状態にしてください
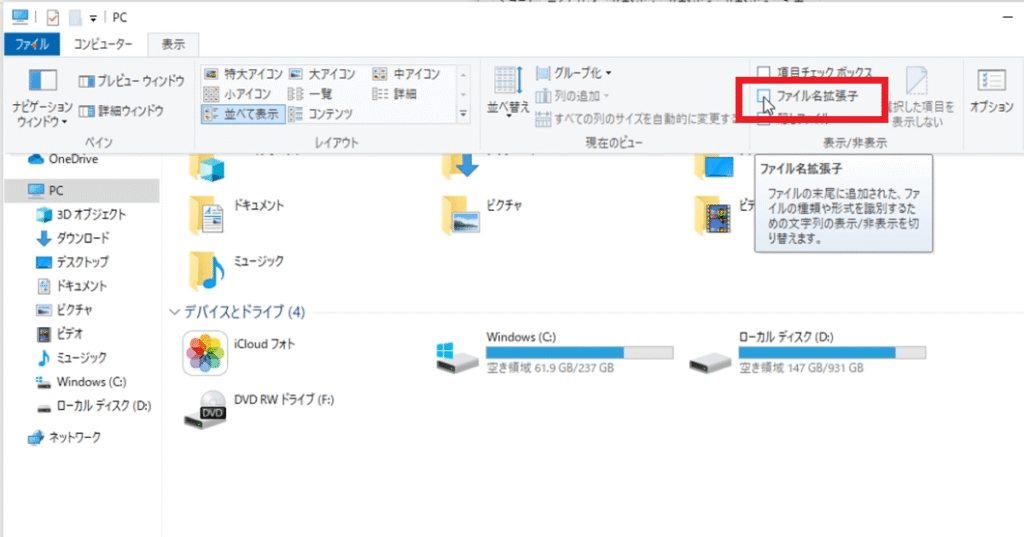
拡張子が末尾に表示されるようになり、プログラムのデータなのか?画像ファイルなのか?音楽ファイルなのか?ファイルの種類が分かりやすくなりました
これら3つの条件と、拡張子の表示設定をすれば、Stable Diffusion WebUI(automatic1111)を使っていけるんですね
その通りです!これでみなさんもAIイラスト生成の世界に入れますよ。
Stable Diffusion WebUI(automatic1111)インストールのやり方
Stable Diffusion WebUIをローカル環境で構築するために、これから4つのインストールするモノがあります
- Python 3.10.6
- git
- Stable Diffusion WebUI
- モデル
インストール先は、Cドライブにすることをおすすめします
たくさん容量を必要とするので、Cドライブ以外の場所に置きたいところですが、Cドライブ以外ですと、動かない事や不具合の報告もあります
Python 3.0.6
まず、GitHubのautomatic1111ページにアクセスします。
https://github.com/AUTOMATIC1111/stable-diffusion-webui
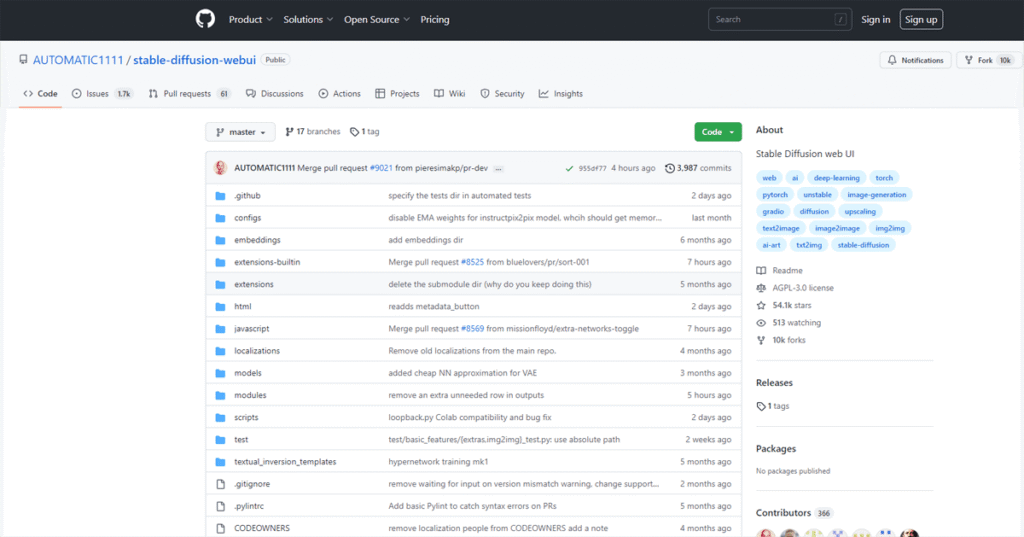
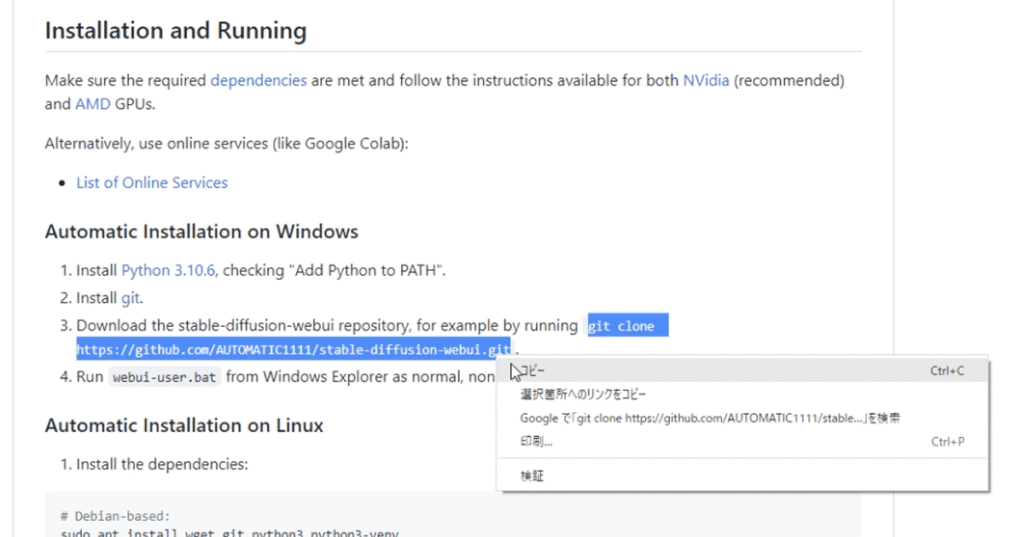
下にスクロールして、Installation and Runningの欄の中にあるAutomatic Installation on Windowsという欄を見てください
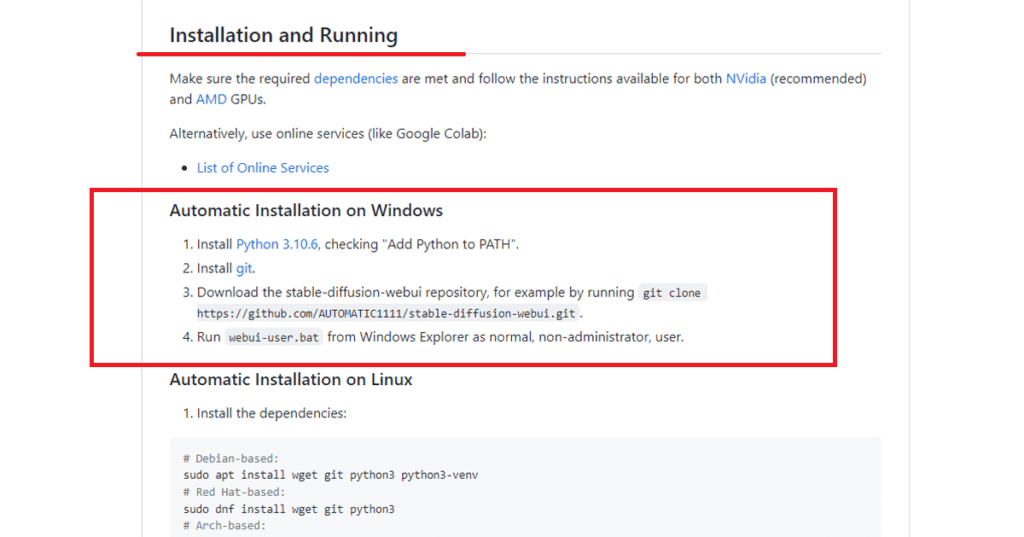
ここのリンクになっている Python 3.10.6 をクリックしてください
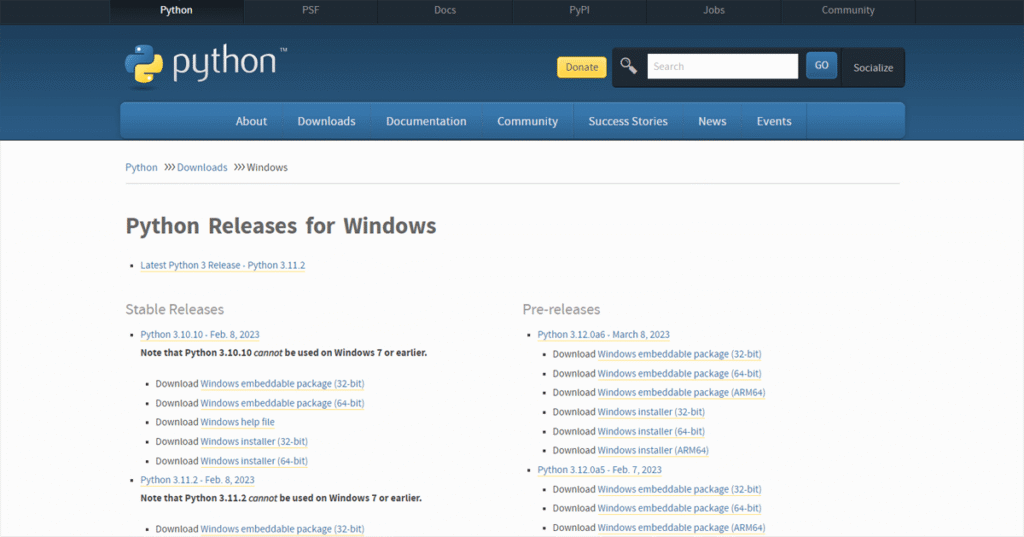
Python のページを開きます
https://www.python.org/downloads/windows/
そして、Python 3.10.6の項目の中にある Download Windows installer (64-bit)をクリックしてダウンロードしましょう
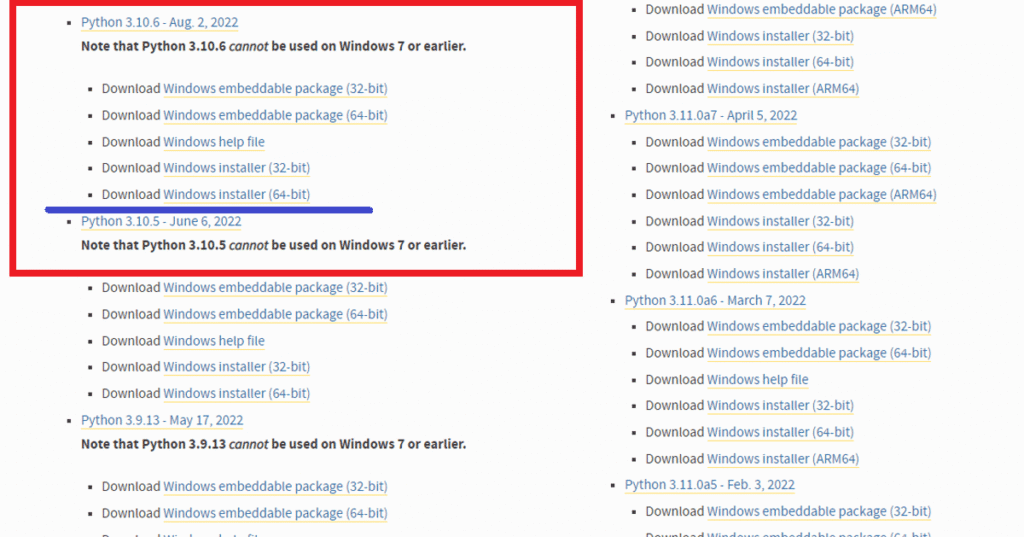
バージョンが違うと不具合やエラーの原因になりますので、間違わないで下さいね
ダウンロードしたら、ファイルを実行してください
インストール時に「Add Python to PATH」にチェックを入れるのを忘れずにね。
そうすれば、プログラム中に長いパスを書かずに済むんですよね
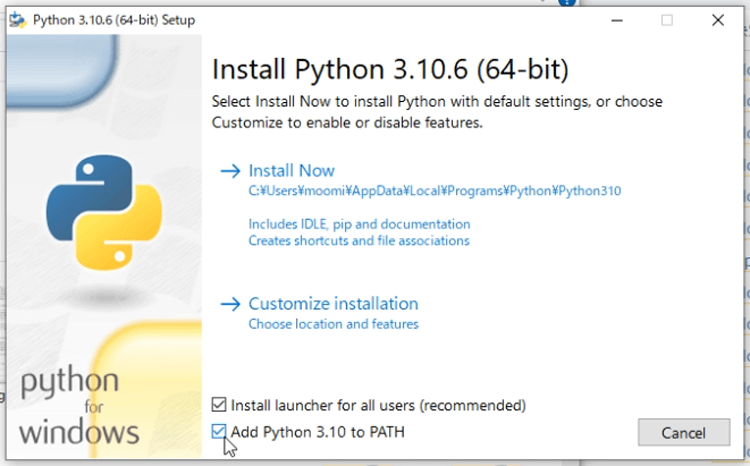
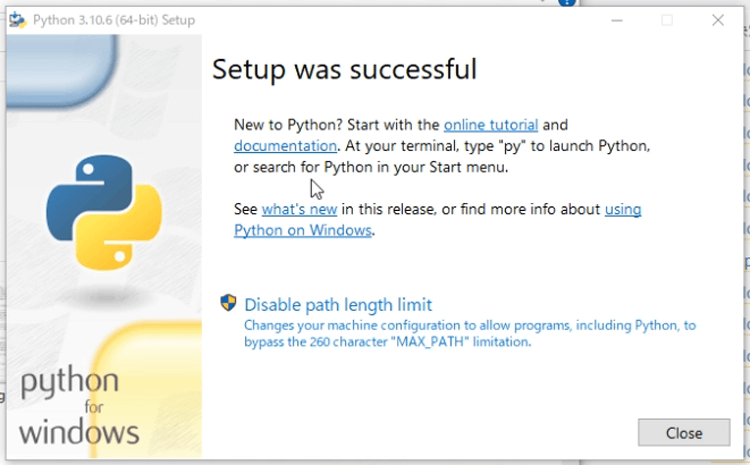
インストールを押して、少し待ちましてSttup was successfulと出たら完成です
git
次に、gitをインストールします。
今度は2番の所に、gitというリンクがあるので、クリックしてください
automatic1111のページからダウンロードリンクにアクセスできますので、click here todownloadをクリックしてね
https://git-scm.com/download/win
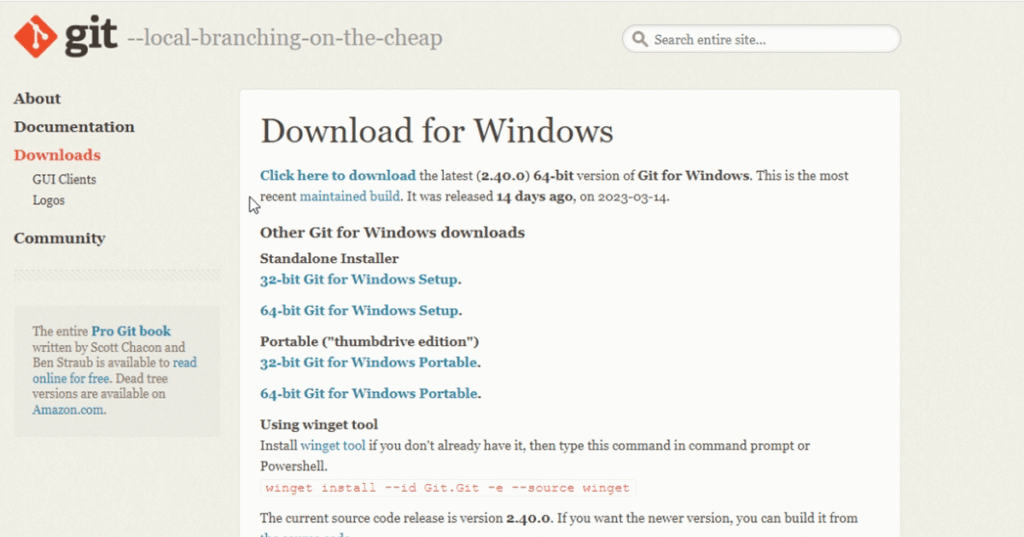
64bit版Windows用の最新安定版をダウンロードできましたら、インストールしてください。
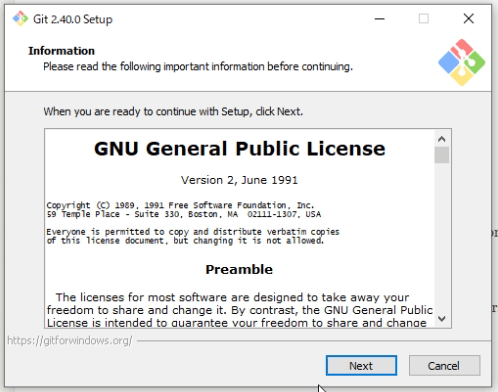
すべて、Nextを押して大丈夫です
Stable Diffusion WebUIをインストール
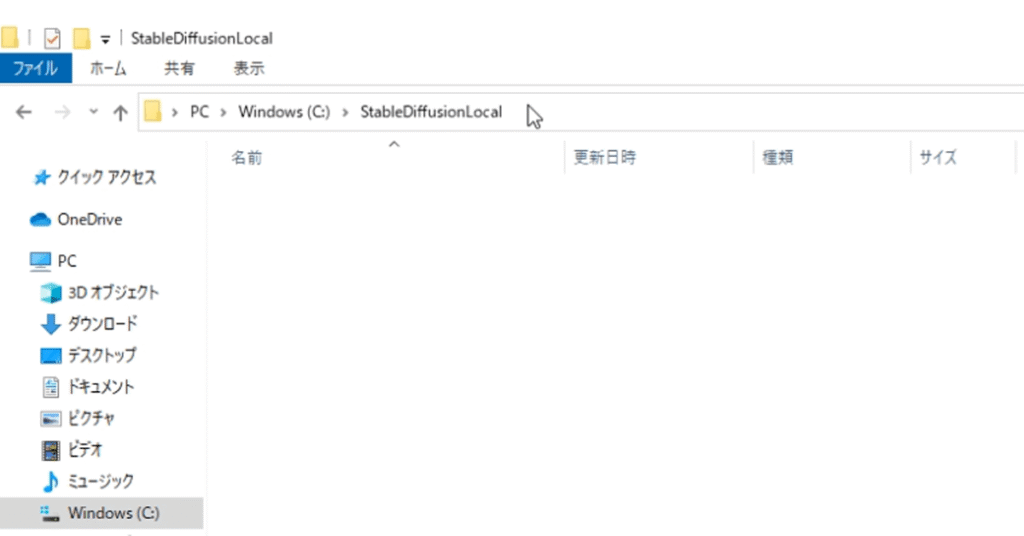
次に、Stable Diffusion WebUIをインストールするフォルダを作成しましょう。
今回はCドライブの分かりやすい場所に新規フォルダを作成してみましょう。
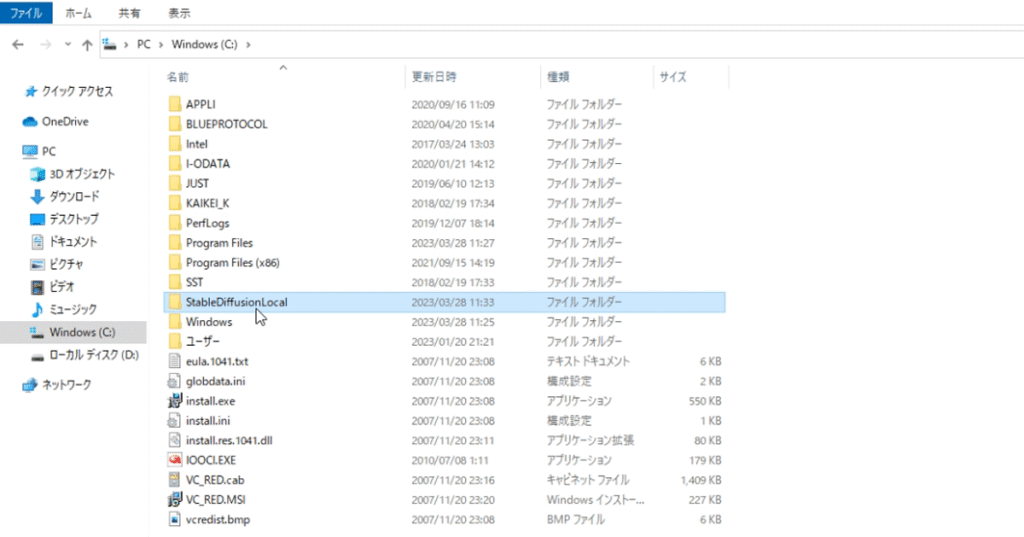
フォルダ名は半角英数字ならなんでも大丈夫ですが、ここでは「StableDiffusionLocal」としておきます
のちのち、50GB以上を使うことになりますので、ドライブの空き容量と、保存場所は慎重に選んでくださいね
今作ったフォルダ、「StableDiffusionLocal」の中に、Stable Diffusion WebUIをインストールしていきます
「StableDiffusionLocal」のフォルダを開いてください
このインストールするフォルダの中で、エクスプローラーのアドレスバーをクリックし、書いてある文字を消して「cmd」と入力します。
↓
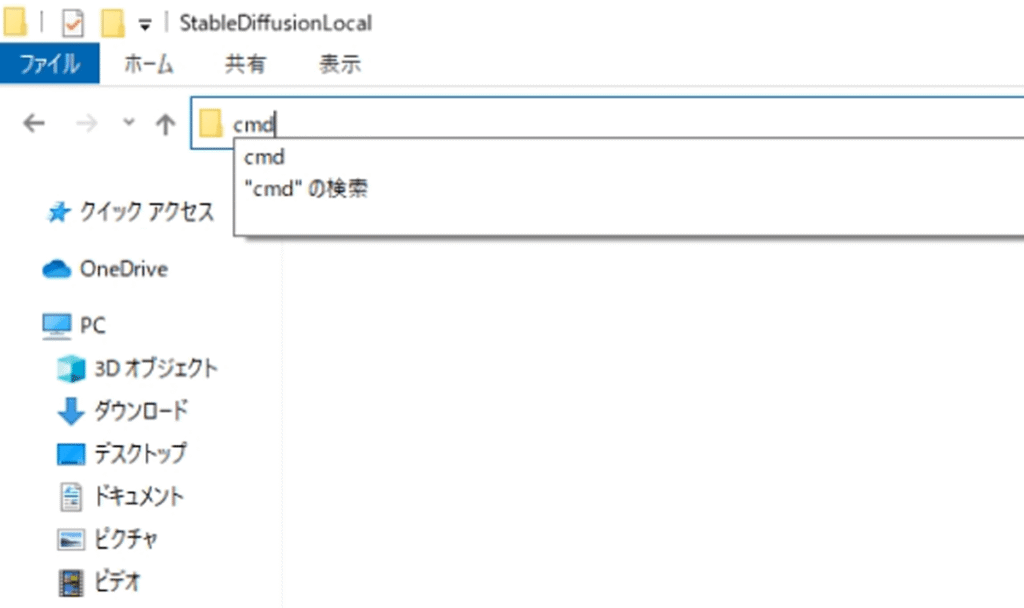
コマンドプロンプトが開きます

そこに、先ほどの、GitHubのautomatic1111のページの3つめにURLが記載されているので、コチラをコピーして貼り付けます
git clone https://github.com/AUTOMATIC1111/stable-diffusion-webui.git
そして、先ほどのコマンドプロンプトにペーストします
この作業で、先ほど作成したフォルダStableDiffusionLocalにautomatic1111のファイルが複製することが出来ます。
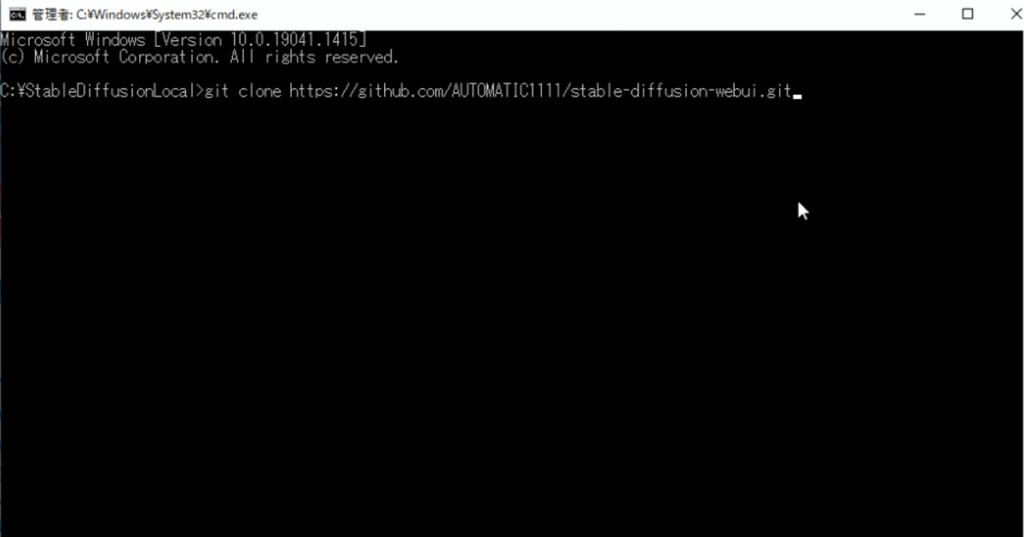
エンターを押して実行します

この画面になれば完成です
先ほどのStableDiffusionLocalのフォルダに、ファイルが生成されるのを確認できますよね
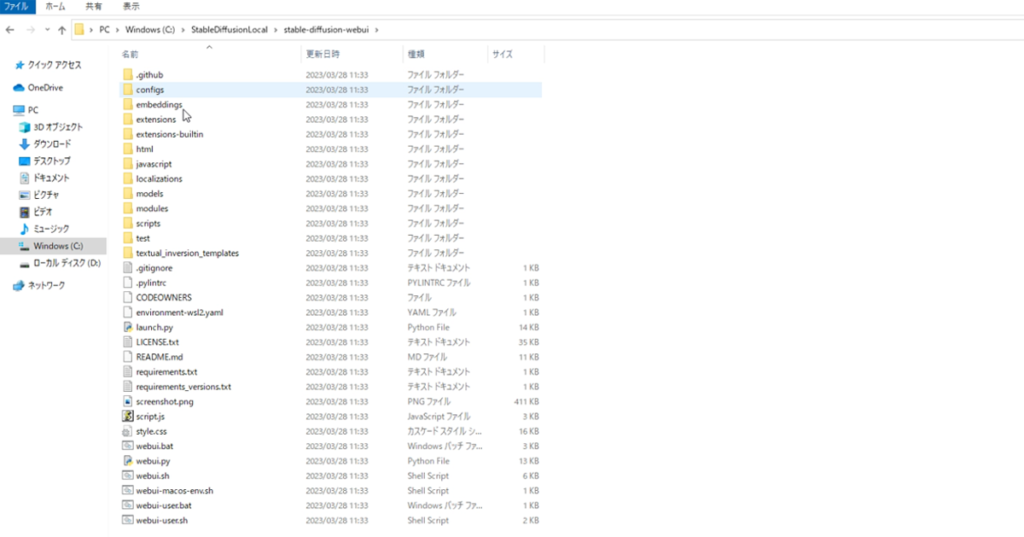
これで、Stable Diffusion WebUI(automatic1111)のファイル一式がインストールされました
AIイラストを描くための【モデル】のインストール
最後に、Stable Diffusion WebUI(automatic1111)のモデルのインストール方法を学びましょう。
モデルはイラスト生成する時に、イラストのテイストを決める重要な役割を果たします。
イラストが得意なものや、アニメ調が得意なものや、写真が得意なものなど、モデルによって得意な分野が異なります。
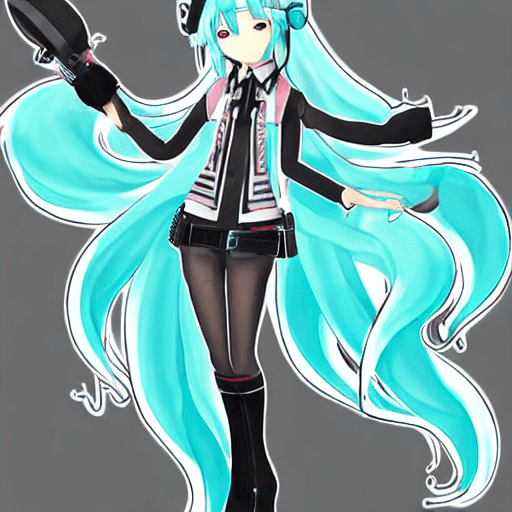
今回は、Counterfeit(カウンターフェイト)モデルをインストールしてみますね。
CounterfeitはこのようなAIイラスをを描くことをができるモデルです
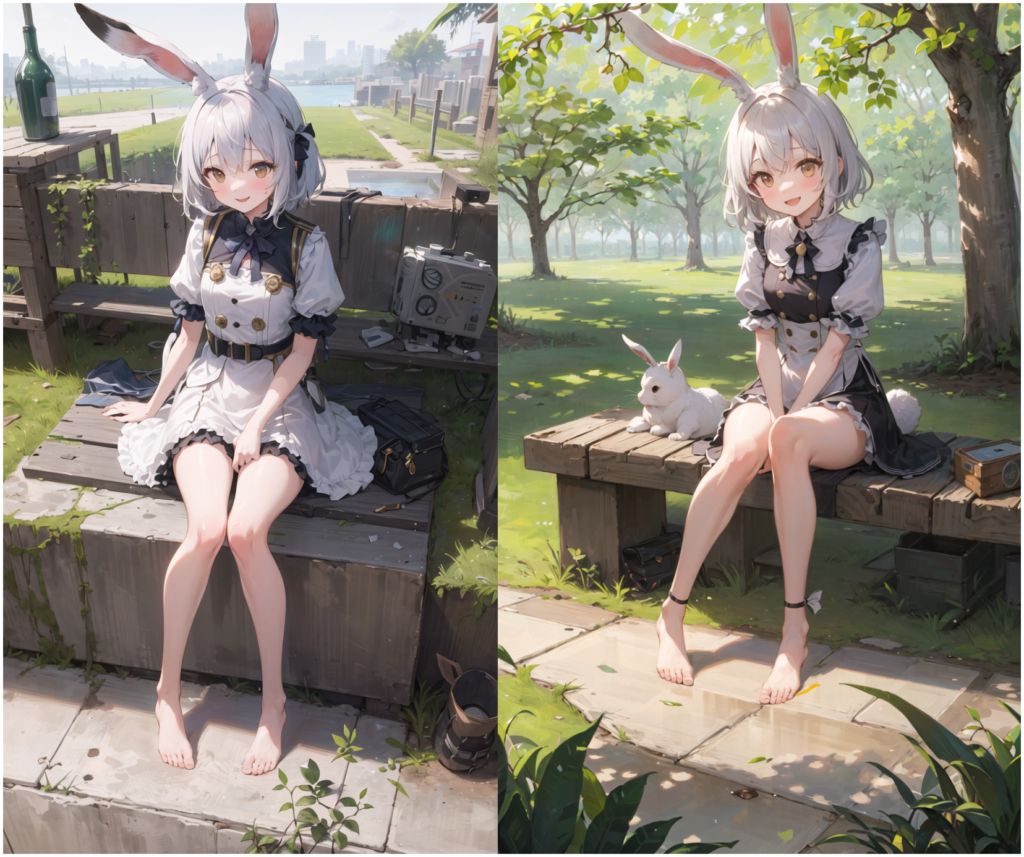
か、かわいい!
わかりました!モデルをインストールするには、どうすればいいですか?
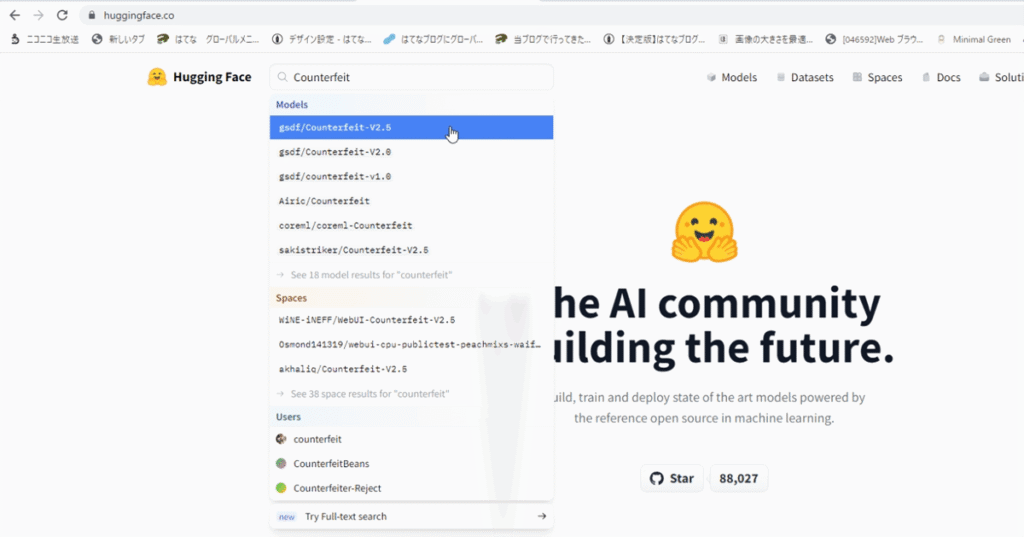
まず、ブラウザで「Hugging Face」と検索して、Hugging Faceのウェブサイト開きましょう
または、下のリンクから、開いてくださいね
そして、検索窓に「Counterfeit」と入力し、出てきた候補からCounterfeitを選びましょう。
ページをスクロールすると、サンプルイラストが表示されますよ。
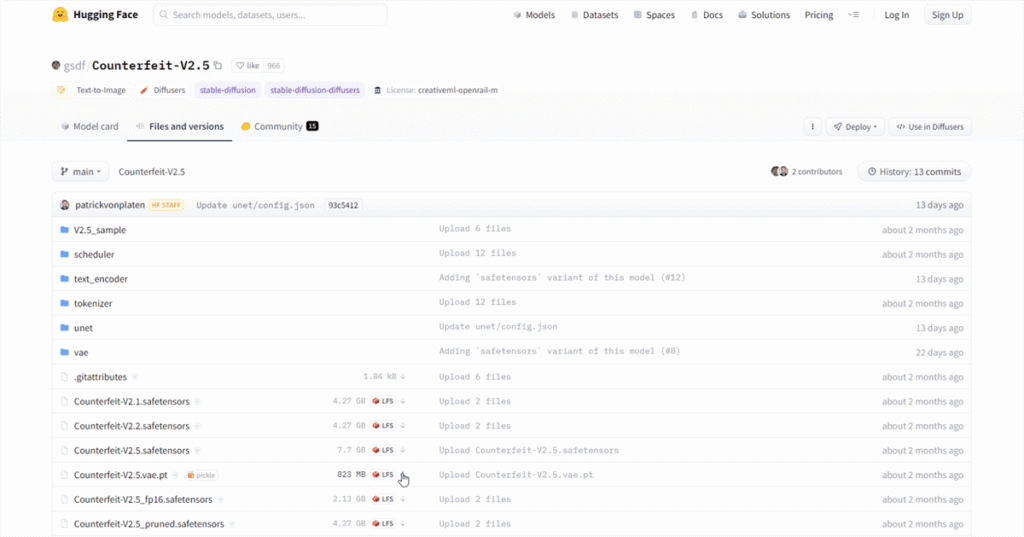
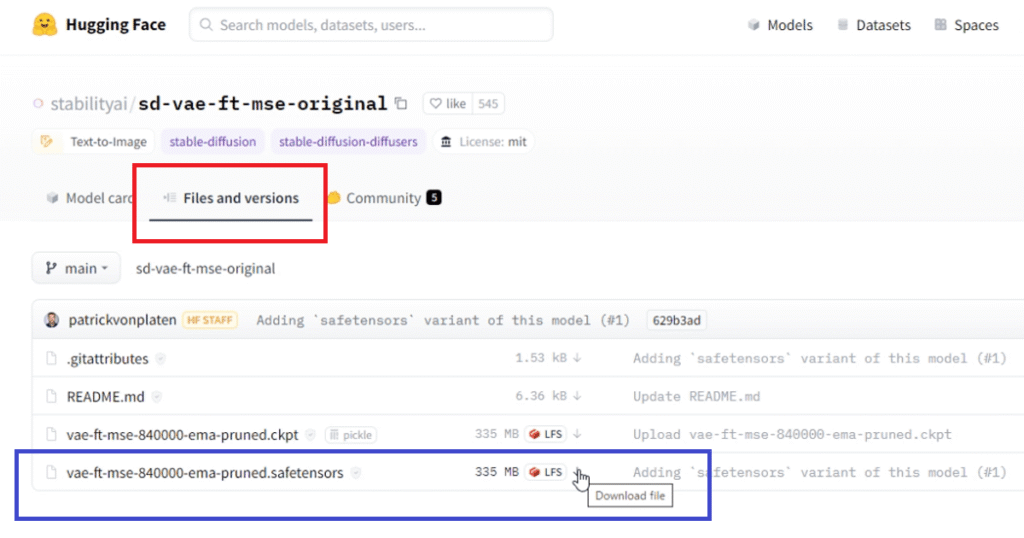
上の方にある「Files and Versions」をクリックしてください
これらがモデルのファイルです。
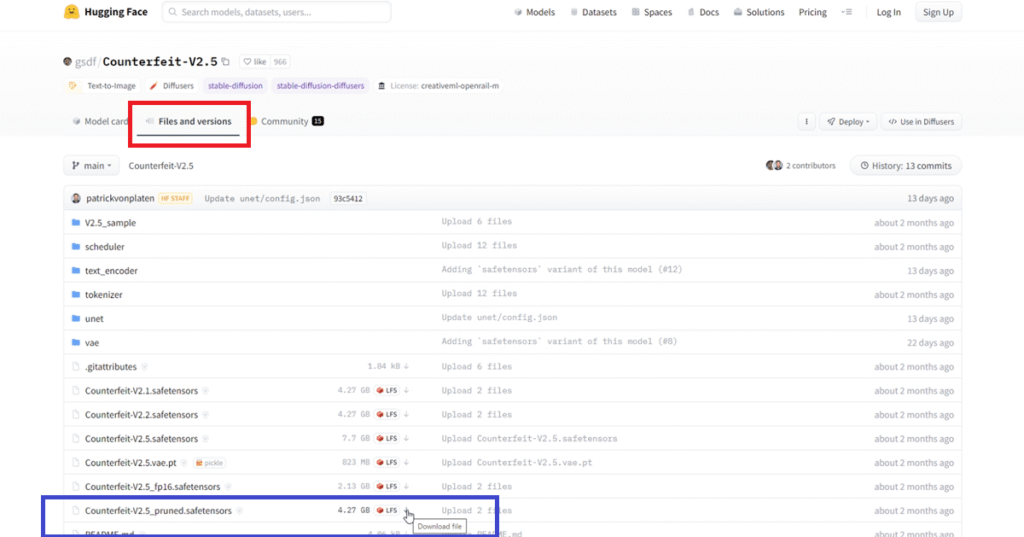
似たようなファイル一覧が並んでいますが、モデルの名称と拡張子が「.safetensors」になっているものが、容量などのバランスから、おすすめです。
Pruned Safetensors版がをダウンロードしましょう
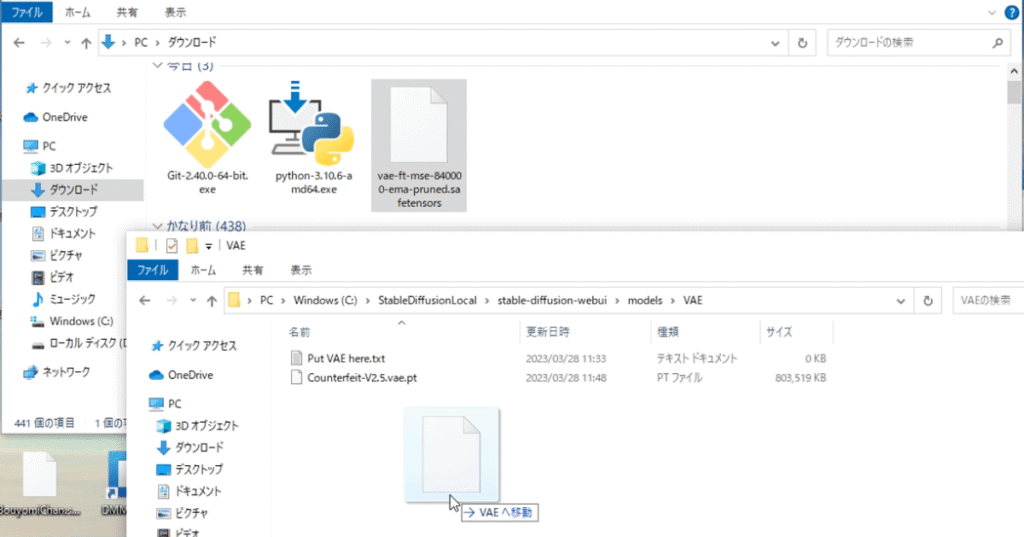
モデルファイルをダウンロードしたら、先ほど作成したStable Diffusion WebUIフォルダを開いて、「models」というフォルダをひらきます。その中の、Stable Diffusionフォルダの中に入れてください
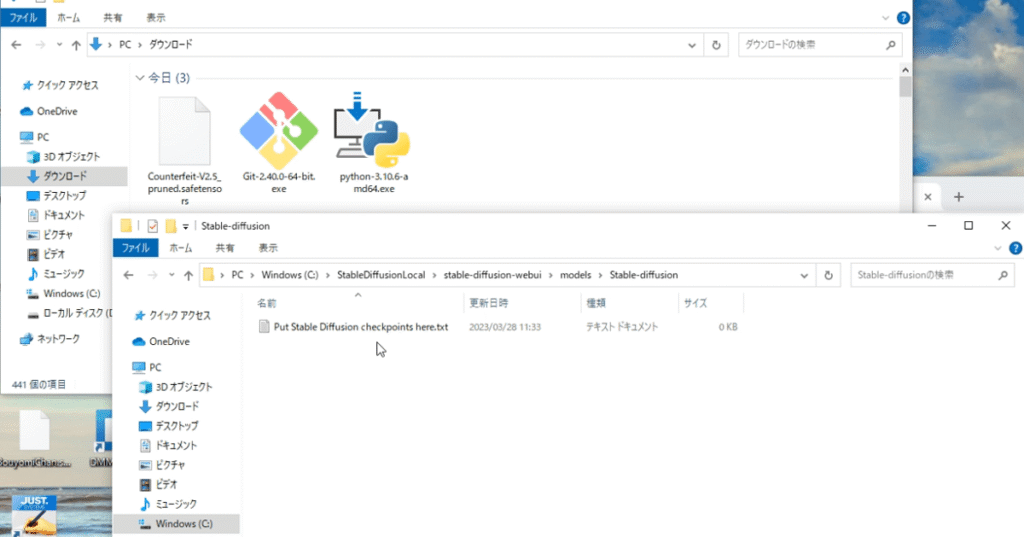
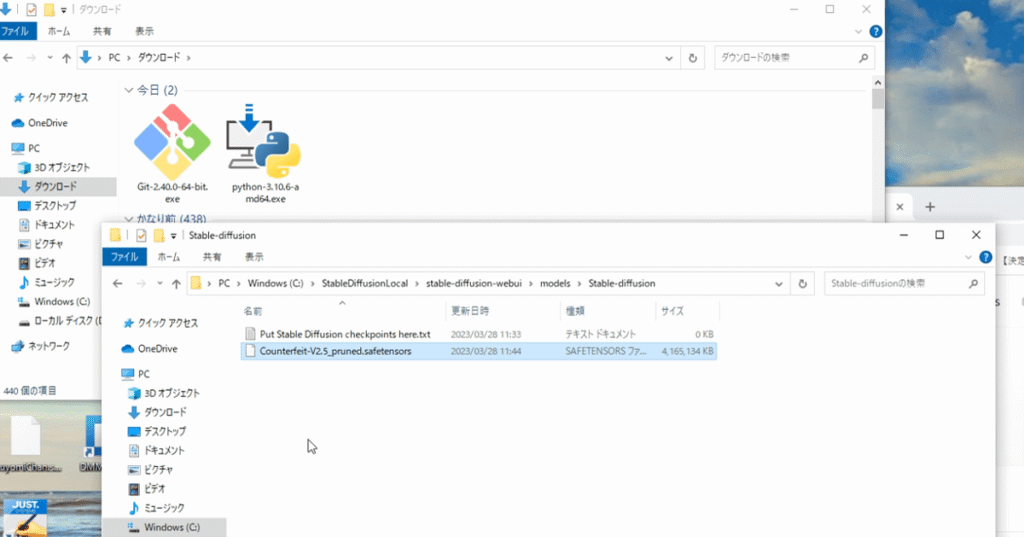
そこにダウンロードしたモデルファイルを入れることで、インストールが完了します。
ファイルが正しく配置されていれば、それだけで大丈夫です。
了解です。他のモデルも同じ場所に入れるんですね。
そうです。新しいモデルをインストールする際にも、同じモデルフォルダを使用しますので、場所を覚えておくことが重要です。
これで、Stable Diffusion WebUI(automatic1111)のモデルインストール方法についての説明が終わります。
AIイラストを綺麗にしてくれる【VAE】
Stable Diffusion WebUI(automatic1111)のVAE(Variational Autoencoder)についてお話ししましょう。
VAEってなに?
VAEとは変分オートエンコーダ の略で、訓練データの特徴を学習し、似たような画像を作成する生成モデルの一種
分かりやすく
画像をきれいにするプログラムです
SDXL版では、学習モデルに専用VAEが内蔵いていることもあり、内蔵されている学習モデルにVAEを使ってしまうと、色が白っぽくなってしまう時があります。
その様なモデルでは、VAEは使わないでください
SDXLでは、Stability AI社のSDXL標準VAEがありました

以下のVAEの解説では、部分では、StableDiffusion WebUI(AUTOMATIC1111)ver.1.41以前のSDver.1やSDver.1.5をベースにしたものでの解説です
理論的には覚えておいた方がいいかもしれません
VAEには大きく分けて2種類あります。
モデル専用の独自のVAEと、汎用的に使えるVAEがあるんですよ。
- モデル専用のVAE:独自のモデル専用に作られたVAE(AnythingV4専用のanything-v4.0.vae.ptや、counterfeit-v2.5.vae.pt)
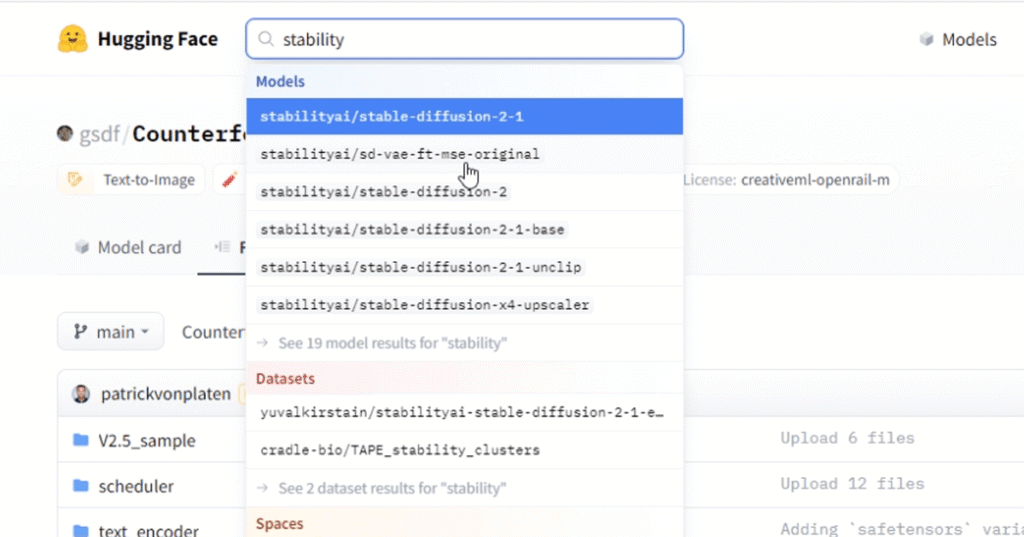
- 汎用的に使えるVAE:どのモデルでも使えるVAE(StabilityAI社のvae-ft-mse-840000-ema-pruned.safetensorsなど)
さっき入れたモデルではどっちを使うの?
counterfeit-v2.5は専用モデルがありますし、専用のVAEをいれてみます
せっかくなので、やり方はほとんど一緒なので、汎用性のあるVAEも後から説明するね
導入方法
Counterfeit-V2.5の場合、Hugging FaceのCounterfeit-V2.5を開き、Files and Versionsタブの、先ほどダウンロードした場所の近くに、Counterfeit-V2.5.vae.ptというファイルがあります。
モデルと同じ名前がついていて、vaeと表記ていることが多いので分かりやすくなっています
これをダウンロードします
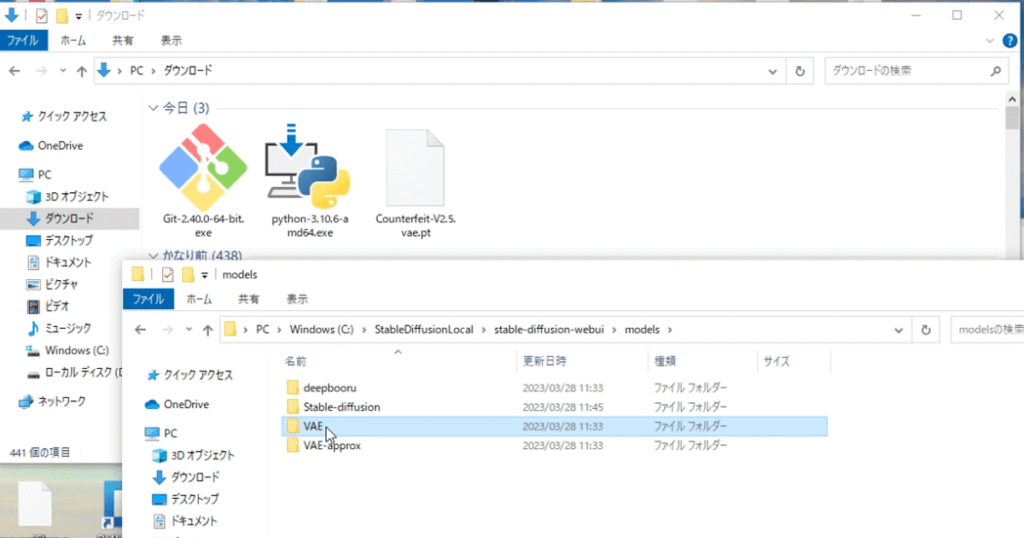
VAEファイルをダウンロードしたら、先ほど作成したStable Diffusion WebUIフォルダを開いて、「models」というフォルダをひらきます。その中の、VAEフォルダの中に入れてください
動かすための設定は、Stable Diffusion WebUiが立ち上がったのちに設定しますので、下の項目で解説します
VAEの適用方法
VAEの適用方法は2つありますよ
自動適用:モデルと同名にして、モデルと一緒にフォルダに入れると、自動でVAEが適用される
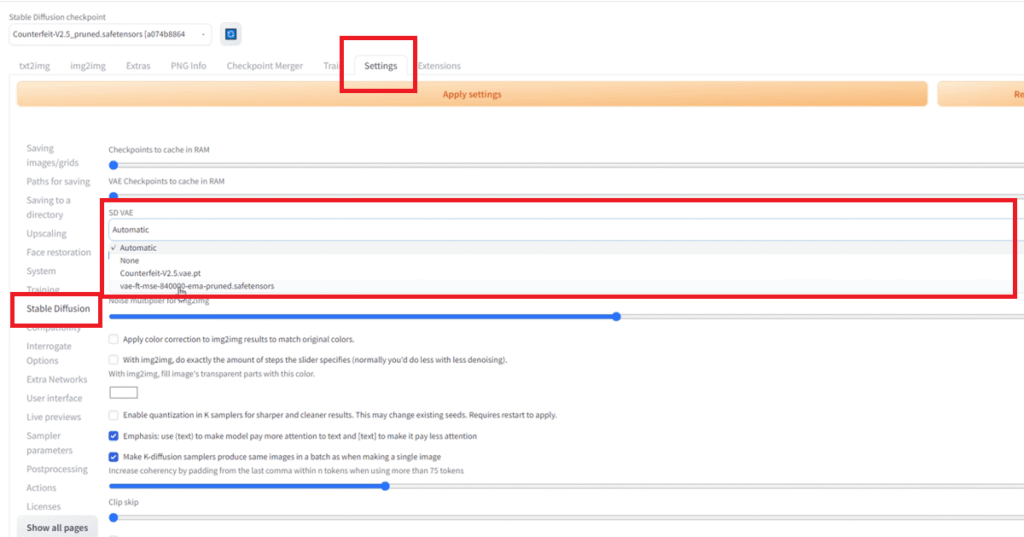
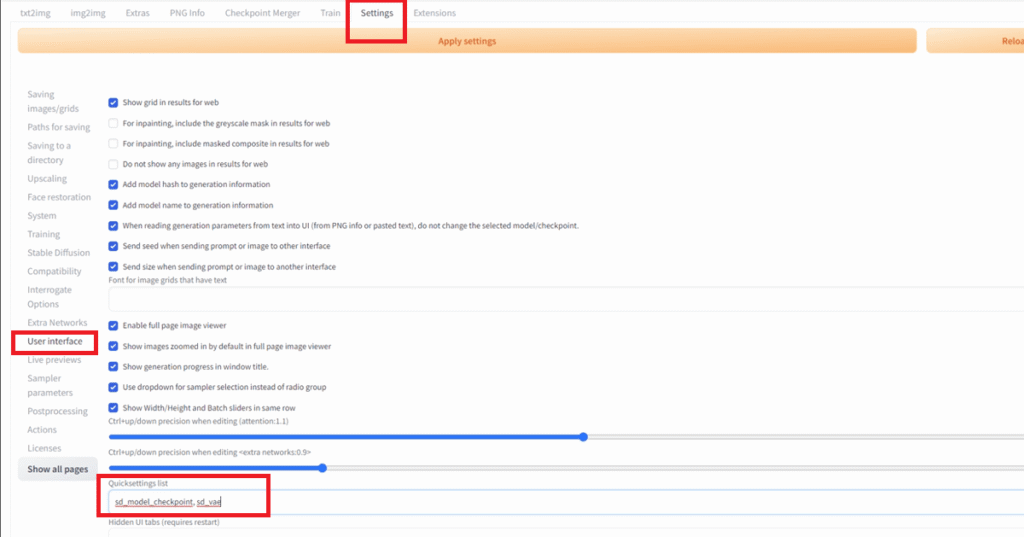
手動適用:Stable Diffusion WebUIの設定画面でVAEを選択して適用する。
VAEの適用方法には自動的適用と手動適用があるんですが、それぞれ記載します
自動適用の方が、自動でやってくれる感じの印象がありますが、実際のところStable Diffusion WebUIの画面で簡単に切り替えることが出来る様に設定できますので、手動適用がおすすめです。
自動適用は、モデルとVAEを同じ名前にして、モデルと一緒にフォルダに入れると、自動でVAEが適用されますよ
Stable Diffusion WebUI 起動します
それでは、初回起動の手順を説明しますね。
まず、展開したファイルの中から「WebUI-User.bat」というバッチファイルを見つけてください。
このファイルをダブルクリックして実行します。
ダブルクリックしたら、何か画面が出てきました。
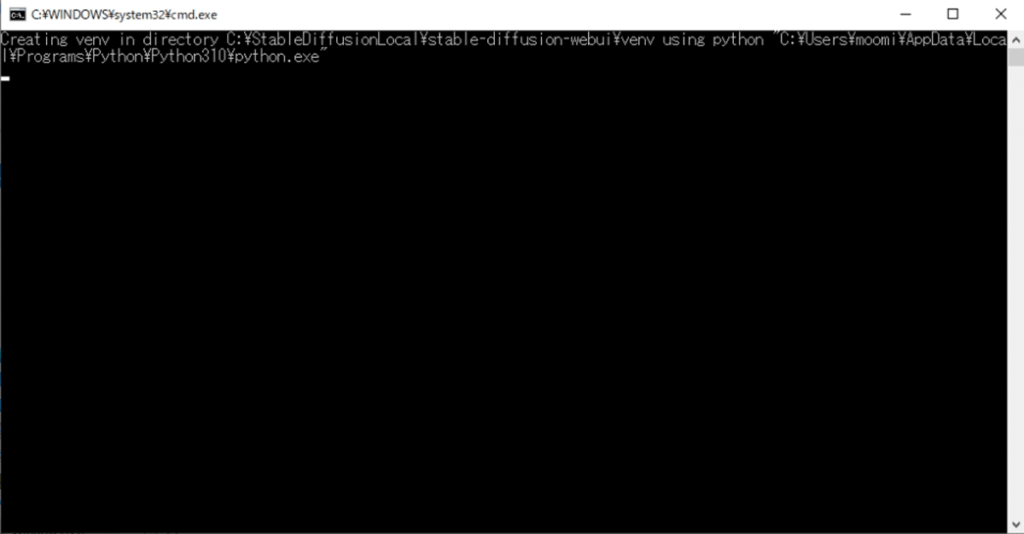
そうですね。それが起動準備の画面です。
初回起動には時間がかかることがありますので、しばらくお待ちください。
パソコンの性能によっては、最長で1時間程度かかることがあります。
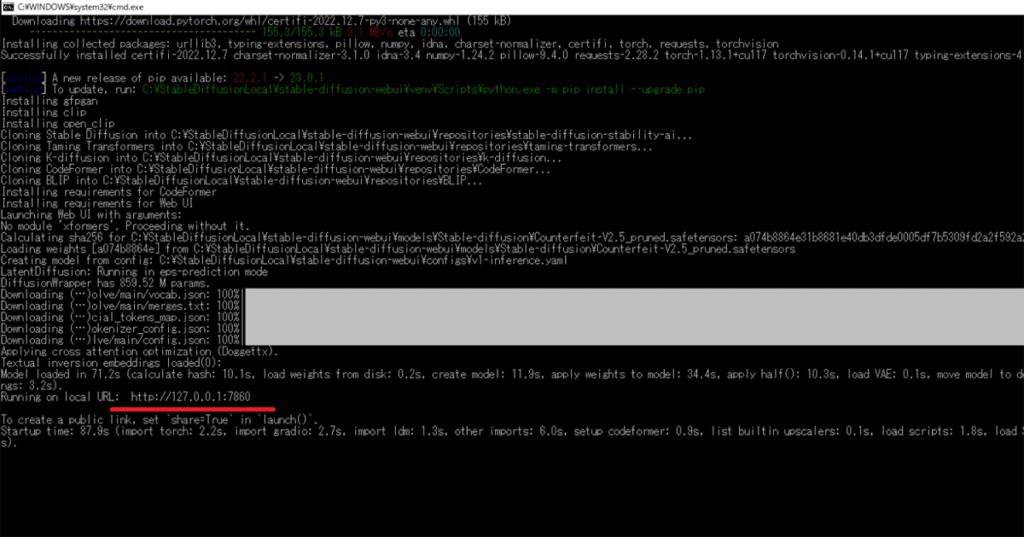
「Running on Local URL」
「To Create Public Link」が表示されて止まりました
起動準備が整いましたね。
では、http://127.0.0.1:7860 を選択してコピーし、ブラウザのURL欄に貼り付けて、エンターを押してアクセスしてみてください。
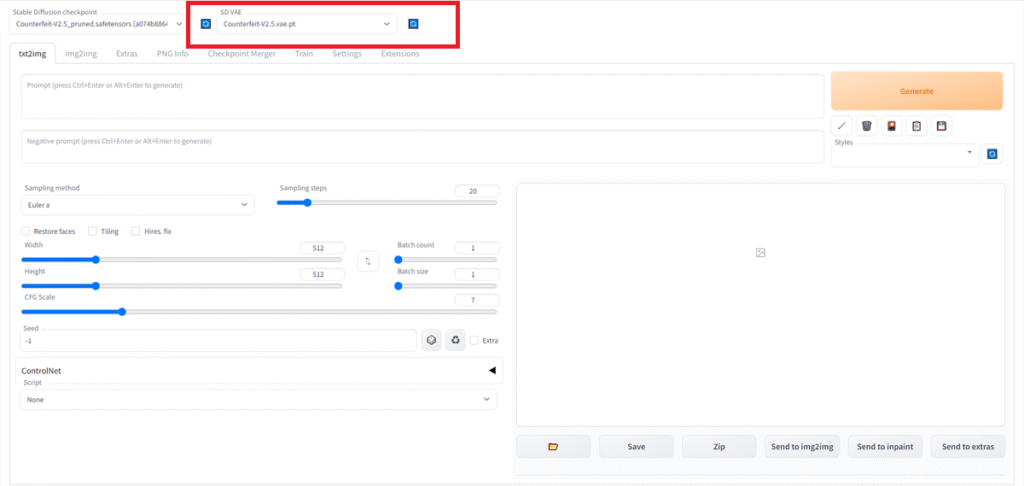
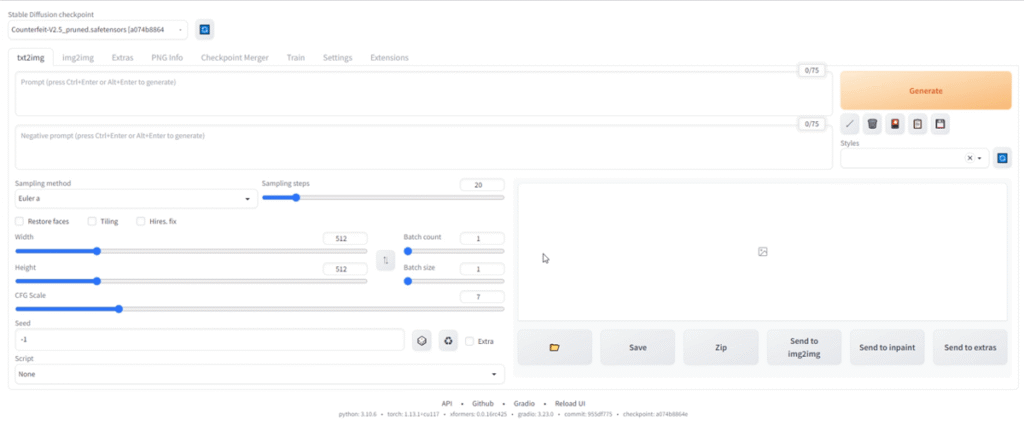
これが、Stable Diffusion WebUIの操作画面です。
お気に入りに登録しておくと便利ですよ。
お気に入りに登録しました!
次に動作確認を行いましょう。
画面左上に「Stable Diffusion Checkpoint」というウィンドウがあります。
これが現在使用中のモデルです。
右側にあるオレンジ色の「Generate」ボタンを押してください。
画像が1枚生成されました!
動作確認に成功しましたね。
インストールもうまくいっていて、使用可能な状態です。
動作確認ができたら、
2回目以降の起動方法は同じですか?
はい、その通りです。
「WebUI-User.bat」ファイルをダブルクリックして実行しプロンプト画面が起動させます。
少し待って「Running on Local URL」「To Create Public Link」が表示されが表示てから、WebUIを呼び出してください。
ブラウザから「http://127.0.0.1:7860」へアクセスすれば画像生成ができるようになりますよ
ですが、冒頭でも話しましたが、Stable Diffusion WebUIはブラウザで使うのですが、Webサイトではなくて自分のパソコンにローカル環境を構築して使用してますよ
生成したAIイラストの保存場所
イラストの保存場所はどこですか?
イラストの保存場所は、Stable Diffusion WebUIをインストールしたフォルダの中にあるアウトプッツの中にありますよ
プロンプトの書き方は、コチラのページを参考にしてね
StableDiffusionに関する以下のコンテンツとコラボさせて頂いてますので、ご興味ありましたら覗いてもらえたら嬉しいです
おまけ:このブログ記事の動画版など
本格的にやりたい人は、デジタルイラスト/アイコンお絵描きする必要なおすすめ道具をまとめましたので参考にしてね
StableDiffusion WebUI v1.6.0(随時更新リサーチ中)
- StableDiffusion WebUIバージョン1.6.0リリース速報まとめ
- 【SDXL1.0のVAE】StableDiffusion WebUI v1.6.0 導入&設定方法
- StableDiffusion WebUI ver1.6.0「VAE」切り替えを便利なインターフェイス
- ControlNet ver1.14バージョンアップSDXLに対応…しかし
- SDXL1.0環境のEasyNegative【negativeXL 】ネガティブプロンプト省略embeddings
StableDiffusion WebUI や拡張機能のダウングレード
StableDiffusion webUI基本設定
- StableDiffusion WebUIをローカル環境で使う設定のやり方♪
- StableDiffusion WebUIバージョンアップ方法。更新手順や注意点
- StableDiffusion WebUIバージョンの確認方法
- 【操作画面の解説・txt2img】分かりやすくパラメータの使い方を説明
- 【画像生成AIイラスト】VAEインストール方法と便利な使い方
- 「VAE」かんたんに切り替えするインターフェイス
- 【日本語化】StableDiffusionWebUI インターフェイス設定方法。
- 大きく、キレイな画像を出力する方法Hires.fix使い方。解像度アップ!
- 操作画面の5つのボタン解説
- 【X/Y/Z plot】使い方。プロンプトや設定を調整し比較してみよう!
- 【img2imgインペイント】画像生成AIイラストを修正/inpaintのパラメータ
- 【学習モデルの追加と変更】かんたん切り替え
- StableDiffusion WebUIバージョン1.3。LoRAを使う方法
- 【まとめ】画質が悪いを改善する7つの機能の使い方!
- 【StabilityMatrix】StableDiffusionWebUI簡単インストーラー
【学習モデル・checkpoint】
- 【実写系学習モデル・3選】写真の様なリアルな美少女が作れるモデルまとめ
- 【BracingEvoMix】日本人風の顔に特化した最新学習モデル
- 【BeautifulRealisticAsiansV5通称BRAV5】
プロンプト
- Stable Diffusionプロンプト(呪文)に関しての書き方。
- 【画質を上げる・画質に美しく芸術性を持たすプロンプト】呪文の書き方
- 【Tag complete】プロンプトのコツを掴める入力補助機能。
【ControlNet】
- 【ControlNet】使い方とインストール方法。画像生成AIイラストに便利な神機能。
- 【ControlNet-V1.1206】最新バージョンアップデート&モデル更新方法。
- 【ControlNet】不具合?表示されない…反映されない時には?
- 骨(棒人間)を使い、思い通りの姿勢をとらせた方法。
- 原画の絵と同じ姿勢(ポーズ)のAIイラスト生成のやり方♪
- AIイラストから線画を抽出する方法♪
- AIイラストを手描きで修正し、生成するやり方♪
- 【ControlNet】自作の線画イラストを画像生成AIに色塗り(ペイント)させる方法
- 自作の線画イラストをAIイラストに色塗り(ペイント)させる方法♪
【その他 拡張機能について】
- 【Eagle-pnginfo】画像やプロンプトを自動で一括管理できる拡張機能
- 【eagle】画像管理おすすめアプリ使い方
- 【eagle】公式サイト
- 【EasyNegative v2】導入&使い方♪設定方法
- 【EasyNegative V2】反映されないときには?原因と対処方法
- 【EasyNegative V2】【LoRA】にサムネイルを付ける方法
- 【LoRA】画像生成AIの追加学習データの使い方。
- 【Dynamic Prompts】ダウンロードとインストールの設定方法と特殊構文の使い方
- SDXLでも使える?【ADetailer】手や顔の崩れを自動できれいに修正できる拡張機能
画像生成で収益化方法
- AIイラストを生成して販売する方法(わどさん・外部リンク)♪
- 未経験でも10分で!AI美女をStableDiffusionでの作り方
- AI美女などの画像販売で稼ぐ方法/AIグラビアをStableDiffusionWebUI で作る