ADetailerは、生成されたAIイラストの顔の崩れや、手の変形を補正することのできる拡張機能です。
顔や手の崩れを自動で見つけて、きれいに修正してくれるので、とても便利です
また、顔の表情を変えることも可能です
自動で修正することも可能ですが、プロンプトを併用することで補正の精度を上げることが出来ますよ

本記事では、ADetailerのインストール、使い方、設定方法について解説しますね

現在、Stable Diffusionや画像生成AIに関する記事は、以下のものがありますので参考にしてね
この記事に、特に関連する記事はコチラ
【ADetailer】の導入。まずはダウンロード
ADetailerのインストール方法は2つあります
StableDiffusionWebUIのExtensionsタブの install from URL か Availableからインストールできます
今回は、install from URLを使ってGitHubからダウンロードしてくる方法をご紹介しますね
まずは、以下のリンクか、検索でGitHubのページに行きましょう
(URLをコピペするだけでも大丈夫です)
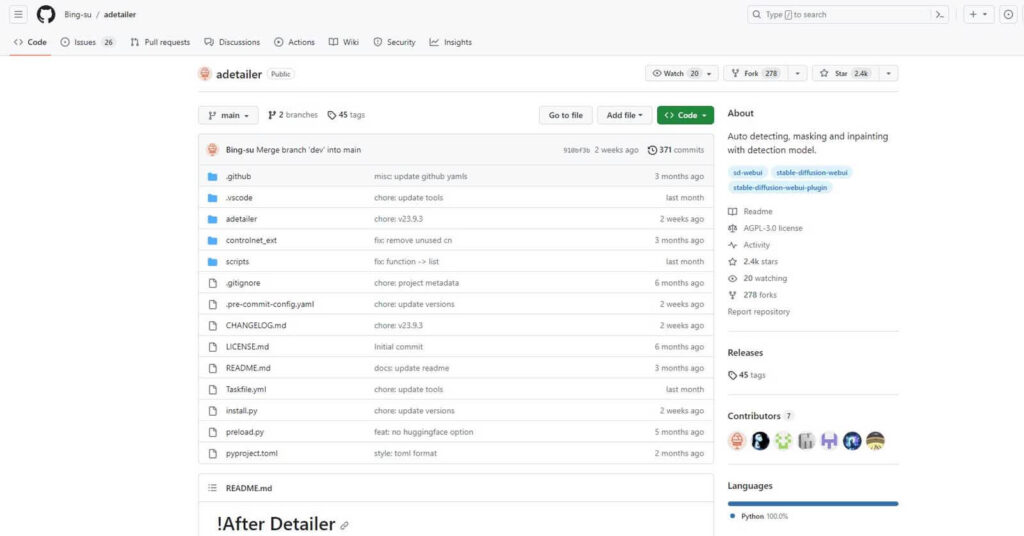
いつもお馴染みのGitHubへ
GitHubに来ましたら、検索窓にADetailerと入力して検索をかけてください
そうしますとコチラですね、コチラをクリックしてページを開きます

 みけねこまる
見つかったのだ
StableDiffusion WebUIを起動してインストール&設定していこう
それでは、今度はStableDiffusion WebUIを起動してくださいね
起動しましたら、Stable Diffusion WebUIのExtensions というタブがあるので開きます
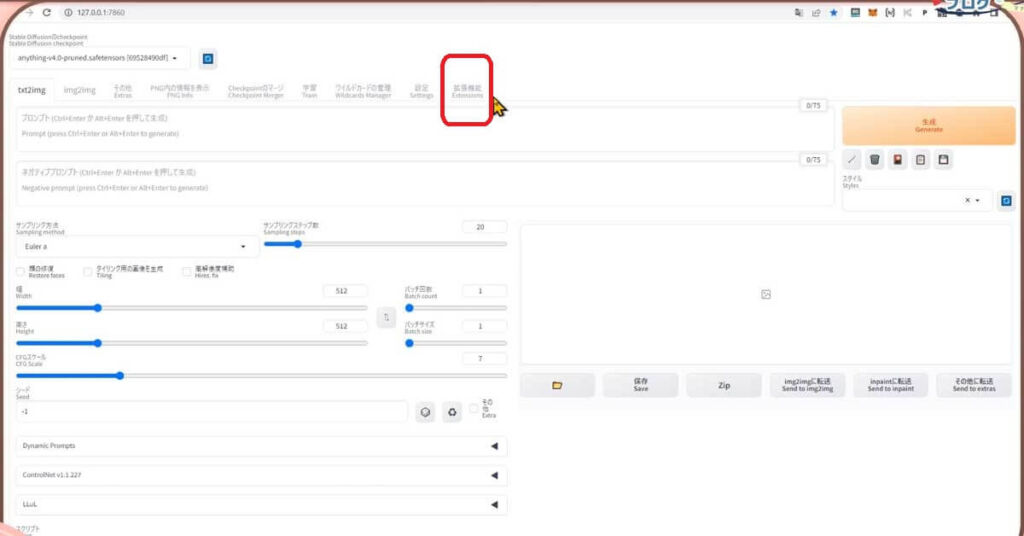
そのなかに、install from URLというタブがありますので開きます
ここの上の空欄のところに、URL for extension’s git repositoryという欄があります
ここに、先ほどのADetailerがダウンロードできるページのURLをかきこみます
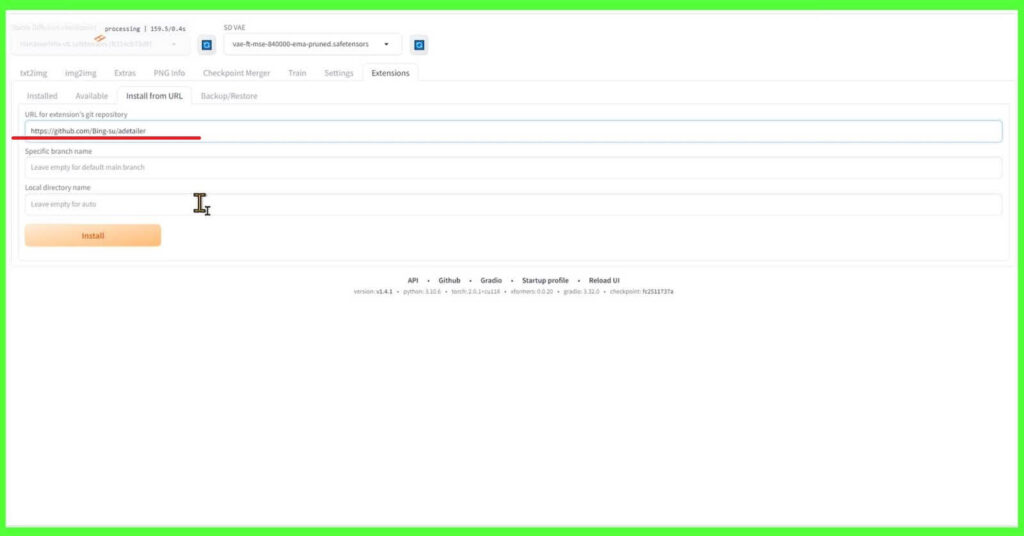
URLをコピーしまして、ペーストできましたか?
できましたら、の【install】ボタンを押してください

1分以内で、ダウンロードが終わると思います

なにか、表示されましたよ
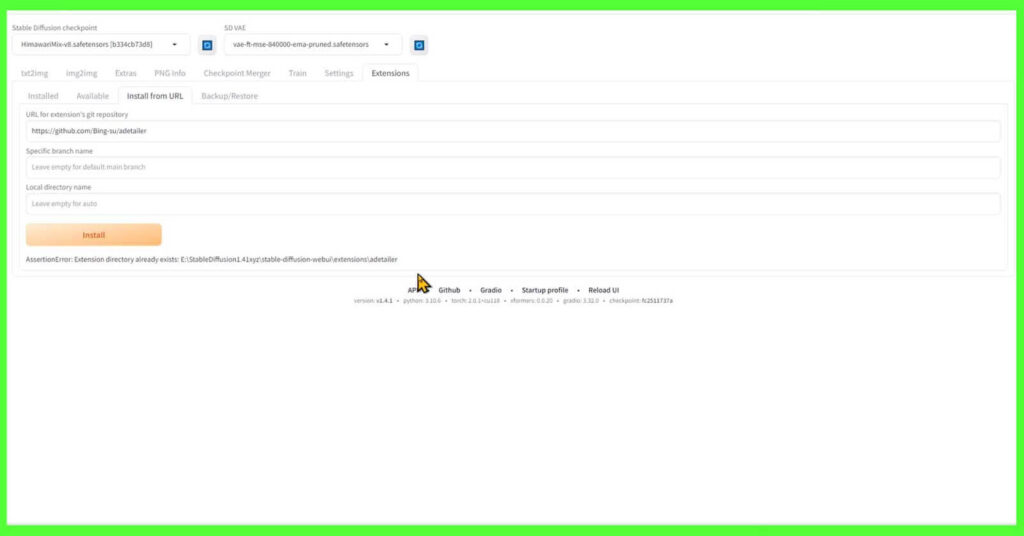
インストールが終わったみたいです
みけねこまるわかりにくいのだ
この表示以外は、特に音やポップアップする訳ではないので、チョット分かりにくいですが、これで大丈夫です
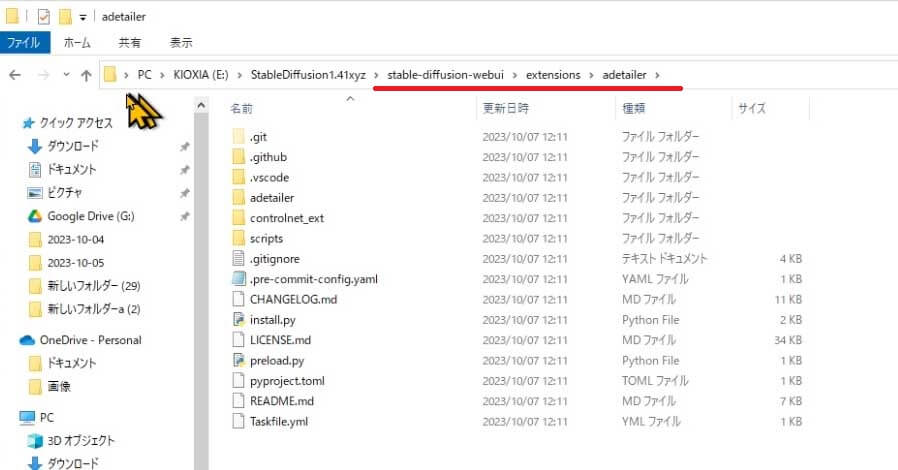
確認してみましょうか
フォルダの方を実際に見て見ますと、この様にフォルダやファイルが出来ていますね
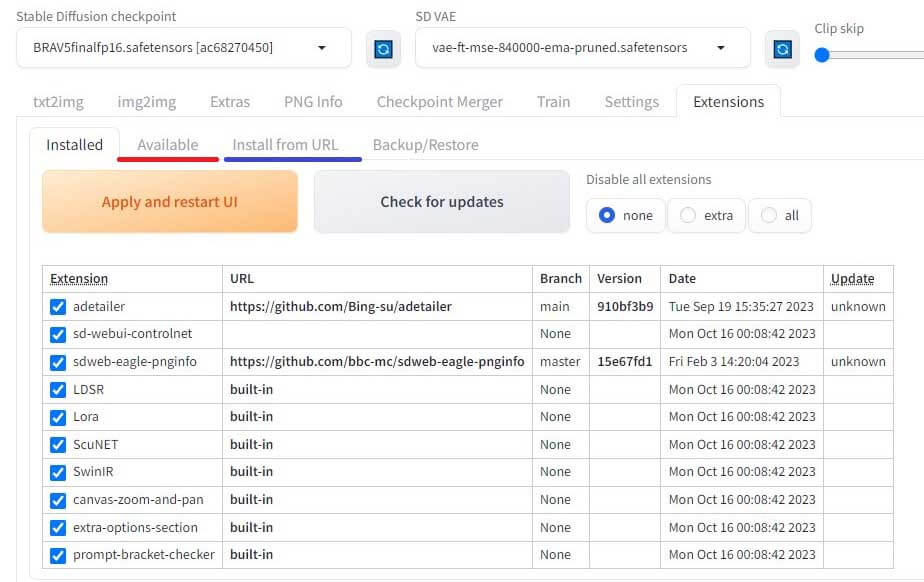
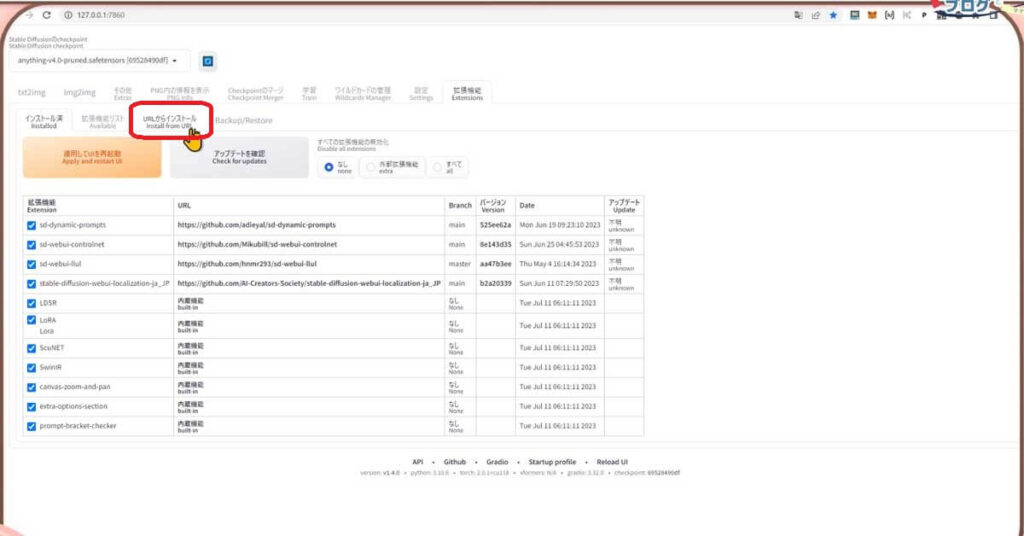
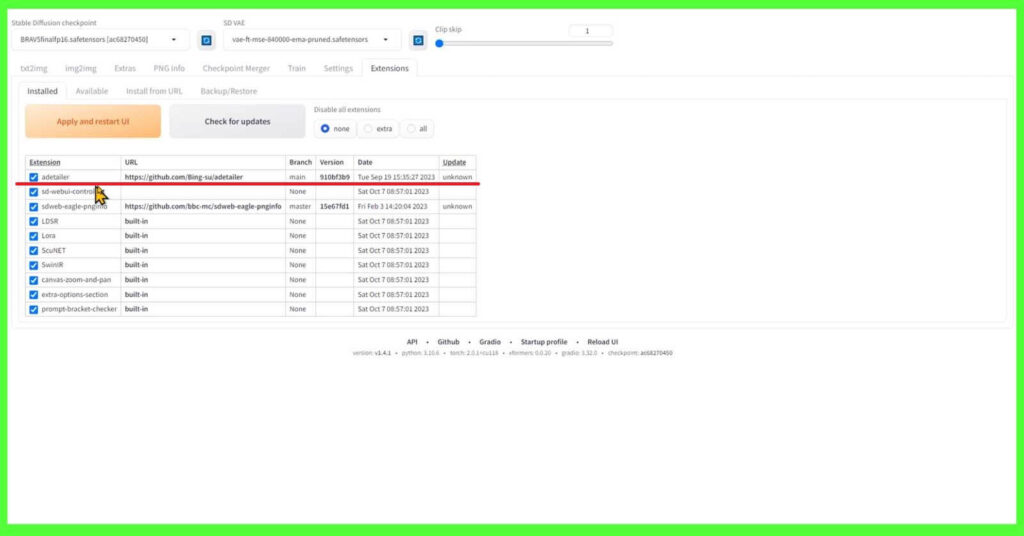
Stable Diffusion WebUIの画面の方でも確認することが出来ます
こちらの、installedのタブを開いてください
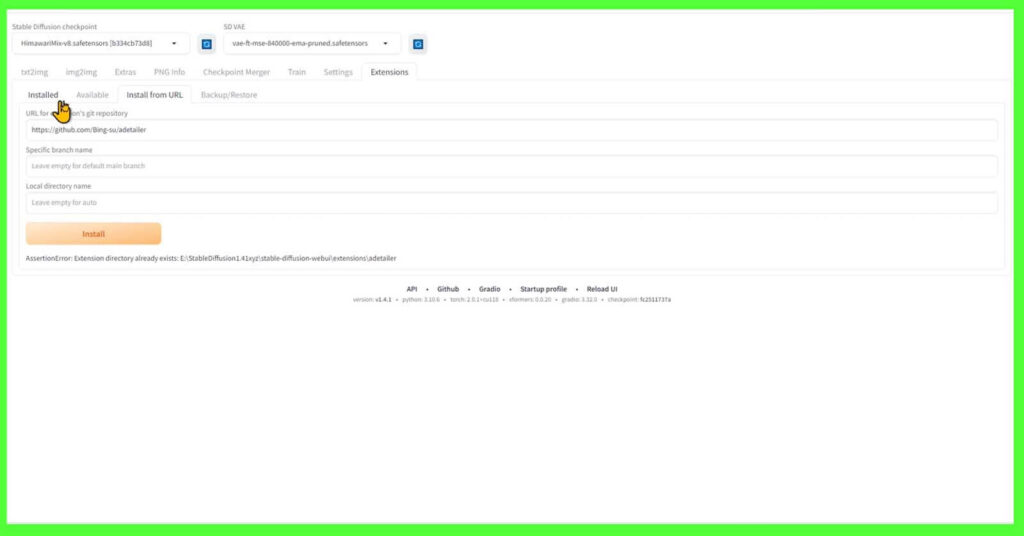
コチラの欄に、さきほどのURLが記載されていればインストールされていると言うことになります
 みけねこまる
良かったのだ
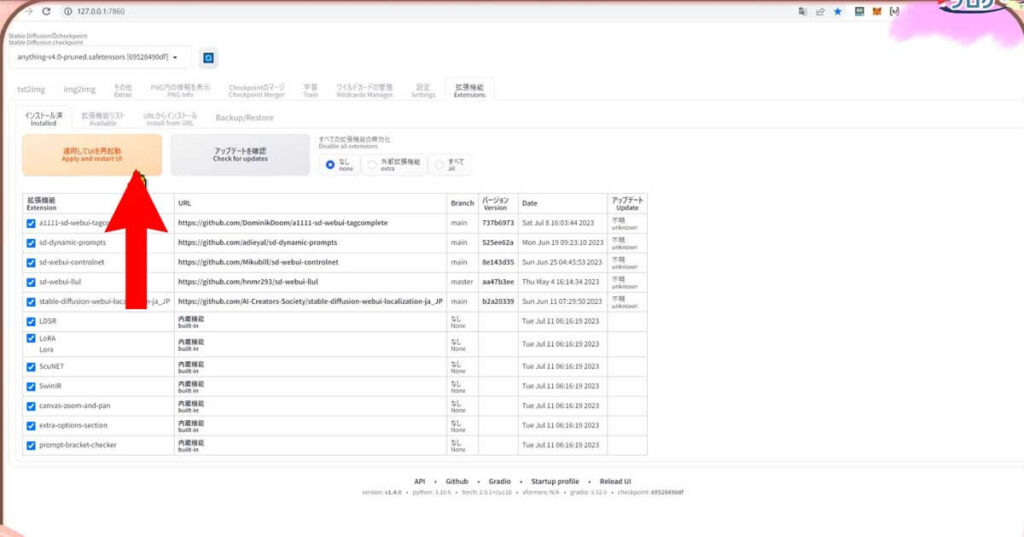
そうしましたら、【apply and restart UI】をクリックしてください
これでADetailerのインストールが終わったの?
はい、これでインストールが終わりました。
ADetailerの使い方
ADetailerはtxt2imgで使用します。
まずは、txt2imgタブで下の拡張機能の欄に「ADetailer」が表示されているか確認しましょう。

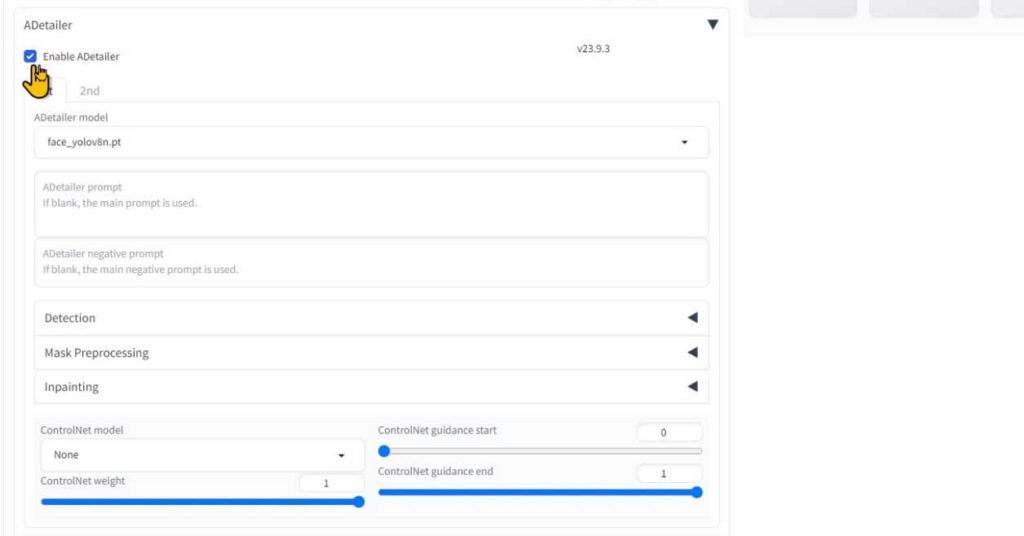
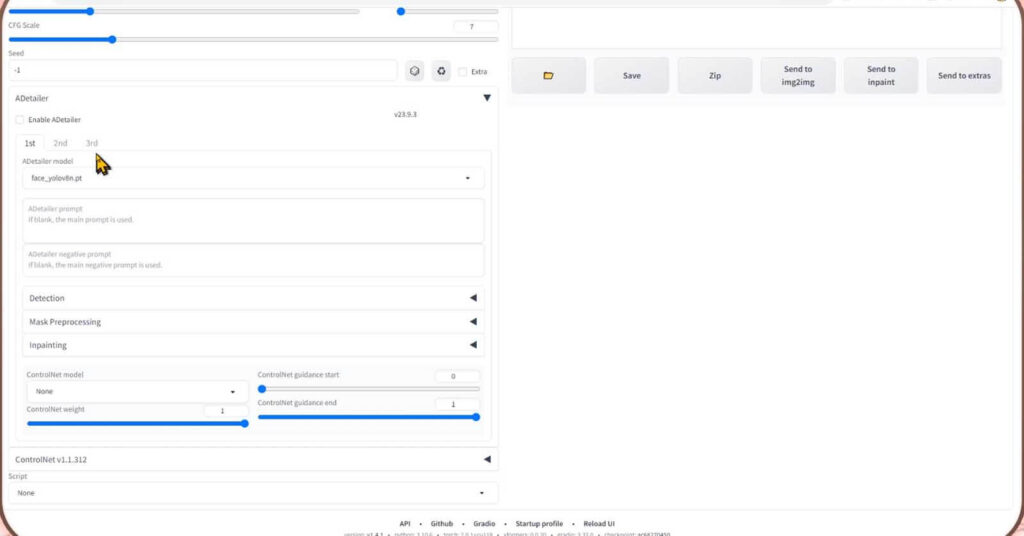
ADetailerのメニューを開いてください
Enable ADetailerをチェックし有効にします。
 みけねこまる
Enableは、ADetailerのスイッチオンって意味なのだ
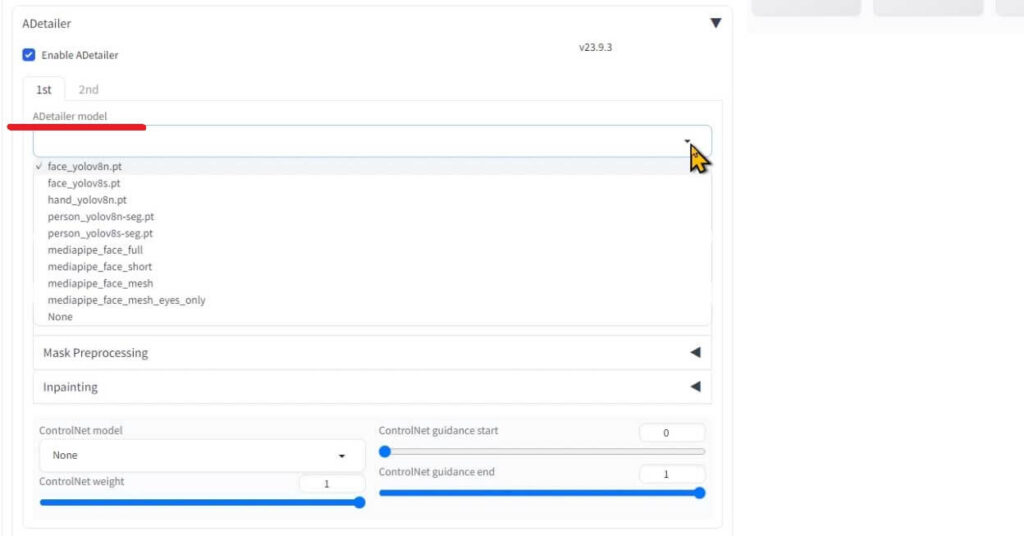
ADetailerで使う補正用のモデル・ADetailer modelを選択しよう
ADetailer modelとは、ADetailerを適用する場所である「顔や手」などを識別するモデルのことです。
StableDiffusion WebUIは、さまざまなファイルの事をモデルと言うことがあるからわかりにくいね
そうですね、分かりにくいので、少し長い名称になりますが、ここではADetailerの検出するモデルと呼ぶことにしますね
おすすめは、yolov8n系です
修正したい場所の、face(顔), hand(手), person(人物)のyolov8n系を使うといいですよ
識別するモデルは、下の表が用意されています
詳細は、ADetailer公式サイトの方で記載がありますが、分かりやすいように抜粋し日本語にしました
修正したい場所でADetailer modelを使い分ける感じなのね
修正したい場所に合わせ、顔や手などを識別するモデル(ADetailer model)を選んでね
| ADetailer model | Target | ターゲット |
|---|---|---|
| face_yolov8n.pt | 2D / realistic face | イラスト系と実写系の顔 |
| face_yolov8s.pt | 2D / realistic face | イラスト系と実写系の顔 |
| hand_yolov8n.pt | 2D / realistic hand | イラスト系と実写系の手 |
| person_yolov8n-seg.pt | 2D / realistic person | イラスト系と実写系の人物 |
| person_yolov8s-seg.pt | 2D / realistic person | イラスト系と実写系の人物 |
| mediapipe_face_full | realistic face | 実写系の顔 |
| mediapipe_face_short | realistic face | 実写系の顔 |
| mediapipe_face_mesh | realistic face | 実写系の顔 |
複数の場所を同時に補正をかけることが出来ます
その時には2ndタブでもモデルを選択してください

大きなVRAMが必要になる場合があるので、スペックと相談して使ってみてください
このままでも生成すれば修正することが出来ますが、より精度を上げて修正するためにプロンプトも入力します

この欄は、プロンプト入力欄になりますが、空欄にすると画像生成した時のプロンプトが適用されます。
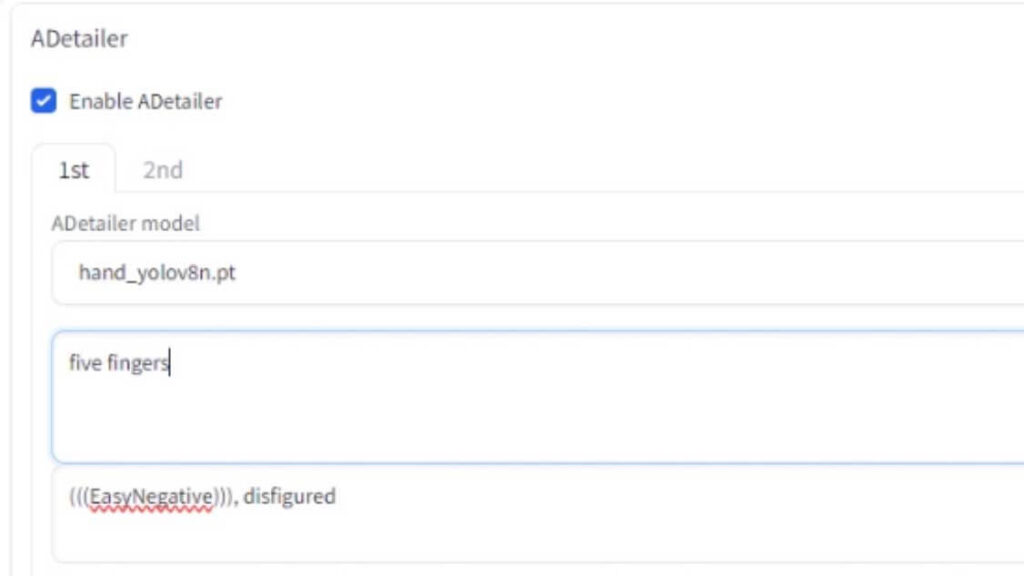
ADetailer prompt欄に記載する内容は、修正する場所、今回の例では顔の詳細のプロンプトを入力していきます
画像全体の生成は、いつも通りのプロンプト欄に記載して
修正する場所の詳細をコチラの欄に記載すればいいのね
ADetailerのプロンプトと、ネガティブプロンプトには以下のように記載しました
プロンプト : five fingers
ネガティブプロンプト : EasyNegative, disfigured
StableDiffusion WebUIのプロンプト欄には、コチラのAIイラストを生成した時のプロンプトを入れてみます
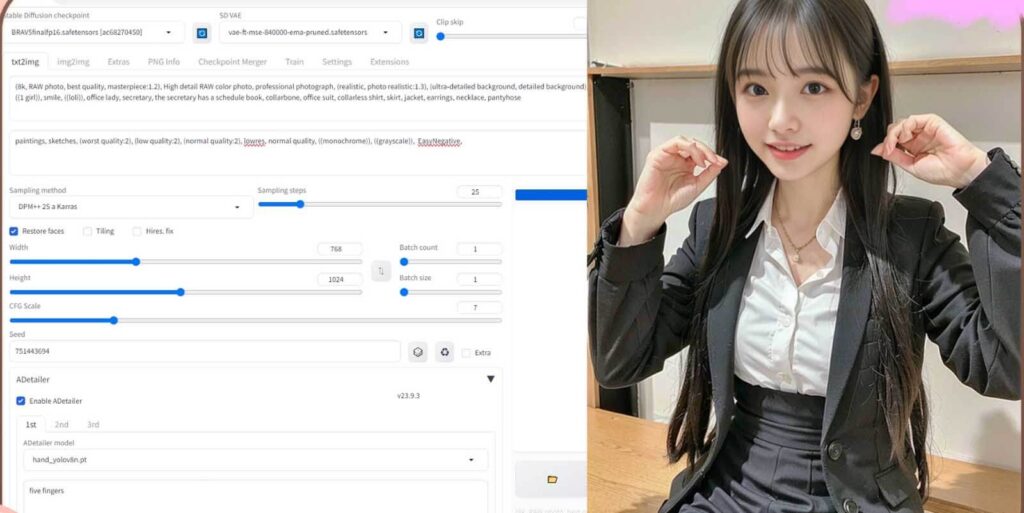
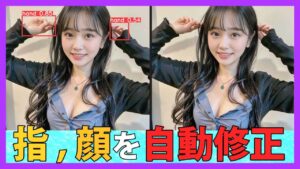
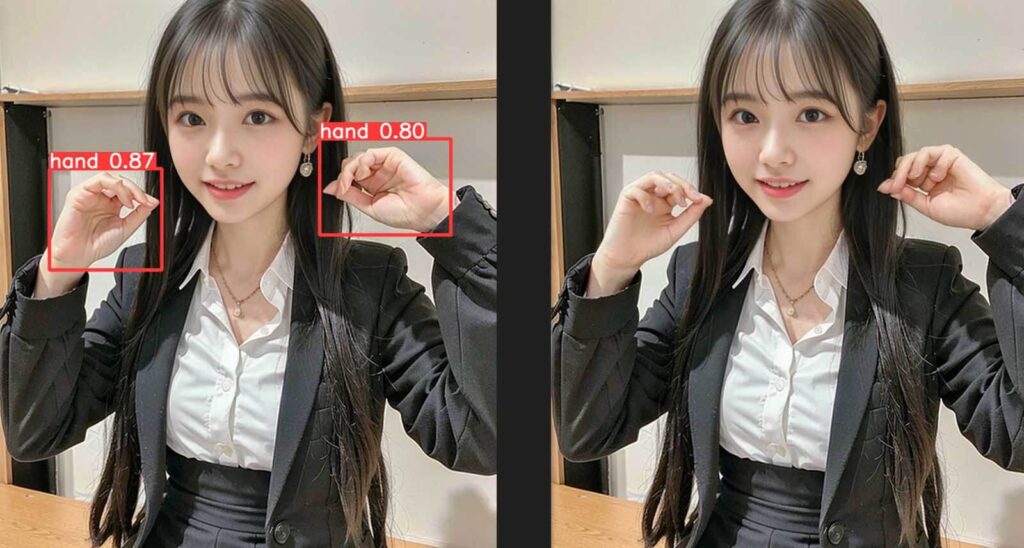
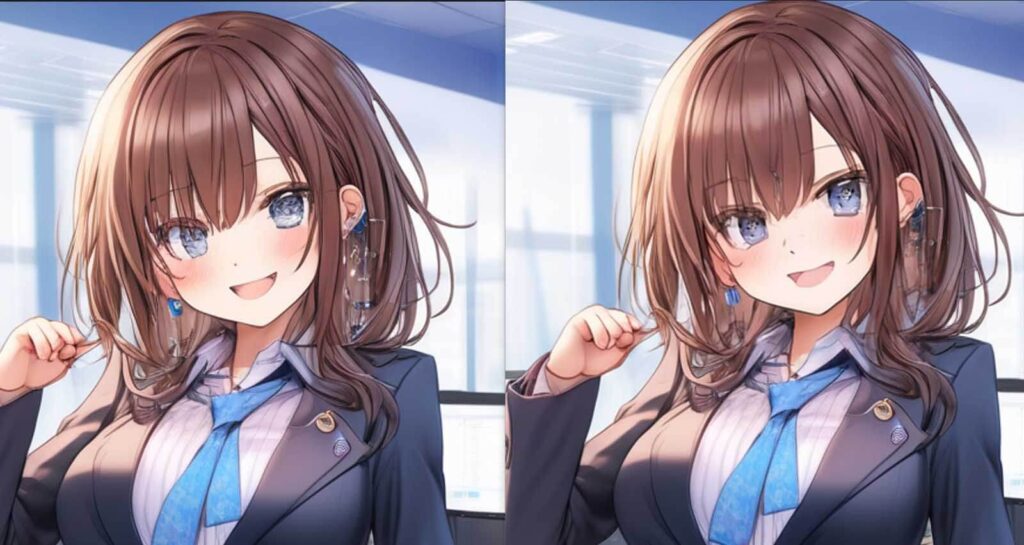
全体的には、イイ感じに生成された画像ですが、指の本数がすくなかったり、爪がなかったり、よく見ると指が変形してしまっていますね
ADetailerの効果を反映して生成してみますね
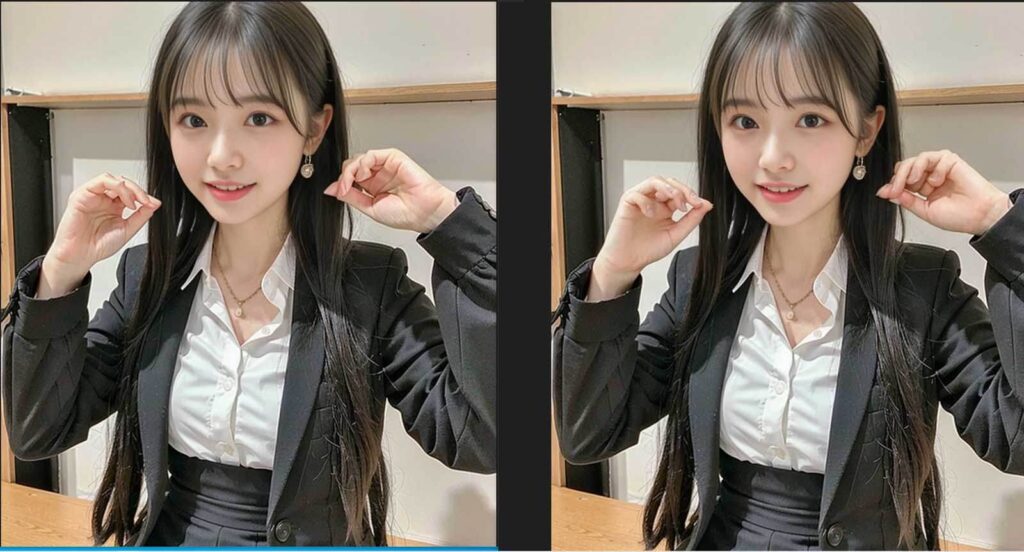
左が元のAIイラスト 右がADetailerで補正をしたAIイラストとなります
正直なところ、もうちょっとナチュラルさは欲しいところですが、指の本数や、爪などが整い、シルエットもだいぶ整った感じがしますよね
ADetailerの設定をしてより便利に使おう
次はADetailerの設定の方も解説していきます
ADetailerの設定をすることで、どのように生成されたのか詳細が分かる様になったり、一度に修正する場所の数を変えることが出来ますよ
それでは、StableDiffusion WebUIのSettingsをクリックしましょう
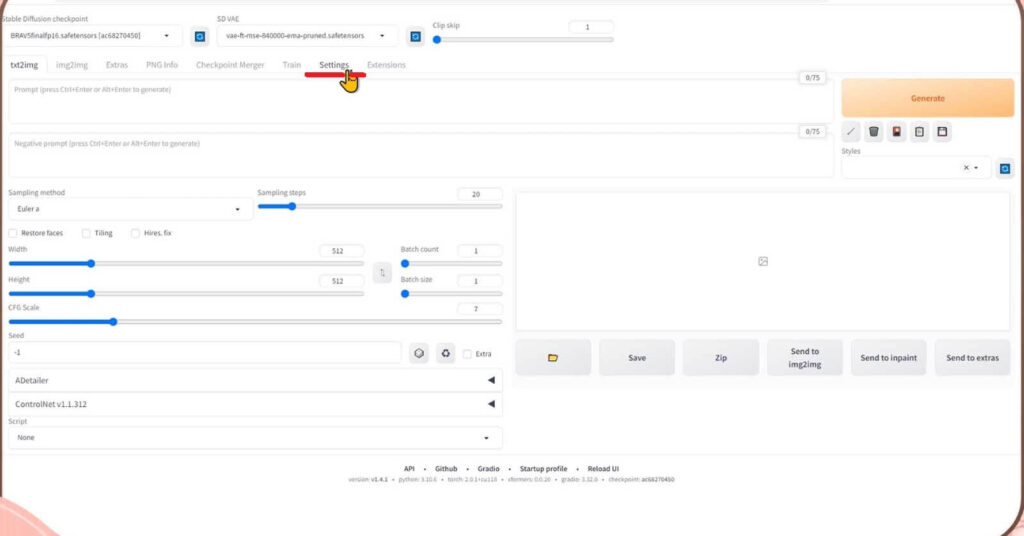
Settingsの画面が表示されましたら、左のメニューからADetailerをクリックしてください
ADetailerの設定項目が表示されます
Max models
Max modelsは適用するモデルを最大いくつまでするかの設定です。
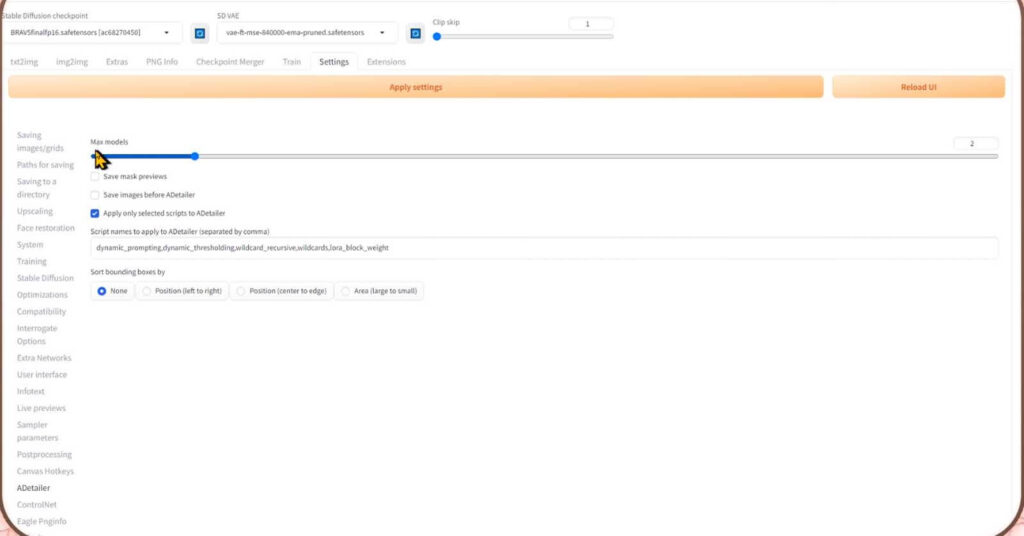
多くの場合は、1度に同時に修正をかける場合、顔と手とキャラクターの3種類の部位になりますので、3にするのをおすすめします
3にしておけば、1でも2でも3でも出来るって事だね
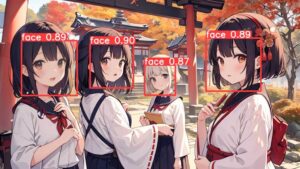
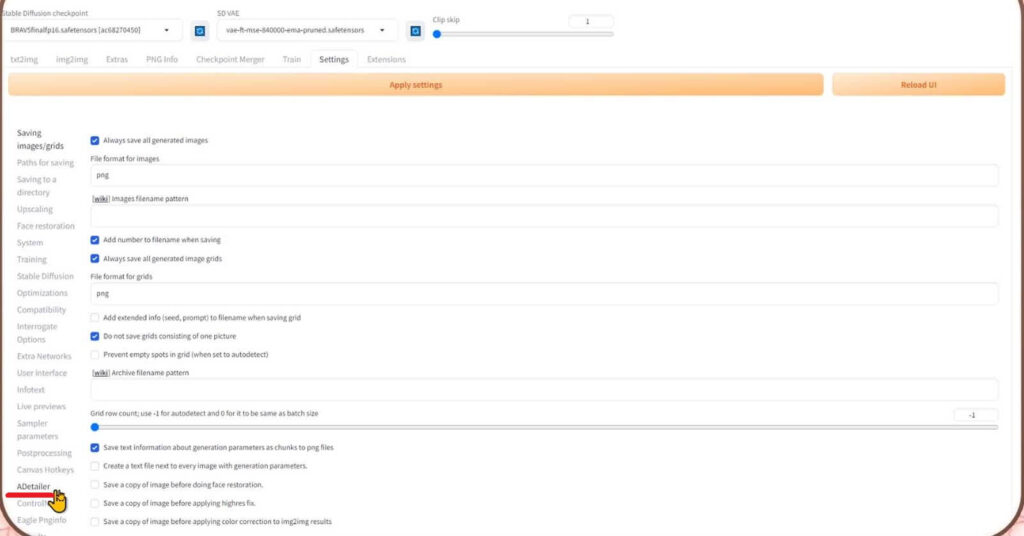
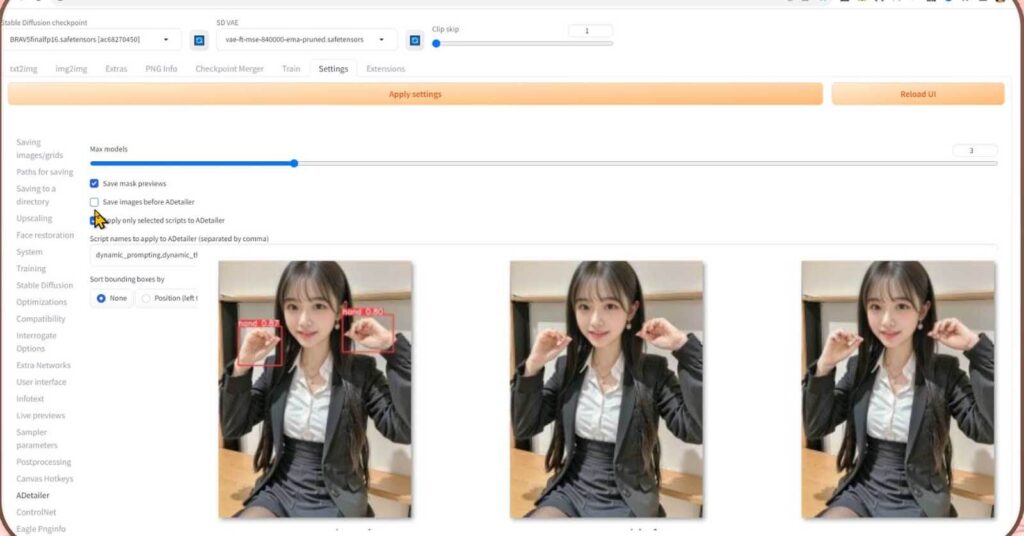
Save mask previews
Save mask previewsをチェックを入れると、検出と補正する範囲をこの様に可視化した画像が保存されます。
ちなみに、可視化される表示方式は、ADetailerのモデルによって変化しますよ
補正するエリアと、補正する量を、見た目として確認できるので分かりやすくなりますよね
Save images before ADetailer
Save images before ADetailerにチェックすると修正前の画像が保存されます。
ADetailerを使う時は、もともと修正したい場所で使うので、修正前の画像を保存することは、特に必要ないと思います
この2つにチェックを入れると、修正後、修正場所、修正前の3つの画像が保存されるようになります
あまり無駄にたくさん保存されてしまうと、逆に分かりにくくなるかもしれませんから、自分の分かりやすい設定にするといいかもしれませんね
Apply only selected scripts to ADetailer
Apply only selected scripts to ADetailerに、チェックを入れると、他の拡張機能の効果を有効にすることが出来ます
のちほど、ほかの拡張機能も使う事になると思いますので、チェックを入れておきましょう
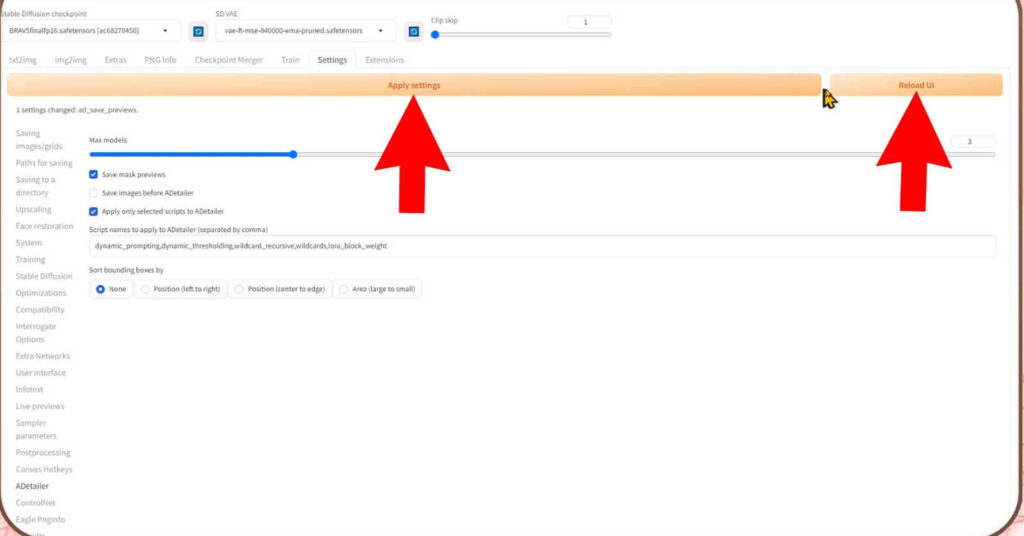
以上で設定は、終わりです
設定を変更したら、上のApply settingsをクリックしましょう。
そして、Reload UIををクリックしましょう
SDXLでもADetailerは使えるの?
StableDiffusionWebUI・AUTOMATIC1111のバージョン1.6では、自然とSDXLを使う事になりますが、ADetailerは使えるのか?と言いますと、結論は使うことが出来ます
ただし、グラボ(VRAM)が12GBでギリギリ使える状態になると思います
私も何度かやってみたところ、問題なく動いているように見えたんですが…
仕上がった画像がほとんど変化がないので、生成は上手くいくけど正しくADetailerが反応されていないのかと思いました。
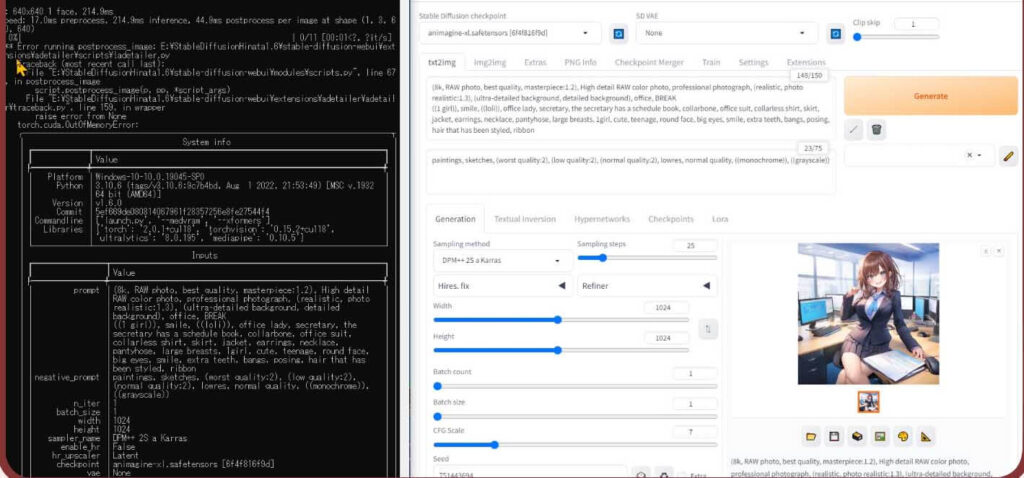
コマンドラインの方を見ると、ADetailerのシステム上は問題なく動こうとしていますが、私の環境ではVRAM不足で上手く修正の変化を与えられていませんでした
VRAM不足でも動くように、時間をかけ処理させたところ、補正されました。
ADetailerはStableDiffusionWebUI・AUTOMATIC1111のバージョン1.6で動作することが分かりました
言語モデル系のAIに比べれば、画像生成AIの要求スペックは大きくないモノの、個人ユーザーが購入できるパソコンでは、要求されるスペックがどんどん大きくなってきてますね
VRAM12GBが推奨のレベルって、ほとんどのパソコンで出来るゲームの要求スペックを超えているレベルですもんね
要求されるスペックが足りない場合や、生成速度をあげてスムーズに生成を行いたい人向けに、現在私の方で、グラボがないパソコンやスマホでもStableDiffusionWebUIを使うことが出来る、webコンテンツを仲間と一緒に制作しております

年内中には完成する予定ですすめていまして、のちほどご報告させて頂きますので、使って頂けると嬉しいです
StableDiffusionに関する以下のコンテンツとコラボさせて頂いてますので、ご興味ありましたら覗いてもらえたら嬉しいです
おまけ 動画版【ADetailer】手や顔の崩れを自動できれいに修正
StableDiffusion WebUI v1.6.0(随時更新リサーチ中)
- StableDiffusion WebUIバージョン1.6.0リリース速報まとめ
- 【SDXL1.0のVAE】StableDiffusion WebUI v1.6.0 導入&設定方法
- StableDiffusion WebUI ver1.6.0「VAE」切り替えを便利なインターフェイス
- ControlNet ver1.14バージョンアップSDXLに対応…しかし
- SDXL1.0環境のEasyNegative【negativeXL 】ネガティブプロンプト省略embeddings
StableDiffusion WebUI や拡張機能のダウングレード
StableDiffusion webUI基本設定
- StableDiffusion WebUIをローカル環境で使う設定のやり方♪
- StableDiffusion WebUIバージョンアップ方法。更新手順や注意点
- StableDiffusion WebUIバージョンの確認方法
- 【操作画面の解説・txt2img】分かりやすくパラメータの使い方を説明
- 【画像生成AIイラスト】VAEインストール方法と便利な使い方
- 「VAE」かんたんに切り替えするインターフェイス
- 【日本語化】StableDiffusionWebUI インターフェイス設定方法。
- 大きく、キレイな画像を出力する方法Hires.fix使い方。解像度アップ!
- 操作画面の5つのボタン解説
- 【X/Y/Z plot】使い方。プロンプトや設定を調整し比較してみよう!
- 【img2imgインペイント】画像生成AIイラストを修正/inpaintのパラメータ
- 【学習モデルの追加と変更】かんたん切り替え
- StableDiffusion WebUIバージョン1.3。LoRAを使う方法
- 【まとめ】画質が悪いを改善する7つの機能の使い方!
- 【StabilityMatrix】StableDiffusionWebUI簡単インストーラー
【学習モデル・checkpoint】
- 【実写系学習モデル・3選】写真の様なリアルな美少女が作れるモデルまとめ
- 【BracingEvoMix】日本人風の顔に特化した最新学習モデル
- 【BeautifulRealisticAsiansV5通称BRAV5】
プロンプト
- Stable Diffusionプロンプト(呪文)に関しての書き方。
- 【画質を上げる・画質に美しく芸術性を持たすプロンプト】呪文の書き方
- 【Tag complete】プロンプトのコツを掴める入力補助機能。
【ControlNet】
- 【ControlNet】使い方とインストール方法。画像生成AIイラストに便利な神機能。
- 【ControlNet-V1.1206】最新バージョンアップデート&モデル更新方法。
- 【ControlNet】不具合?表示されない…反映されない時には?
- 骨(棒人間)を使い、思い通りの姿勢をとらせた方法。
- 原画の絵と同じ姿勢(ポーズ)のAIイラスト生成のやり方♪
- AIイラストから線画を抽出する方法♪
- AIイラストを手描きで修正し、生成するやり方♪
- 【ControlNet】自作の線画イラストを画像生成AIに色塗り(ペイント)させる方法
- 自作の線画イラストをAIイラストに色塗り(ペイント)させる方法♪
【その他 拡張機能について】
- 【Eagle-pnginfo】画像やプロンプトを自動で一括管理できる拡張機能
- 【eagle】画像管理おすすめアプリ使い方
- 【eagle】公式サイト
- 【EasyNegative v2】導入&使い方♪設定方法
- 【EasyNegative V2】反映されないときには?原因と対処方法
- 【EasyNegative V2】【LoRA】にサムネイルを付ける方法
- 【LoRA】画像生成AIの追加学習データの使い方。
- 【Dynamic Prompts】ダウンロードとインストールの設定方法と特殊構文の使い方
- SDXLでも使える?【ADetailer】手や顔の崩れを自動できれいに修正できる拡張機能
画像生成で収益化方法
- AIイラストを生成して販売する方法(わどさん・外部リンク)♪
- 未経験でも10分で!AI美女をStableDiffusionでの作り方
- AI美女などの画像販売で稼ぐ方法/AIグラビアをStableDiffusionWebUI で作る